
يمكن للمستخدمين التحكّم في مستوى تكبير الكاميرا وإمالتها وموضعها وتدويرها باستخدام الإيماءات على الخريطة. يمكنك أيضًا ضبط الكاميرا آليًا.
موضع الكاميرا
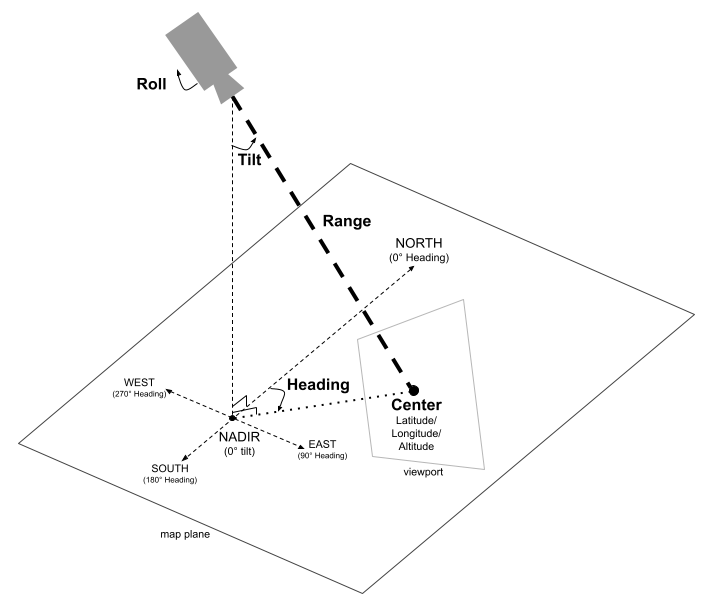
يتم تصميم طريقة عرض الخريطة على أنّها كاميرا تنظر إلى نقطة معيّنة في الفضاء. يتم تحديد موضع الكاميرا واتجاهها من خلال إحداثيات خطوط العرض والطول والارتفاع والاتجاه والإمالة والنطاق والدوران.
خط العرض وخط الطول والارتفاع
يتم تحديد الموضع الأولي للكاميرا من خلال ضبط خط العرض وخط الطول والارتفاع. تتحد هذه القيم لتحديد موضع الكاميرا، وليس النقطة التي تشير إليها الكاميرا أو النقطة التي تتمركز حولها.
يمكن أن يتراوح خط العرض بين -90 و90 درجة، بما في ذلك هاتان القيمتان. يتراوح خط الطول بين -180 و180 درجة، بما في ذلك هاتان القيمتان. يتم تحديد الارتفاع بالأمتار فوق مستوى سطح البحر.
سيتم تقريب أي قيم أعلى أو أقل من هذا النطاق إلى أقرب قيمة ضمن هذا النطاق. على سبيل المثال، سيؤدي تحديد خط عرض يبلغ 100 إلى ضبط القيمة على 90.
الاتجاه
يحدّد الاتجاه اتجاه الخريطة على البوصلة، ويتم قياسه بالدرجات في اتجاه عقارب الساعة من الشمال الحقيقي. يشير الشمال إلى 0 درجة، والشرق إلى 90 درجة، والجنوب إلى 180 درجة، والغرب إلى 270 درجة.
الإمالة
تحدّد الإمالة زاوية الكاميرا بالنسبة إلى المحور العمودي، ويتم قياسها بالدرجات. تعني الإمالة بمقدار 0 درجة أنّ الكاميرا تشير إلى الأسفل مباشرةً نحو الـ أرض (سمت القدم). تعني الإمالة بمقدار 90 درجة أنّ الكاميرا تشير أفقيًا في الاتجاه الذي يحدّده الاتجاه.
النطاق
يحدّد النطاق المسافة بالأمتار بين موضع الكاميرا ومركز الخريطة. يمكن أن يتراوح النطاق بين صفر متر (لقطات مقرّبة جدًا) و63 مليون متر، ما يتيح عرض اللقطات المقرّبة جدًا وصولاً إلى منظور عالمي حقيقي. يتحكّم هذا الإعداد فعليًا في مستوى "التكبير" أو "التصغير" الذي تظهر به الخريطة.
الدوران
يضبط الدوران زاوية الكاميرا بالنسبة إلى الأفق، ويتم قياسها بالدرجات. يمكن استخدام هذه المَعلمة لإنشاء مؤثرات، مثل الإمالة أثناء عمليات محاكاة الطيران أو حتى الدوران الكامل، ما يؤدي إلى تدوير الكاميرا حول محور العرض.
التحكّم في الكاميرا
يوضّح نموذج الرمز البرمجي التالي كيفية التحكّم في الكاميرا آليًا.Swift
public static var sanFrancisco: Camera = .init(
  latitude: 37.7845812,
  longitude: -122.3660241,
  altitude: 585,
  heading: 288.0,
  tilt: 75.0,
  roll: 0.0,
  range: 100)