
নেভিগেশন SDK আপনাকে আপনার মোবাইল অ্যাপ্লিকেশনগুলিতে গুগল ম্যাপসের টার্ন-বাই-টার্ন নেভিগেশন যুক্ত করার সুযোগ দেয়। সবচেয়ে গুরুত্বপূর্ণ বিষয় হলো, এটি বর্তমান রুট সেগমেন্ট এবং চূড়ান্ত গন্তব্যের ডেটা সরবরাহ করে, যা ড্রাইভার SDK থেকে প্রাপ্ত লোকেশন আপডেট এবং অক্ষাংশ/দ্রাঘিমাংশ স্থানাঙ্কের সাথে আপনার ড্রাইভার গাড়ি চালানো শুরু করলে ফ্লিট ইঞ্জিনে পাঠানো হয়। এর ফলে একটি সম্পূর্ণ ড্রাইভিং অভিজ্ঞতা পাওয়া যায়।
নেভিগেশন এসডিকে কেন ব্যবহার করবেন?
নেভিগেশন SDK ড্রাইভারের রুট আপডেট করার জন্য ফ্লিট ইঞ্জিনের সাথে সহজতর ইন্টিগ্রেশন সক্ষম করে। ড্রাইভার SDK-এর সাথে নেভিগেশন SDK ব্যবহার করলে আপনার ড্রাইভার অন্য কোনো অ্যাপে না গিয়েই, একটিমাত্র অ্যাপ ব্যবহার করে অ্যাসাইনমেন্ট পরিচালনা করতে এবং নেভিগেট করতে পারবেন, ঠিক যেমনটি তারা গুগল ম্যাপসের কনজিউমার ভার্সন ব্যবহার করে থাকেন।
নেভিগেশন এসডিকে দিয়ে আপনি কী করতে পারেন?
ফ্লিট ইঞ্জিনের সাথে নিম্নলিখিত বিষয়গুলো যোগাযোগ করতে নেভিগেশন SDK ব্যবহার করুন।
- গুগল ম্যাপস দ্বারা চালিত নির্ভরযোগ্য ধাপে ধাপে দিকনির্দেশনা।
- ড্রাইভার এসডিকে দ্বারা প্রদত্ত অক্ষাংশ/দ্রাঘিমাংশ স্থানাঙ্কের উপর ভিত্তি করে কাস্টমাইজড রুট।
- গুরুত্বপূর্ণ নেভিগেশন তথ্য হাইলাইট করতে এবং নেভিগেশন অভিজ্ঞতাকে ব্যক্তিগতকৃত করতে কাস্টম মার্কার, ওভারলে এবং UI উপাদানের মতো কাস্টমাইজড ম্যাপ এলিমেন্ট।
নেভিগেশন এসডিকে কীভাবে কাজ করে
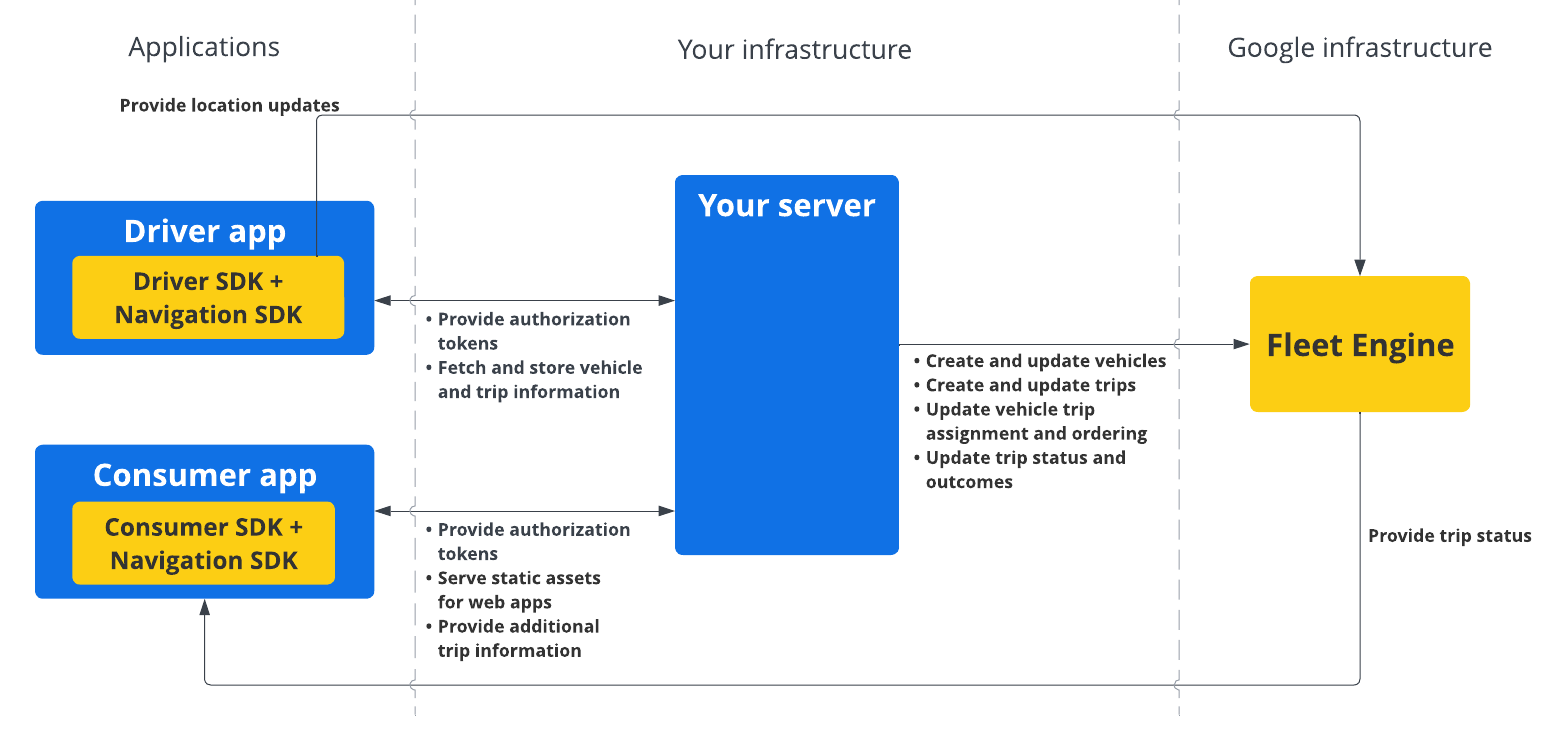
ন্যাভিগেশন এসডিকে ফ্লিট ইঞ্জিনকে রুটিং তথ্য এবং গন্তব্য সরবরাহ করে, অন্যদিকে ড্রাইভার এসডিকে অবস্থানের আপডেট, অক্ষাংশ/দ্রাঘিমাংশ স্থানাঙ্ক, অবশিষ্ট দূরত্ব এবং আনুমানিক পৌঁছানোর সময়ের (ETA) একটি ধারাবাহিক প্রবাহ সরবরাহ করে। গাড়ির অন্যান্য সমস্ত ডেটা আপডেট অবশ্যই কাস্টমার ব্যাকএন্ডে পাঠাতে হবে, যা সেই ডেটা ফ্লিট ইঞ্জিনে পৌঁছে দেয়।
নেভিগেশন এসডিকে কীভাবে ব্যবহার করবেন
আপনার ড্রাইভার অ্যাপ্লিকেশনে নেভিগেশন এসডিকে অন্তর্ভুক্ত করার একটি সাধারণ ব্যবহারিক পরিস্থিতি নিচের ধাপে বর্ণনা করা হলো:
অ্যান্ড্রয়েড
| ১ | আপনার গুগল ক্লাউড প্রজেক্ট সেট আপ করুন | ন্যাভিগেশন এসডিকে ব্যবহার করার আগে একটি গুগল ক্লাউড প্রজেক্ট তৈরি করুন। আরও তথ্যের জন্য, আপনার গুগল ক্লাউড প্রজেক্ট সেট আপ করুন দেখুন। |
| ২ | আপনার API কী-তে নেভিগেশন SDK যোগ করুন | এপিআই কী হলো একটি অনন্য শনাক্তকারী যা আপনার অনুরোধগুলোকে প্রমাণীকরণ করে। নেভিগেশন এসডিকে ব্যবহার করার জন্য আপনার প্রোজেক্টের সাথে অন্তত একটি এপিআই কী যুক্ত করুন। আরও তথ্যের জন্য, ‘এপিআই কী ব্যবহার’ দেখুন। |
| ৩ | আপনার অ্যান্ড্রয়েড স্টুডিও প্রজেক্ট সেট আপ করুন | একটি অ্যান্ড্রয়েড প্রজেক্ট তৈরি করুন এবং এতে নেভিগেশন এসডিকে (SDK) যুক্ত করুন। আরও তথ্যের জন্য, আপনার অ্যান্ড্রয়েড স্টুডিও প্রজেক্ট সেট আপ করুন (Set up your Android Studio project) দেখুন। |
| ৪ | আপনার প্রোজেক্টে ড্রাইভার SDK যোগ করুন | ফ্লিট ইঞ্জিনের সমস্ত ফিচারের সুবিধা নিতে ড্রাইভার SDK ইনস্টল ও কনফিগার করুন। আরও তথ্যের জন্য, ‘অন-ডিমান্ড ট্রিপের জন্য ড্রাইভার SDK নিন’ এবং ‘নির্ধারিত কাজের জন্য ড্রাইভার SDK নিন’ দেখুন। |
আইওএস
| ১ | আপনার গুগল ক্লাউড প্রজেক্ট সেট আপ করুন | ন্যাভিগেশন এসডিকে ব্যবহার করার আগে একটি গুগল ক্লাউড প্রজেক্ট তৈরি করুন। আরও তথ্যের জন্য, আপনার গুগল ক্লাউড প্রজেক্ট সেট আপ করুন দেখুন। |
| ২ | আপনার API কী-তে নেভিগেশন SDK যোগ করুন | এপিআই কী হলো একটি অনন্য শনাক্তকারী যা আপনার অনুরোধগুলোকে প্রমাণীকরণ করে। নেভিগেশন এসডিকে ব্যবহার করার জন্য আপনার প্রোজেক্টের সাথে অন্তত একটি এপিআই কী যুক্ত করুন। আরও তথ্যের জন্য, ‘এপিআই কী ব্যবহার’ দেখুন। |
| ৩ | আপনার Xcode প্রজেক্ট সেট আপ করুন | একটি Xcode প্রজেক্ট তৈরি করুন এবং এতে নেভিগেশন SDK ইনস্টল করুন। আরও তথ্যের জন্য, আপনার Xcode প্রজেক্ট সেট আপ করুন দেখুন। |
| ৪ | আপনার প্রোজেক্টে ড্রাইভার SDK যোগ করুন | ফ্লিট ইঞ্জিনের সমস্ত ফিচারের সুবিধা নিতে ড্রাইভার SDK ইনস্টল ও কনফিগার করুন। আরও তথ্যের জন্য, ‘অন-ডিমান্ড ট্রিপের জন্য ড্রাইভার SDK নিন’ এবং ‘নির্ধারিত কাজের জন্য ড্রাইভার SDK নিন’ দেখুন। |
নেভিগেশন SDK-এর বৈশিষ্ট্যসমূহ সম্পর্কে আরও তথ্যের জন্য, Android এবং iOS- এর জন্য নেভিগেশন SDK-এর সম্পূর্ণ ডকুমেন্টেশন দেখুন।