
ড্রাইভার এসডিকে হলো একটি মোবাইল অ্যাপ টুলকিট এবং ফ্লিট ইঞ্জিনের একটি মৌলিক উপাদান। এই এসডিকে-র সাহায্যে আপনার ড্রাইভার অ্যাপ নির্ধারিত ট্রিপগুলো পরিচালনা করার পাশাপাশি ড্রাইভারের নেভিগেশন এবং রুটিং ক্ষমতাও সক্রিয় করতে পারে।
শুরু করার আগে
এই নির্দেশিকাটি ধরে নেয় যে আপনি নিম্নলিখিত বিষয়গুলো পড়েছেন:
- ফ্লিট ইঞ্জিনের অপরিহার্য বিষয়সমূহ ।
- যানবাহনের ডেটা মডেল ।
- অন-ডিমান্ড ট্রিপের ডেটা মডেল ।
- ফ্লিট ইঞ্জিন কীভাবে সেট আপ করবেন ।
- ফ্লিট ইঞ্জিনে কীভাবে যানবাহন তৈরি ও ব্যবহার করবেন ।
অন-ডিমান্ড ট্রিপের জন্য ড্রাইভার এসডিকে (Driver SDK) কী?
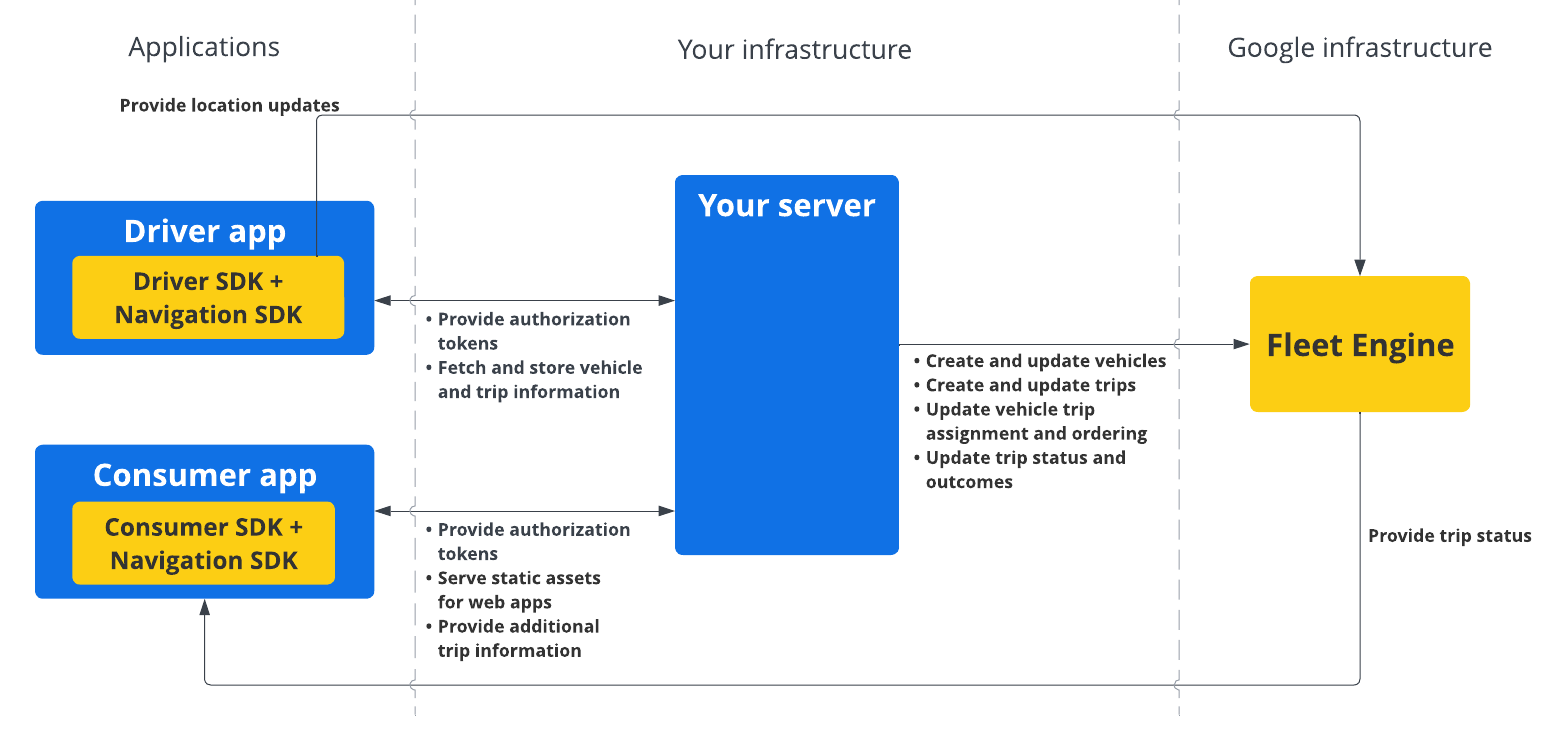
ড্রাইভার SDK গাড়ির অবস্থান এবং ট্রিপের আপডেট ফ্লিট ইঞ্জিনকে জানায়, যাতে ফ্লিট ইঞ্জিন গাড়িগুলো এবং তাদের নির্ধারিত ট্রিপগুলো ট্র্যাক করতে পারে। এর মূল অংশে, আপনার ড্রাইভার যখন গাড়ি চালানো শুরু করে, তখন SDK একটি ইভেন্ট লিসেনার ব্যবহার করে নেভিগেশন SDK থেকে বর্তমান রুট সেগমেন্ট ও গন্তব্যের সাথে অবস্থানের আপডেট এবং অক্ষাংশ/দ্রাঘিমাংশের স্থানাঙ্ক ফ্লিট ইঞ্জিনে পাঠায়।
অন-ডিমান্ড ট্রিপের জন্য ড্রাইভার এসডিকে কেন ব্যবহার করবেন?
ড্রাইভার এসডিকে (SDK) ড্রাইভারের রুট আপডেট করার জন্য ফ্লিট ইঞ্জিনের (Fleet Engine) সাথে সহজতর ইন্টিগ্রেশন সক্ষম করে। এই এসডিকে-র সাহায্যে, আপনার ড্রাইভার অন্য কোনো অ্যাপে না গিয়েই, গুগল ম্যাপসের কনজিউমার ভার্সনের মতোই একটিমাত্র অ্যাপ ব্যবহার করে অ্যাসাইনমেন্ট পরিচালনা করতে এবং নেভিগেট করতে পারবেন।
অন-ডিমান্ড ট্রিপের জন্য ড্রাইভার এসডিকে দিয়ে আপনি যা করতে পারেন
অন-ডিমান্ড ট্রিপের জন্য ড্রাইভার SDK ব্যবহার করে ফ্লিট ইঞ্জিনের সাথে নিম্নলিখিত বিষয়গুলো যোগাযোগ করুন:
- মানচিত্রে একটি যানবাহনের রিয়েল-টাইম অবস্থান।
- নেভিগেশন এসডিকে দ্বারা প্রদত্ত ট্রিপ ওয়েপয়েন্টগুলির অক্ষাংশ/দ্রাঘিমাংশ স্থানাঙ্ক।
- পরবর্তী ওয়েপয়েন্ট পর্যন্ত অবশিষ্ট দূরত্ব।
- পরবর্তী ওয়েপয়েন্টে পৌঁছানোর আনুমানিক সময়।
- নেভিগেশন এসডিকে দ্বারা প্রদত্ত পথ অনুযায়ী যানবাহনটিকে চলতে হবে।
অন-ডিমান্ড ট্রিপের জন্য ড্রাইভার এসডিকে কীভাবে কাজ করে
রুটিং তথ্য এবং গন্তব্যের জন্য ড্রাইভার SDK, নেভিগেশন SDK-এর উপর নির্ভর করে। নেভিগেশন SDK থেকে প্রাপ্ত তথ্যের সাথে ড্রাইভার SDK আপনার ড্রাইভার অ্যাপের সাথে সমন্বিত হয় এবং ফ্লিট ইঞ্জিনকে অবস্থানের আপডেট, অক্ষাংশ/দ্রাঘিমাংশ স্থানাঙ্ক, অবশিষ্ট দূরত্ব এবং পৌঁছানোর আনুমানিক সময়ের (ETA) একটি ধারাবাহিক প্রবাহ সরবরাহ করে। গাড়ির অন্যান্য সমস্ত ডেটা আপডেট অবশ্যই কাস্টমার ব্যাকএন্ডে পাঠাতে হবে, যা সেই ডেটা ফ্লিট ইঞ্জিনে প্রেরণ করে।
অন-ডিমান্ড ট্রিপের জন্য ড্রাইভার এসডিকে কীভাবে ব্যবহার করবেন
ড্রাইভার এসডিকে ব্যবহার শুরু করার পদ্ধতি দেখতে আপনার প্ল্যাটফর্ম নির্বাচন করুন।
অ্যান্ড্রয়েড
| ১ | অ্যান্ড্রয়েডের জন্য ড্রাইভার এসডিকে ডাউনলোড করুন | আরও তথ্যের জন্য, ড্রাইভার এসডিকে (SDK) সংগ্রহ করুন (Get the Driver SDK ) দেখুন। |
| ২ | একটি গুগল ক্লাউড কনসোল প্রজেক্ট কনফিগার করুন | আরও তথ্যের জন্য, একটি গুগল ক্লাউড কনসোল প্রজেক্ট কনফিগার করুন দেখুন। |
| ৩ | নির্ভরতা ঘোষণা করুন | আরও তথ্যের জন্য, নির্ভরতা ঘোষণা দেখুন। |
| ৪ | প্রমাণীকরণ টোকেন তৈরি করুন | আরও তথ্যের জন্য, প্রমাণীকরণ টোকেন তৈরি করুন দেখুন। |
| ৫ | ড্রাইভার SDK শুরু করুন | আরও তথ্যের জন্য, ড্রাইভার এসডিকে প্রারম্ভিককরণ দেখুন। |
| ৬ | গাড়িটি প্রস্তুত করুন | আরও তথ্যের জন্য, “যানবাহন প্রস্তুত করুন” দেখুন। |
| ৭ | ভ্রমণের বিবরণ সেট করুন | আরও তথ্যের জন্য, ভ্রমণের বিবরণ নির্ধারণ করুন দেখুন। |
আইওএস
| ১ | iOS-এর জন্য ড্রাইভার SDK ডাউনলোড করুন | আরও তথ্যের জন্য, ড্রাইভার এসডিকে (SDK) সংগ্রহ করুন (Get the Driver SDK ) দেখুন। |
| ২ | একটি গুগল ক্লাউড কনসোল প্রজেক্ট কনফিগার করুন | আরও তথ্যের জন্য, একটি গুগল ক্লাউড কনসোল প্রজেক্ট কনফিগার করুন দেখুন। |
| ৩ | প্রমাণীকরণ টোকেন তৈরি করুন | আরও তথ্যের জন্য, প্রমাণীকরণ টোকেন তৈরি করুন দেখুন। |
| ৪ | ড্রাইভার SDK শুরু করুন | আরও তথ্যের জন্য, ড্রাইভার এসডিকে প্রারম্ভিককরণ দেখুন। |
| ৫ | গাড়িটি প্রস্তুত করুন | আরও তথ্যের জন্য, “যানবাহন প্রস্তুত করুন” দেখুন। |
| ৬ | ভ্রমণের বিবরণ সেট করুন | আরও তথ্যের জন্য, ভ্রমণের বিবরণ নির্ধারণ করুন দেখুন। |
এরপর কী?
আপনি যে প্ল্যাটফর্মে ড্রাইভার এসডিকে সেট আপ করতে চান, তার ডকুমেন্টেশন দেখুন: