The Attribution Reporting API enables cross app and web attribution for sources and triggers that occur on the same device. Browsers, such as Chrome, can delegate both source and trigger registrations to the Attribution Reporting API for Android instead of handling those registrations in the browser. This allows Android to match sources and triggers across both sites and apps.
This guide will teach you how to set up cross app and web attribution.
As you set up cross app and web attribution, it is highly recommended to also familiarize yourself with the debugging solutions available to ensure your setup is working as intended.
Register sources and triggers with Android OS
Cross app and web attribution will only be available if the Attribution Reporting API is enabled in both the browser and the Android OS on the same device. The availability of the Android Attribution Reporting API is sent through the Attribution-Reporting-Support header. This header will return os, web, or both, depending on what is available on that device. If both are available, ad techs will then have the choice to register web sources and web triggers with either the browser or the OS.
The ad tech needs to decide whether to register the web source or web trigger with the browser or the OS.
- For web only campaigns, ad techs can still register both sources and triggers with Chrome's Attribution Reporting API or choose to delegate both to the OS. For web only campaigns where either the source or trigger may happen in a WebView, ad techs must delegate both the source and trigger registrations to the OS. See the section on WebViewsfor more information.
- Ad techs should avoid registering sources and triggers with both the Chrome and Android APIs simultaneously in order to avoid creating duplicate attribution reports.
- Attribution happens separately for browsers and the OS. If a source is registered with the browser but the trigger is registered with the OS, those two cannot be matched and the other way around.
- For sources that may result in either an app or a web trigger, it is highly recommended for the ad tech to delegate web source and trigger registrations to the Android Attribution Reporting API.
- For triggers that may have been driven by app based sources, the ad tech can choose to delegate web trigger registration to the Android Attribution Reporting API.
- For campaigns where both the source and trigger happen in an app, both will need to be registered with the OS Attribution Reporting API.
Register an app source and web trigger
For some campaigns, the source may occur in an app while the trigger would occur on a website in the mobile browser on the same device.
Example
A user is reading articles in their favorite news app. They see an ad for cheap flights to Paris and excitedly click to book. The ad tech serving the ad in the news app registers the click source with the Android Attribution Reporting API. The user is taken to the advertiser's web page in Chrome where they are able to convert. The ad tech on the advertiser's site checks if the OS level API is available, and it is. The ad tech registers the conversion trigger by instructing Chrome to delegate the registration to the OS instead of registering it directly with Chrome's Attribution Reporting API. The OS-level Attribution Reporting API is then able to match the app source and web trigger and send out the relevant reports.
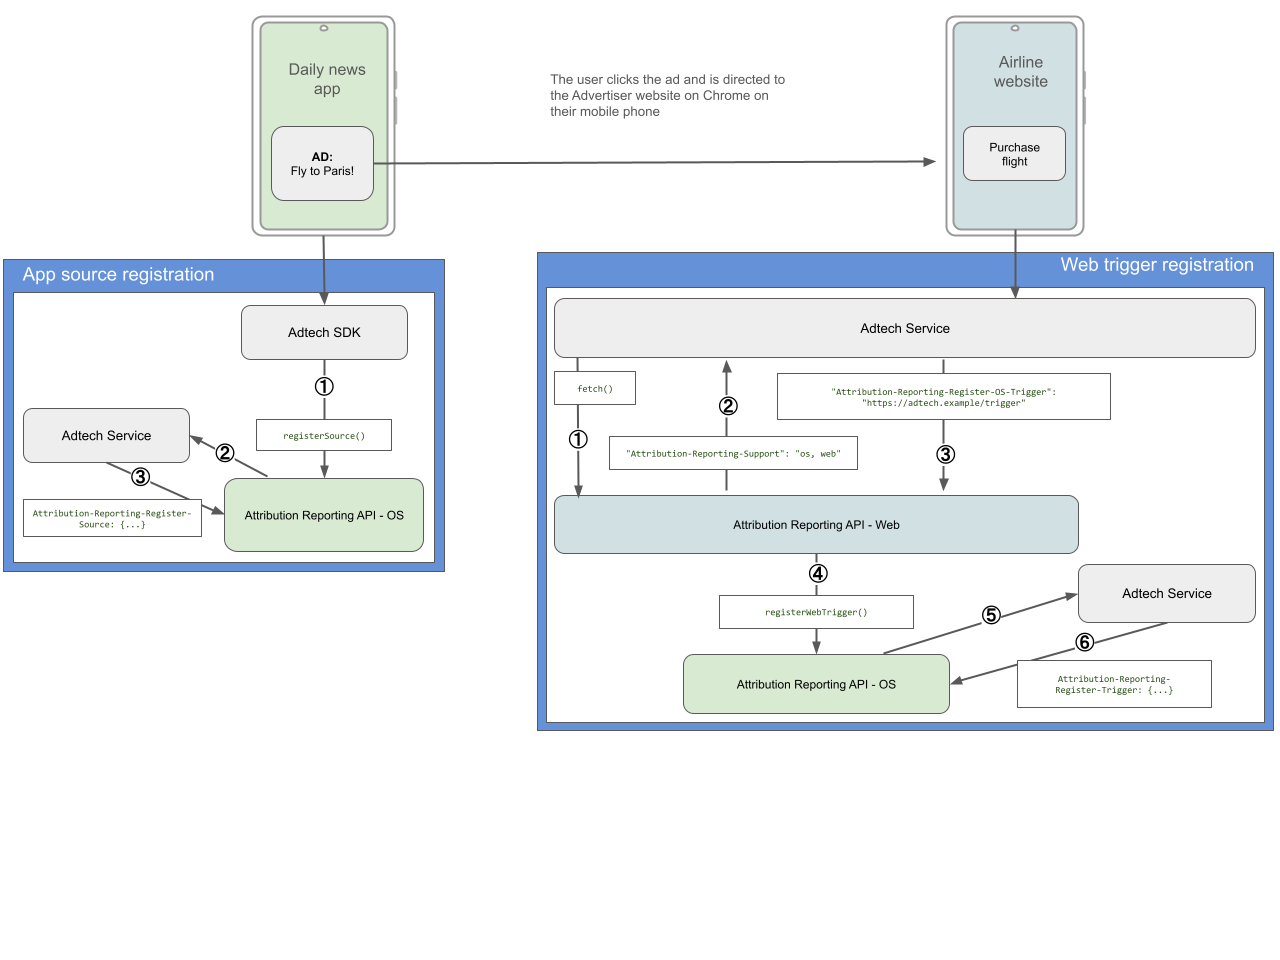
App source registration:
The ad tech SDK in the Daily News Android App registers the click by using
registerSource()The Attribution Reporting API on Android sends a request to the ad tech server URL provided to
registerSource()The ad tech server responds with the Attribution-Reporting-Register-Source header to complete the source registration
Web trigger registration:
The ad tech registers a trigger and checks for OS availability in the Attribution Reporting API
The web ARA returns information about which platform is supported
The
OS-Triggerheader tells the web ARA API to call the OS ARA APIregisterWebTrigger()functionThe call to
registerWebTrigger()happens under the hood and the developer does not need to callregisterWebTrigger()with the OS directlyThe OS ARA takes over and sends a request to the ad tech server URL provided by the
Attribution-Reporting-Register-OS-TriggerheaderThe ad tech will complete the trigger registration with the OS API
The OS ARA will perform attribution according to the same logic applied to app<>app attribution and send out the same reports
Workflow
The following steps include further details on how to complete the task:
The ad tech from the app registers a source with Android's Attribution Reporting API with the following adjustments:
- To register an app source that is expected to convert on a website, the
Attribution-Reporting-Register-Sourceresponse header should include a web destination (eTLD+1) instead of an app destination.
Attribution-Reporting-Register-Source: { "web_destination": "https://advertiser.example", ... }- Some advertisers may be using multiple measurement providers (for example, a third-party measurement tool or an analytics tool) using 302 redirect chains. In some cases, the Attribution Reporting API will follow the redirect path specified in the Attribution-Reporting-Redirect header in the background and at the same time the 302 redirect path executes in the foreground for existing navigation requests. These requests will go to the same URL and could result in the third-party measurement provider double counting registrations. To prevent double counting registrations, ad techs can modify redirection behavior to send the Attribution Reporting API registration to an alternative yet deterministic URL.
To enable this behavior, ad techs need to include a new HTTP header when responding to a registration request:
- The header is
Attribution-Reporting-Redirect-Config - The header's value should be redirect-302-to-well-known
Attribution-Reporting-Redirect-Config: redirect-302-to-well-known- The header is
The rest of the source registration process is the same as a standard app-to-app source registration.
- To register an app source that is expected to convert on a website, the
The ad tech on the advertiser's website registers the trigger by asking Chrome to delegate the registration to the Android Attribution Reporting API:
Once a user completes a conversion on a website, the ad tech will make a request to register the trigger with Chrome
A pixel or
fetch()request can be used to make the request to register a triggerThe
Attribution-Reporting-Supportrequest header is returned by Chrome to the ad tech. If the API is enabled on both the Chrome browser and the Android device, the header will returnos, web
Attribution-Reporting-Support: os, webThe ad tech should then tell Chrome to delegate to the OS using the
Attribution-Reporting-Register-OS-Triggerheader which:Tells Chrome to delegate the registration to the OS
Chrome delegates the registration to the OS by calling the OS API function
registerWebTrigger()- The call to
registerWebTrigger()happens under the hood, the ad tech does not need to callregisterWebTrigger()directly
- The call to
The OS API initiates a secondary API call to the ad tech URI passed on from the browser
Attribution-Reporting-Register-OS-Trigger: "https://adtech.example/register-trigger",
"https://other-adtech.example/register-trigger"
In some cases the
Attribution-Reporting-Supportheader is unavailable and can't be sent. When this happens, the ad tech can still set a preferred platform to handle the trigger registration by including theAttribution-Reporting-Infoheader. The key is preferred-platform and the allowed values areosandweb. The browser will use the preferred platform when available and will fall back to the web platform when the OS is unavailable.
Attribution-Reporting-Info: preferred-platform=os- To complete the trigger registration, the ad tech's endpoint should respond to the Android Attribution Reporting API request using the response header.
Attribution-Reporting-Register-Trigger: { "event_trigger_data": [{"trigger_data":"1"}], "aggregatable_trigger_data": [ {"key_piece":"0x400","source_keys":["campaignCounts"]}, {"key_piece":"0xA80","source_keys":["geoValue"]} ], ... }- The remainder of the trigger registration remains the same.
Register a web source and an app trigger
For some campaigns, a source may occur on a site in a mobile browser while the trigger occurs in an app on the same device.
Example
A user is browsing on a site in their Chrome browser on their Android phone. They see an ad for a sweater from one of their favorite stores. They click the ad and are taken to the app they already have downloaded. The ad tech on the website where the ad was served registers the click source by instructing Chrome to delegate the registration to the Android Attribution Reporting API instead of using the Attribution Reporting API on Chrome. The user purchases the sweater in the shopping app. The ad tech in the advertiser's app then registers the conversion trigger with the Android Attribution Reporting API. The OS-level Attribution Reporting API is able to match the web source and app trigger and send out the relevant reports.
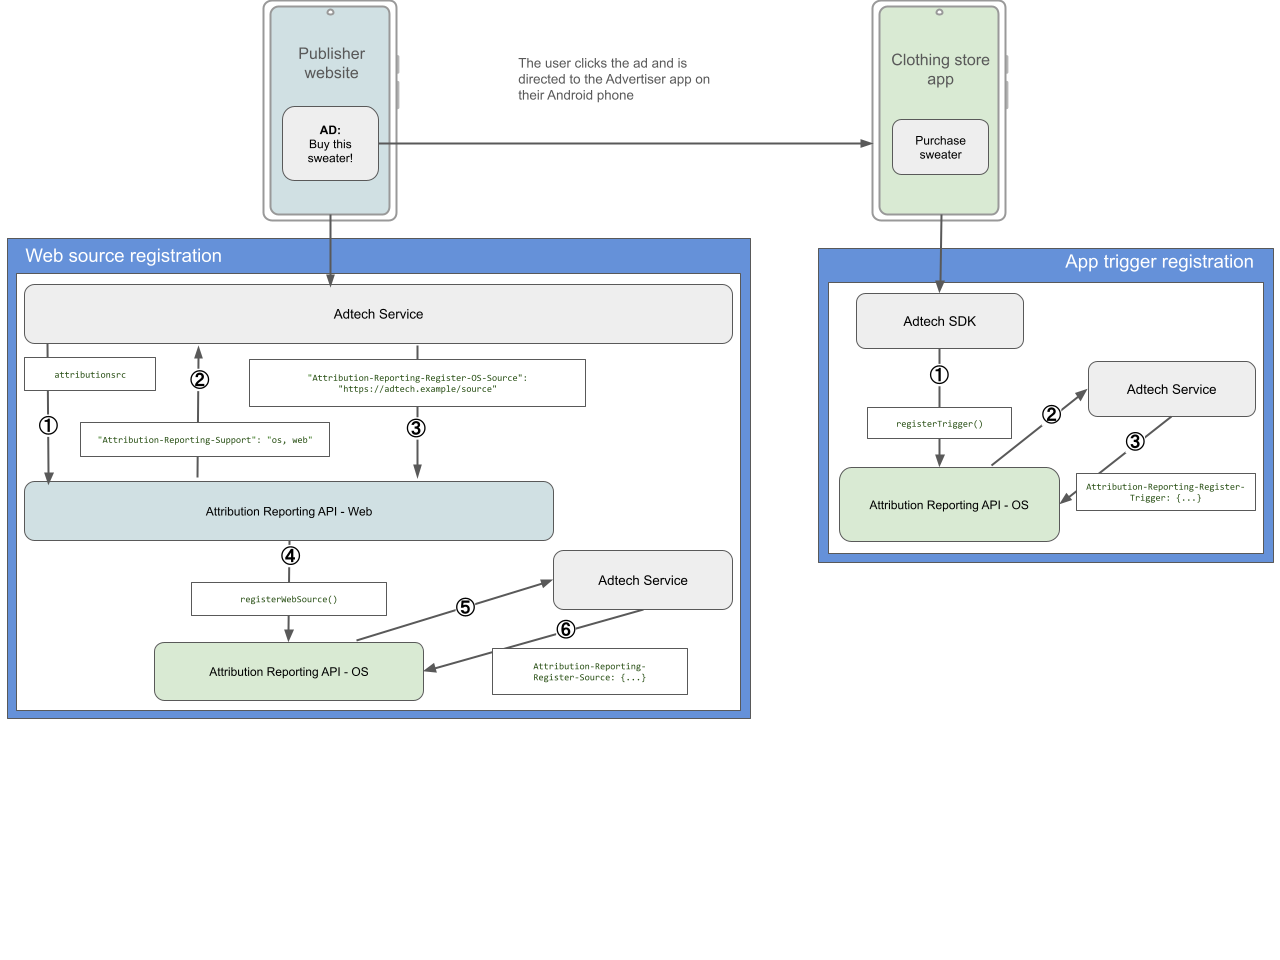
Web source registration:
The ad tech registers a source and checks for OS availability in the Attribution Reporting API
The web ARA returns information about which platform is supported
The
OS-Sourceheader tells the web ARA API to call the OS ARA APIregisterWebSource()functionThe call to
registerWebSource()happens under the hood and the developer does not need to callregisterWebSource()with the OS directlyThe OS ARA takes over and sends a request to the ad tech server URL provided by the
Attribution-Reporting-Register-OS-SourceheaderThe ad tech will complete the source registration with the OS API
App trigger registration:
The ad tech SDK in the Clothing store Android app registers the trigger with the OS ARA
The Attribution Reporting API on Android sends a request to the ad tech server URL provided to
registerTrigger()The ad tech server responds with the
Attribution-Reporting-Register-Triggerheader to complete the trigger registrationThe OS ARA will perform attribution according to the same logic applied to app<>app attribution and send out the same reports
Workflow
The following steps include further details on how to complete the task:
The ad tech on the publisher website registers the source by instructing Chrome to delegate the registration to the Android Attribution Reporting API:
- For a web to app use case, when registering a source, the attribution
source parameter must be specified directly, either by using the
attributionsrctag or by using JavaScript registration - The following example uses the
attributionsrctag to specify the source parameter:
<img src="https://adtech.example/conversionpixel" attributionsrc="https://adtech.example/register-source?purchase=12">- For a web to app use case, when registering a source, the attribution
source parameter must be specified directly, either by using the
The
Attribution-Reporting-Supportrequest header is returned by Chrome to the ad tech. If the API is enabled on both the Chrome browser and the Android device, the header will returnos, web.Attribution-Reporting-Support: os, webThe ad tech should tell Chrome to delegate to the OS-level API using the
Attribution-Reporting-Register-OS-Sourceheader which:- Tells Chrome to delegate the registration to the OS
- Chrome delegates the registration to the OS by calling the OS API function
registerWebSource() - The call to
registerWebSource()happens under the hood, the ad tech does not need to callregisterWebSource()directly - The OS API initiates a secondary API call to the ad tech URI passed on from the browser
Attribution-Reporting-Register-OS-Source: "https://adtech.example/register-source"- In some cases the
Attribution-Reporting-Supportheader is unavailable. When this happens, the ad tech can still set a preferred platform to handle the source registration by including theAttribution-Reporting-Infoheader. The key is preferred-platform and the allowed values areosandweb. The browser will use the preferred platform when available and will fallback to the web platform when the OS is unavailable.
Attribution-Reporting-Info: preferred-platform=os- To complete the source registration, the ad tech's endpoint should respond
to the Android Attribution Reporting API request with the response header
Attribution-Reporting-Register-Source. The response should also specify an app destination in the destination field.
Attribution-Reporting-Register-Source: { "source_event_id":"123001", "destination":"android-app://com.example.advertiser", ... }- To support redirects for source registrations, Chrome will follow the redirects and call the web context APIs for each redirect hop.
- The remainder of the source registration remains the same.
The ad tech in the advertiser's app registers a trigger with the Android Attribution Reporting API:
- For triggers that occur in apps, the apps register triggers with the Android Attribution Reporting API as normal.
Campaigns that have both app and web potential destinations
Set up dual destinations
- Some campaigns may be set up to convert in either the advertiser's app or on the advertiser's web page depending on various factors such as if the user has the app installed.
- In these cases, it is recommended to delegate the source registration to the OS where available so that the source can be correctly attributed regardless of where the trigger occurs. When registering the source with the OS, both an app and web destination can be specified in the respective parameters.
- App destination should be in the
destinationfield - Web destination should be in the
web_destinationfield - Chrome developers should note that the
destinationfield for the OS Attribution Reporting API should be an app package and not a URL.
Attribution-Reporting-Register-Source: { "source_event_id":"123001", "destination":"android-app://com.example.advertiser", "web_destination": "https://example.advertiser" ... }- The next section on coarse reporting will explain how using dual destinations may impact the noise in your reports.
Use coarse reporting to reduce noise in event-level reports for dual destination sources:
- If both an OS (app) and a Web destination were specified in the source registration, event-level reports will specify whether the trigger happened in a web destination or app destination by default. However, to maintain privacy limits, additional noise will be added to these reports.
- Ad techs can use the
coarse_event_report_destinationsfield under theAttribution-Reporting-Register-Sourceheader to turn on coarse reporting and reduce noise. If a source with thecoarse_event_report_destinationsfield specified wins attribution, the resulting report includes both the app and web destinations without distinction as to where the actual trigger occurred but with less noise than reports where the app or web destination is specified. - Aggregate reports remain unchanged.
For apps using Chrome Custom Tabs
Some apps may use Custom Tabs to render web content. Custom tabs behave similarly to a regular web page when measuring across apps and mobile web sites.
- Register an app source and Custom Tab trigger:
- Follow the instructions to register an app source and web trigger.
- Register a Custom Tab source and app trigger:
- Follow the instructions to register a web source and app trigger.
- Register a CCT source and CCT trigger
- This is treated the same as any site-to-site web attribution in Chrome.
For apps using WebView
Some apps may use WebView to display content. There are a variety of use cases for WebView, such as rendering ads, hosting web content, or custom app features better suited to a web format.
Only OS-level attribution is available in WebView. The Attribution-Reporting-Support header will return only os, and only if the Android Attribution Reporting API is available.
When delegating to the OS, WebView may use
registerSourceorregisterWebSourceandregisterTriggerorregisterWebTrigger. Which methods are used by WebView is set by the app rendering the WebView and is determined on a per WebView basis.- The difference between
registerSourceandregisterWebSourceis which source gets logged as the publisher. WithregisterSource, the app is logged as the publisher; an example of when to useregisterSourcewould be a publisher app that shows an ad that is rendered using WebView. WithregisterWebSource, the website hosted in the WebView is logged as the publisher; an example of when to useregisterWebSourcewould be an app that hosts a WebView, and the website that is being rendered by the WebView is showing ads.registerTriggerandregisterWebTriggerbehave similarly. The chart in item #3 details different scenarios for when an app or SDK developer would want to configure the API to useregisterSourceorregisterWebSource, andregisterTriggerorregisterWebTrigger.
- The difference between
By default, WebView will use
registerSourceandregisterWebTriggerwhen calling the Android Attribution Reporting API. This associates sources with the app and triggers with the top-level origin of the URL in the WebView when the trigger occurs.- If an app requires different behavior, they will need to use a new method
setAttributionRegistrationBehavior on the androidx.webkit.WebViewSettingsCompat
class. This method will specify whether WebView should call
registerWebSource()orregisterWebTrigger()rather thanregisterSource()orregisterTrigger().- This behavior will need to be set for each WebView that is initiated.
- If the ad tech SDK is initiating the WebView, the SDK will need to set this default behavior.
- For apps that would like to use
registerWebSource()to associate source registrations with the website in WebView instead of the app, they must join the WebApp allowlist. Complete this form to join the allowlist. The intent of the allowlist is to mitigate privacy considerations around establishing trust for web context.
- Options for setAttributionRegistrationBehavior
Value Description Example use case APP_SOURCE_AND_WEB_TRIGGER (default) Allows apps to register app sources (sources associated with the app package name) and web triggers (triggers associated with the eTLD+1) from WebView. Apps that use WebView to serve ads rather than enable web browsing WEB_SOURCE_AND_WEB_TRIGGER Allows apps to register web sources and web triggers from WebView. WebView-based browser apps, where ad impressions and conversions could both happen on websites in WebView. APP_SOURCE_AND_APP_TRIGGER Allows apps to register app sources and app triggers from WebView. WebView-based apps where ad impressions and conversions should always be associated with the app rather than the eTLD+1 of the WebView. DISABLED Disables source and trigger registration from WebView. - If an app requires different behavior, they will need to use a new method
setAttributionRegistrationBehavior on the androidx.webkit.WebViewSettingsCompat
class. This method will specify whether WebView should call
Source and trigger registrations from WebView
Ad techs should respond to source registrations using the
Attribution-Reporting-Register-OS-Sourceheader. Based on the set behavior for the WebView, this will either callregisterSource()orregisterWebSource()with the OS and initiate a secondary API call from the Android Attribution Reporting API to the ad tech URI.- To complete the source registration, the ad tech's endpoint should respond to the Android Attribution Reporting API request with the response header.
Attribution-Reporting-Register-OS-Source: {
    "source_event_id":"123001",
    "destination":"android-app://com.example.advertiser",
    ...
}
The remainder of the source registration remains the same.
Ad techs should respond to trigger registrations using the
Attribution-Reporting-Register-OS-Triggerheader. Based on the set behavior for the WebView, this will either callregisterTrigger()orregisterWebTrigger()with the OS and initiate a secondary API call from Rb to the ad tech URI.- To complete the trigger registration, the ad tech's endpoint should respond to the Android Attribution Reporting API request with the response header.
Attribution-Reporting-Register-OS-Trigger: { "event_trigger_data": [{"trigger_data":"1"}], "aggregatable_trigger_data": [ {"key_piece":"0x400","source_keys":["campaignCounts"]}, {"key_piece":"0xA80","source_keys":["geoValue"]} ], ... }- The rest of the trigger registration process remains the same.
Debug
When setting up an app to web implementation, it is recommended to set up debug reports to verify if sources and triggers are being registered correctly, and if they are not registered, to receive information about why.
For general Attribution Reporting debugging steps, consult the debugging cookbook.