
Halaman ini menjelaskan cara aplikasi Google Chat dapat membuka dialog untuk menampilkan antarmuka pengguna (UI) dan merespons pengguna.
Dialog adalah antarmuka berbasis kartu yang ditampilkan dalam jendela yang terbuka dari ruang atau pesan Chat. Dialog dan isinya hanya dapat dilihat oleh pengguna yang membukanya.
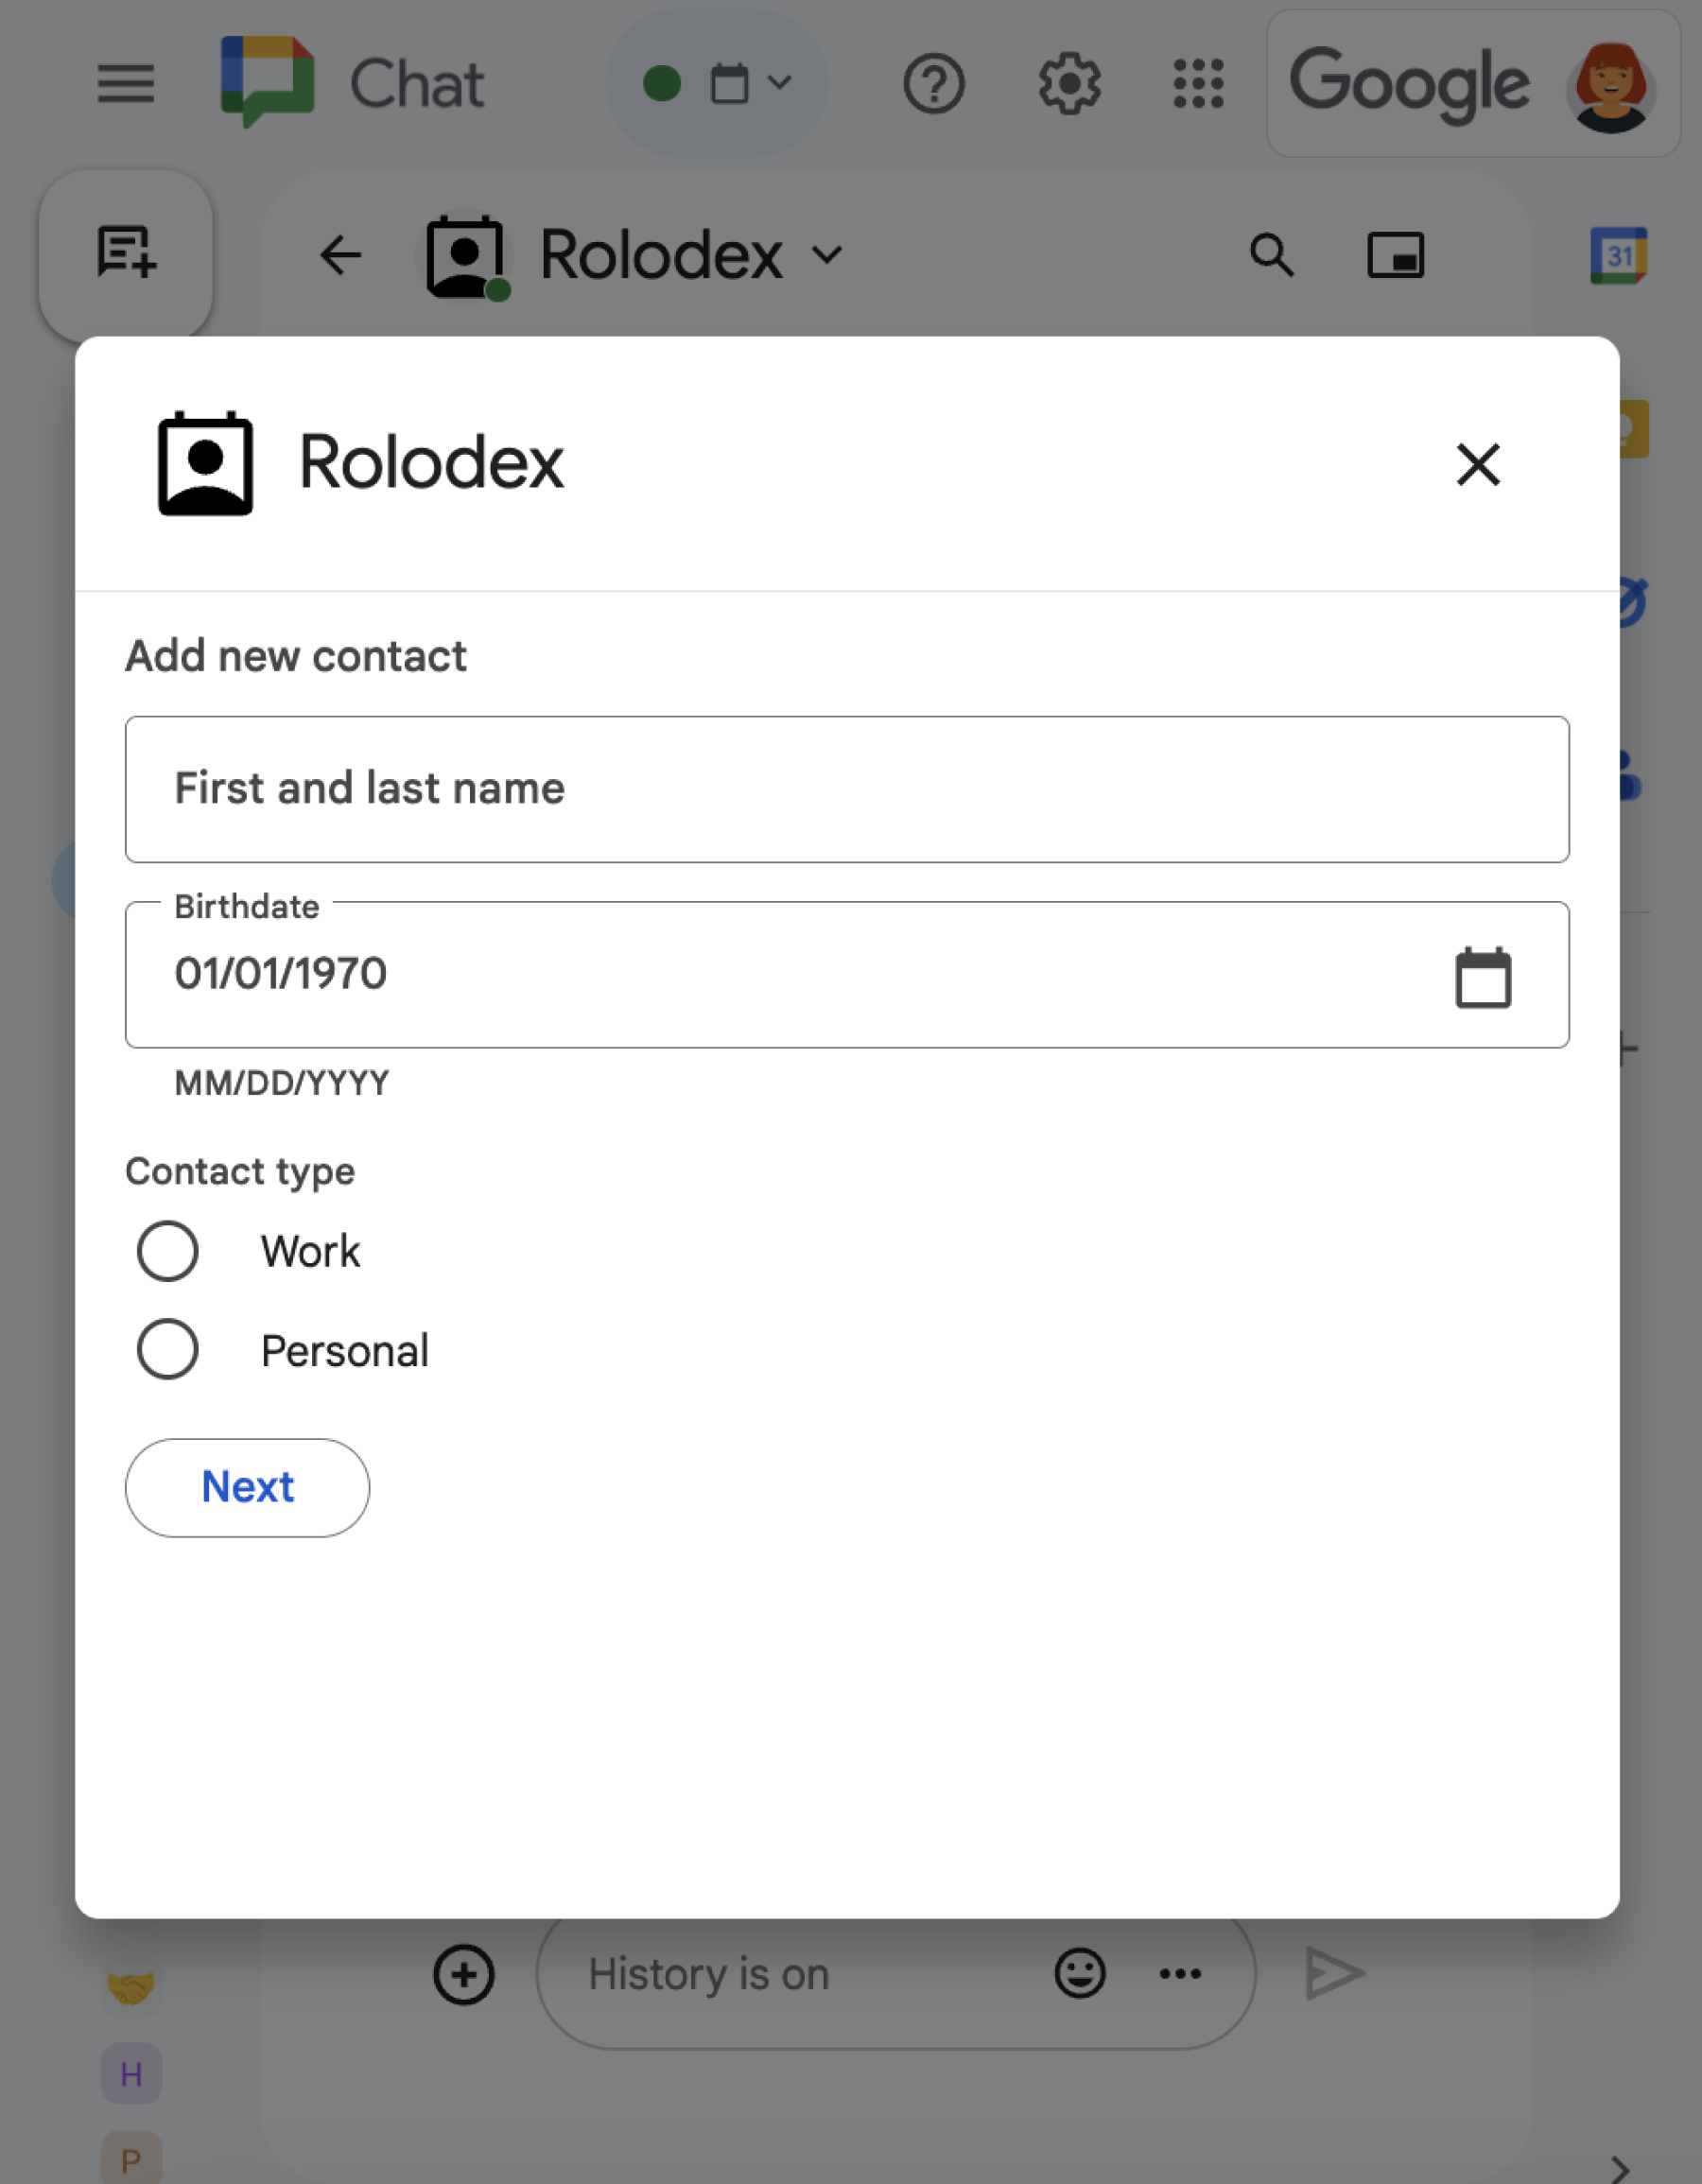
Aplikasi chat dapat menggunakan dialog untuk meminta dan mengumpulkan informasi dari pengguna Chat, termasuk formulir multi-langkah. Untuk mengetahui detail selengkapnya tentang cara membuat input formulir, lihat Mengumpulkan dan memproses informasi dari pengguna.
Prasyarat
HTTP
Add-on Google Workspace yang memperluas Google Chat. Untuk membuatnya, selesaikan mulai cepat HTTP.
Apps Script
Add-on Google Workspace yang memperluas Google Chat. Untuk membuatnya, selesaikan panduan memulai Apps Script.
Membuka dialog
Bagian ini menjelaskan cara merespons dan menyiapkan dialog dengan melakukan hal berikut:
- Memicu permintaan dialog dari interaksi pengguna.
- Tangani permintaan dengan menampilkan dan membuka dialog.
- Setelah pengguna mengirimkan informasi, proses pengiriman dengan menutup dialog atau menampilkan dialog lain.
Memicu permintaan dialog
Aplikasi Chat hanya dapat membuka dialog untuk merespons interaksi pengguna, seperti perintah atau klik tombol dari pesan dalam kartu.
Untuk merespons pengguna dengan dialog, aplikasi Chat harus membangun interaksi yang memicu permintaan dialog, seperti berikut:
- Merespons perintah. Untuk memicu permintaan dari perintah, Anda harus mencentang kotak Membuka dialog saat mengonfigurasi perintah.
- Menanggapi klik tombol dalam
pesan,
baik sebagai bagian dari kartu atau di bagian bawah pesan. Untuk memicu
permintaan dari tombol dalam pesan, Anda mengonfigurasi
tindakan
onClicktombol dengan menyetelinteraction-nya keOPEN_DIALOG.
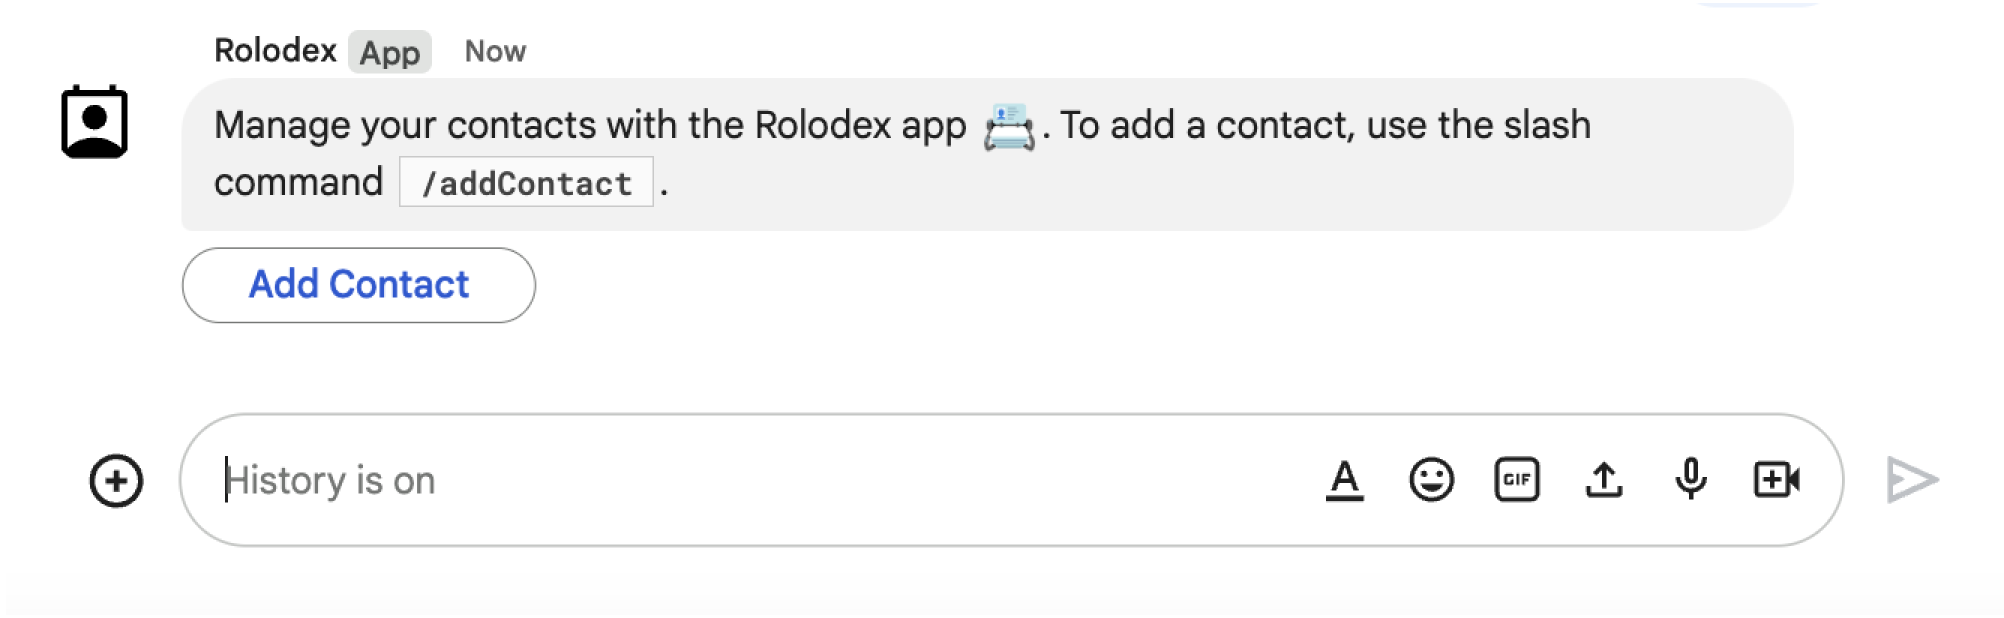
/addContact. Pesan juga menyertakan tombol yang dapat diklik pengguna untuk memicu perintah.
Contoh kode berikut menunjukkan cara memicu permintaan dialog dari tombol dalam
pesan kartu. Untuk membuka dialog, tetapkan kolom
onClick.action.interaction
tombol ke OPEN_DIALOG:
Node.js
Ganti FUNCTION_URL dengan endpoint HTTP yang menangani
klik tombol.
Python
Ganti FUNCTION_URL dengan endpoint HTTP yang menangani
klik tombol.
Java
Ganti FUNCTION_URL dengan endpoint HTTP yang menangani
klik tombol.
Apps Script
Contoh ini mengirim pesan kartu dengan menampilkan JSON kartu. Anda juga dapat menggunakan layanan kartu Apps Script.
Membuka dialog awal
Saat pengguna memicu permintaan dialog, aplikasi Chat Anda akan menerima
objek peristiwa dengan payload
yang menentukan objek dialogEventType sebagai REQUEST_DIALOG.
Untuk membuka dialog, aplikasi Chat Anda dapat merespons
permintaan dengan menampilkan objek
RenderActions
dengan pushCard navigasi untuk menampilkan kartu. Kartu harus berisi elemen antarmuka pengguna (UI) apa pun, termasuk satu atau beberapa widget sections[]. Untuk mengumpulkan informasi dari pengguna, Anda dapat menentukan widget input formulir dan widget tombol. Untuk mempelajari lebih lanjut cara mendesain input formulir, lihat
Mengumpulkan dan memproses informasi dari pengguna.
Contoh kode berikut menunjukkan cara aplikasi Chat menampilkan respons yang membuka dialog:
Node.js
Ganti FUNCTION_URL dengan endpoint HTTP yang menangani
klik tombol.
Python
Ganti FUNCTION_URL dengan endpoint HTTP yang menangani
klik tombol.
Java
Ganti FUNCTION_URL dengan endpoint HTTP yang menangani
klik tombol.
Apps Script
Contoh ini mengirim pesan kartu dengan menampilkan JSON kartu. Anda juga dapat menggunakan layanan kartu Apps Script.
Menangani pengiriman dialog
Saat pengguna mengklik tombol yang mengirimkan dialog, aplikasi Chat Anda akan menerima objek peristiwa dengan objek ButtonClickedPayload. Dalam payload, dialogEventType disetel ke SUBMIT_DIALOG. Untuk
memahami cara mengumpulkan dan memproses informasi dalam dialog, lihat
Mengumpulkan dan memproses informasi dari pengguna Google Chat.
Aplikasi Chat Anda harus merespons objek peristiwa dengan melakukan salah satu hal berikut:
- Mengembalikan dialog lain untuk mengisi kartu atau formulir lain.
- Tutup dialog setelah memvalidasi data yang dikirim pengguna, dan secara opsional, kirim pesan konfirmasi.
Opsional: Menampilkan dialog lain
Setelah pengguna mengirimkan dialog awal, aplikasi Chat dapat menampilkan satu atau beberapa dialog tambahan untuk membantu pengguna meninjau informasi sebelum mengirimkan, menyelesaikan formulir multi-langkah, atau mengisi konten formulir secara dinamis.
Untuk memproses data yang dimasukkan pengguna, aplikasi Chat
menangani data dalam objek
commonEventObject.formInputs
peristiwa. Untuk mempelajari lebih lanjut cara mengambil nilai dari widget input, lihat
Mengumpulkan dan memproses informasi dari pengguna.
Untuk melacak data apa pun yang dimasukkan pengguna dari dialog awal, Anda harus menambahkan parameter ke tombol yang membuka dialog berikutnya. Untuk mengetahui detailnya, lihat Mentransfer data ke kartu lain.
Dalam contoh ini, aplikasi Chat membuka dialog awal yang mengarah ke dialog kedua untuk konfirmasi sebelum mengirimkan:
Node.js
Ganti FUNCTION_URL dengan endpoint HTTP yang menangani
klik tombol.
Python
Ganti FUNCTION_URL dengan endpoint HTTP yang menangani
klik tombol.
Java
Ganti FUNCTION_URL dengan endpoint HTTP yang menangani
klik tombol.
Apps Script
Contoh ini mengirim pesan kartu dengan menampilkan JSON kartu. Anda juga dapat menggunakan layanan kartu Apps Script.
Tutup dialog
Saat pengguna mengklik tombol kirim pada dialog, aplikasi Chat Anda akan menjalankan tindakan terkait dan menyediakan objek peristiwa dengan buttonClickedPayload yang ditetapkan ke berikut ini:
isDialogEventadalahtrue.dialogEventTypeadalahSUBMIT_DIALOG.
Aplikasi Chat harus menampilkan objek
RenderActions
dengan
EndNavigation
ditetapkan ke CLOSE_DIALOG.
Opsional: Menampilkan notifikasi sementara
Saat menutup dialog, Anda juga dapat menampilkan notifikasi teks sementara kepada pengguna yang berinteraksi dengan aplikasi.
Untuk menampilkan notifikasi, tampilkan objek
RenderActions
dengan kolom notification yang ditetapkan.
Contoh berikut menutup dialog dengan notifikasi teks:
Node.js
Python
Java
Apps Script
Contoh ini mengirim pesan kartu dengan menampilkan JSON kartu. Anda juga dapat menggunakan layanan kartu Apps Script.
Untuk mengetahui detail tentang meneruskan parameter antar-dialog, lihat Mentransfer data ke kartu lain.
Opsional: Kirim pesan Chat konfirmasi
Saat menutup dialog, Anda juga dapat mengirim pesan Chat baru, atau memperbarui pesan yang sudah ada.
Untuk mengirim pesan baru, kembalikan objek
DataActions
dengan kolom
CreateMessageAction yang ditetapkan dengan pesan baru. Misalnya, untuk menutup dialog
dan mengirim pesan teks, kembalikan yang berikut:
Contoh berikut menutup dialog dengan mengirim pesan baru:
Node.js
Python
Java
Apps Script
Contoh ini mengirim pesan kartu dengan menampilkan JSON kartu. Anda juga dapat menggunakan layanan kartu Apps Script.
Untuk memperbarui pesan setelah pengguna mengirimkan dialog, tampilkan objek DataActions
yang berisi salah satu tindakan berikut:
UpdateMessageAction: Memperbarui pesan yang dikirim oleh aplikasi Chat, seperti pesan dari tempat pengguna meminta dialog.UpdateInlinePreviewAction: Memperbarui kartu dari pratinjau link.
Memecahkan masalah
Saat aplikasi atau kartu Google Chat menampilkan error, antarmuka Chat akan menampilkan pesan yang mengatakan "Terjadi masalah". atau "Tidak dapat memproses permintaan Anda". Terkadang UI Chat tidak menampilkan pesan error apa pun, tetapi aplikasi atau kartu Chat menghasilkan hasil yang tidak terduga; misalnya, pesan kartu mungkin tidak muncul.
Meskipun pesan error mungkin tidak ditampilkan di UI Chat, pesan error deskriptif dan data log tersedia untuk membantu Anda memperbaiki error jika logging error untuk aplikasi Chat diaktifkan. Untuk mendapatkan bantuan dalam melihat, men-debug, dan memperbaiki error, lihat Memecahkan masalah dan memperbaiki error Google Chat.