บทแนะนํานี้จะแสดงวิธีตั้งค่าเหตุการณ์ purchase ในเว็บไซต์
วัดผลได้เมื่อมีคนทำการซื้อ บทแนะนำจะประกอบด้วยมิติข้อมูล
เมตริก และรายงานที่ Analytics ป้อนข้อมูลจากเหตุการณ์ เพื่อเรียนรู้
ดูข้อมูลเพิ่มเติมเกี่ยวกับเหตุการณ์อีคอมเมิร์ซได้ที่หัวข้อวัดอีคอมเมิร์ซ
ก่อนเริ่มต้น
บทแนะนำนี้จะถือว่าคุณได้ดำเนินการไปแล้ว
- สร้างบัญชีและพร็อพเพอร์ตี้ Google Analytics
- สร้างสตรีมข้อมูลเว็บสําหรับเว็บไซต์
- วางแท็ก Google Analytics ในเว็บไซต์
และจะถือว่าคุณมีสิ่งต่อไปนี้ด้วย
- การเข้าถึงซอร์สโค้ดของเว็บไซต์
- บทบาทผู้แก้ไข (หรือสูงกว่า) ในบัญชี Google Analytics
ขั้นตอนที่ 1: เพิ่มเหตุการณ์ลงในเว็บไซต์
คุณควรวางเหตุการณ์ purchase ในหน้าของเว็บไซต์ซึ่ง
มีคนทำการซื้อสินค้า ตัวอย่างเช่น คุณอาจเพิ่มเหตุการณ์ใน
หน้ายืนยันที่ปรากฏขึ้นเมื่อมีคนทำการซื้อ บทแนะนำนี้
แสดงวิธีเพิ่มเหตุการณ์ลงในหน้าเว็บที่มีคนคลิก "การซื้อ"
วางเหตุการณ์ในแท็ก <script> ท้ายแท็ก <body> การวางพารามิเตอร์
เหตุการณ์โดยตรงในแท็ก <script> จะเรียกเหตุการณ์เมื่อโหลดหน้าเว็บ
ส่วนถัดไปจะอธิบายวิธีเรียกเหตุการณ์ให้แสดงเมื่อมีผู้คลิก "ซื้อ"
<!--
  Note: In the following code sample, make sure to
  replace "TAG_ID" with your tag ID.
  Learn more: https://support.google.com/tagmanager/answer/12326985
-->
<!DOCTYPE html>
<html lang="en">
<head>
    <!-- Google tag (gtag.js) -->
    <script async src="https://www.googletagmanager.com/gtag/js?id=TAG_ID"></script>
    <script>
        window.dataLayer = window.dataLayer || [];
        function gtag(){dataLayer.push(arguments);}
        gtag('js', new Date());

        gtag('config', 'TAG_ID');
    </script>
</head>
<body>
    <div>This is where the purchase form would go</div>
    <button>Submit</button>
    <script>
    gtag("event", "purchase", {
        transaction_id: "T_12345_1",
        value: 30.03,
        tax: 4.90,
        shipping: 5.99,
        currency: "USD",
        coupon: "SUMMER_SALE",
        items: [
        // If someone purchases more than one item,
        // you can add those items to the items array
         {
          item_id: "SKU_12345",
          item_name: "Stan and Friends Tee",
          affiliation: "Google Merchandise Store",
          coupon: "SUMMER_FUN",
          discount: 2.22,
          index: 0,
          item_brand: "Google",
          item_category: "Apparel",
          item_category2: "Adult",
          item_category3: "Shirts",
          item_category4: "Crew",
          item_category5: "Short sleeve",
          item_list_id: "related_products",
          item_list_name: "Related Products",
          item_variant: "green",
          location_id: "ChIJIQBpAG2ahYAR_6128GcTUEo",
          price: 10.01,
          quantity: 3
        }]
    });
    </script>
</body>
</html>
ขั้นตอนที่ 2: เชื่อมต่อเหตุการณ์กับปุ่ม
คุณสามารถตั้งค่าเหตุการณ์ purchase ให้ทริกเกอร์เมื่อมีคนคลิก
"ซื้อ" ได้หลายวิธี วิธีหนึ่งคือการเพิ่มรหัสลงใน "การซื้อ"
แล้ววางโค้ดเหตุการณ์ใน Listener เหตุการณ์ ในรายการต่อไปนี้
เช่น ระบบจะส่งเหตุการณ์เมื่อมีผู้คลิกปุ่มที่มีรหัสเท่านั้น
purchase
<!--
  Note: In the following code sample, make sure to
  replace "TAG_ID" with your tag ID.
  Learn more: https://support.google.com/tagmanager/answer/12326985
-->
<!DOCTYPE html>
<html lang="en">
<head>
    <!-- Google tag (gtag.js) -->
    <script async src="https://www.googletagmanager.com/gtag/js?id=TAG_ID"></script>
    <script>
        window.dataLayer = window.dataLayer || [];
        function gtag(){dataLayer.push(arguments);}
        gtag('js', new Date());

        gtag('config', 'TAG_ID');
    </script>
</head>
<body>
    <div>This is where the purchase form would go</div>
    <button id="purchase">Purchase</button>
    <script>
    document.getElementById("purchase").addEventListener("click", function () {
        gtag("event", "purchase", {
                // This purchase event uses a different transaction ID
                // from the previous purchase event so Analytics
                // doesn't deduplicate the events.
                // Learn more: https://support.google.com/analytics/answer/12313109
                transaction_id: "T_12345_2",
                value: 30.03,
                tax: 4.90,
                shipping: 5.99,
                currency: "USD",
                coupon: "SUMMER_SALE",
                items: [
                {
                  item_id: "SKU_12345",
                  item_name: "Stan and Friends Tee",
                  affiliation: "Google Merchandise Store",
                  coupon: "SUMMER_FUN",
                  discount: 2.22,
                  index: 0,
                  item_brand: "Google",
                  item_category: "Apparel",
                  item_category2: "Adult",
                  item_category3: "Shirts",
                  item_category4: "Crew",
                  item_category5: "Short sleeve",
                  item_list_id: "related_products",
                  item_list_name: "Related Products",
                  item_variant: "green",
                  location_id: "ChIJIQBpAG2ahYAR_6128GcTUEo",
                  price: 10.01,
                  quantity: 3
                }]
          });
      });
    </script>
</body>
</html>
ขั้นตอนที่ 3: ยืนยันว่าคุณรวบรวมข้อมูลอยู่
รายงาน DebugView จะแสดงข้อมูลแบบเรียลไทม์จากเว็บไซต์
ตรวจสอบว่าคุณตั้งค่าเหตุการณ์อย่างถูกต้อง หากต้องการเปิดใช้โหมดแก้ไขข้อบกพร่องในหน้าเว็บ ให้เพิ่ม
พารามิเตอร์ debug_mode ต่อไปนี้กับคําสั่ง config
<!--
  Note: In the following code sample, make sure to
  replace "TAG_ID" with your tag ID.
  Learn more: https://support.google.com/tagmanager/answer/12326985
-->
<!DOCTYPE html>
<html lang="en">
<head>
    <!-- Google tag (gtag.js) -->
    <script async src="https://www.googletagmanager.com/gtag/js?id=TAG_ID"></script>
    <script>
        window.dataLayer = window.dataLayer || [];
        function gtag(){dataLayer.push(arguments);}
        gtag('js', new Date());

        gtag('config', 'TAG_ID',{ 'debug_mode': true });
    </script>
</head>
<body>
    <div>This is where the purchase form would go</div>
    <button id="purchase">Purchase</button>
    <script>
    document.getElementById("purchase").addEventListener("click", function () {
        gtag("event", "purchase", {
                // This purchase event uses a different transaction ID
                // from the previous purchase event so Analytics
                // doesn't deduplicate the events.
                // Learn more: https://support.google.com/analytics/answer/12313109
                transaction_id: "T_12345_3",
                value: 30.03,
                tax: 4.90,
                shipping: 5.99,
                currency: "USD",
                coupon: "SUMMER_SALE",
                items: [
                {
                  item_id: "SKU_12345",
                  item_name: "Stan and Friends Tee",
                  affiliation: "Google Merchandise Store",
                  coupon: "SUMMER_FUN",
                  discount: 2.22,
                  index: 0,
                  item_brand: "Google",
                  item_category: "Apparel",
                  item_category2: "Adult",
                  item_category3: "Shirts",
                  item_category4: "Crew",
                  item_category5: "Short sleeve",
                  item_list_id: "related_products",
                  item_list_name: "Related Products",
                  item_variant: "green",
                  location_id: "ChIJIQBpAG2ahYAR_6128GcTUEo",
                  price: 10.01,
                  quantity: 3
                }]
        });
    });
    </script>
</body>
</html>
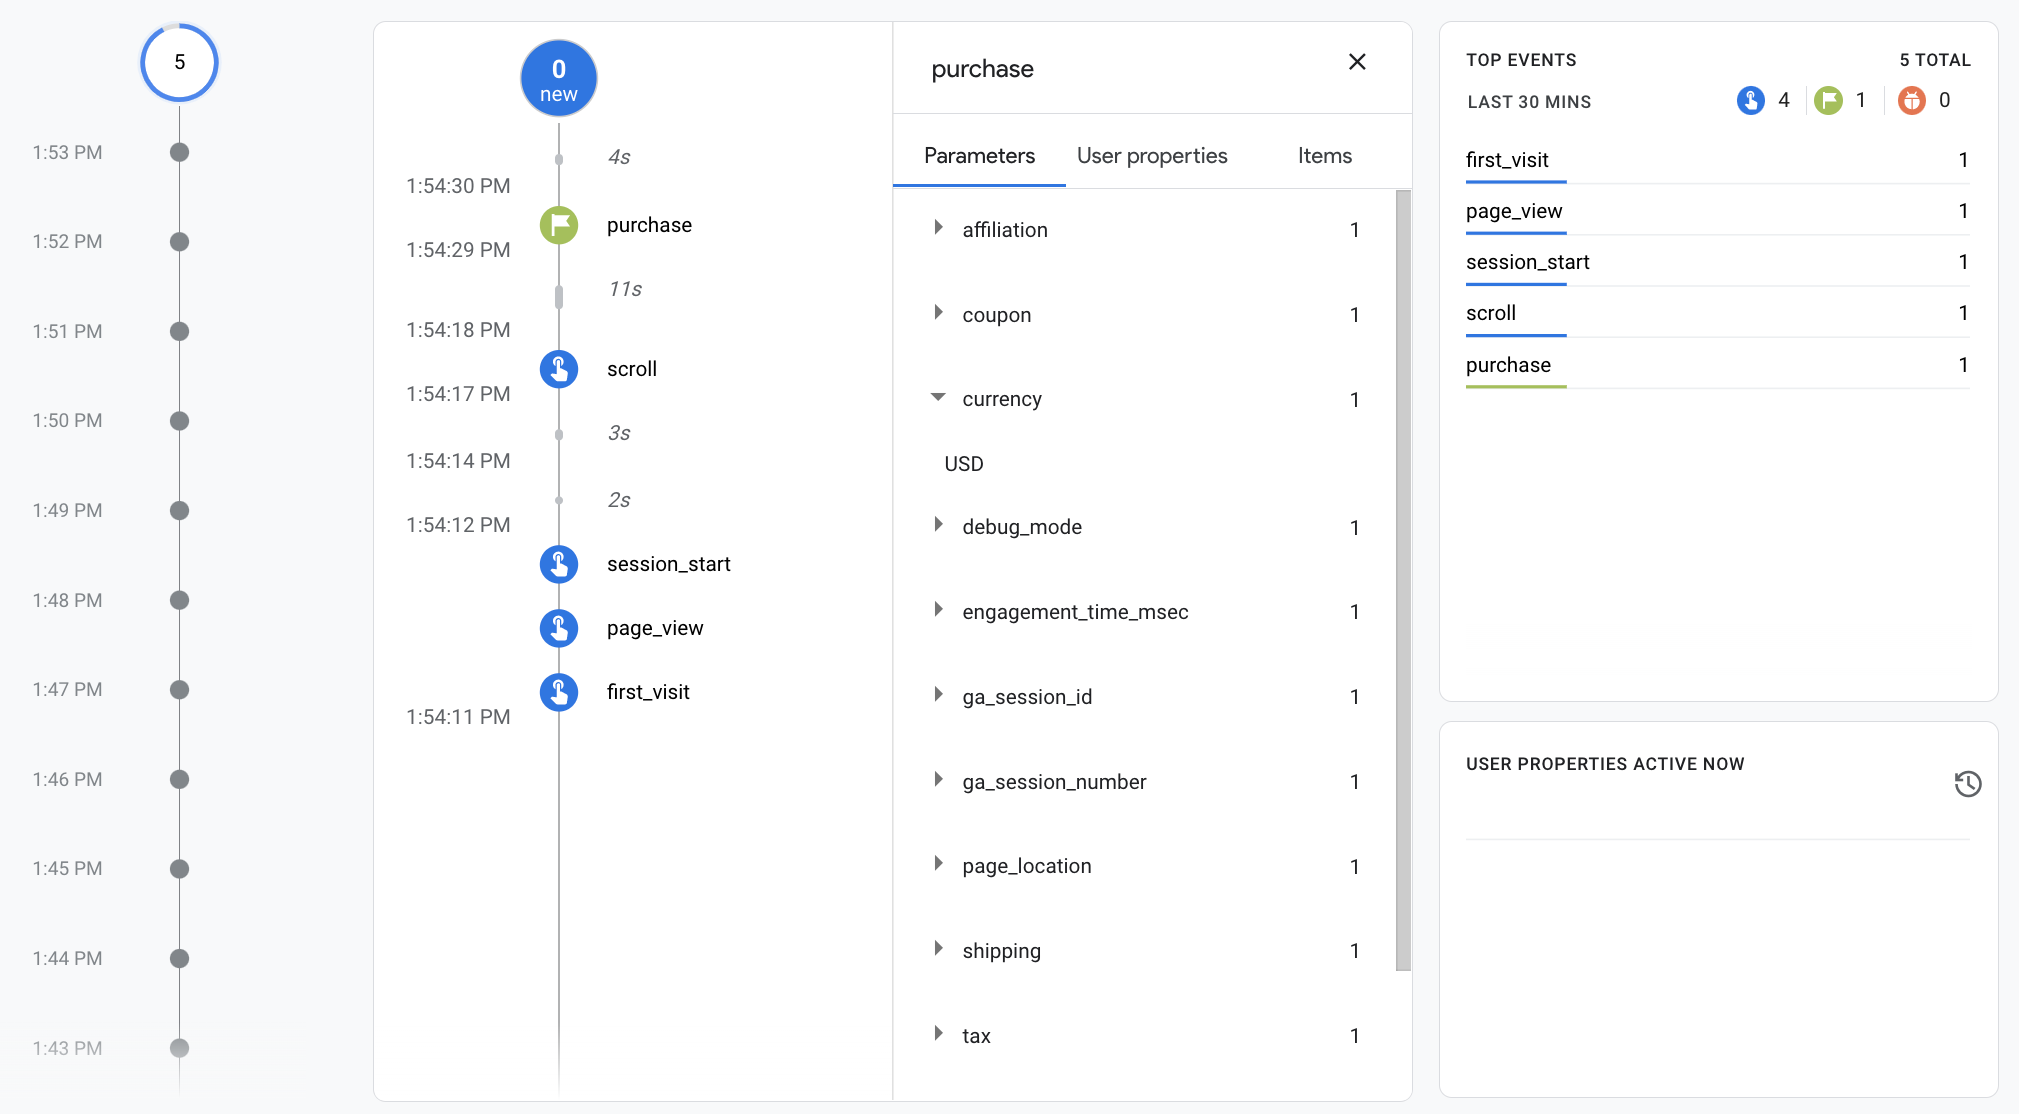
เมื่อเปิดใช้โหมดแก้ไขข้อบกพร่อง คุณจะเริ่มเห็นเหตุการณ์ป้อนข้อมูล DebugView เมื่อมีผู้ใช้งานเว็บไซต์ ตัวอย่างเช่น การคลิก "ซื้อ" ในเว็บไซต์ของคุณจะสร้างรายงานด้วยข้อมูลต่อไปนี้ คุณเลือกเหตุการณ์เพื่อดูพารามิเตอร์ พร็อพเพอร์ตี้ผู้ใช้ และรายการได้ ที่เชื่อมโยงกับเหตุการณ์ดังกล่าว
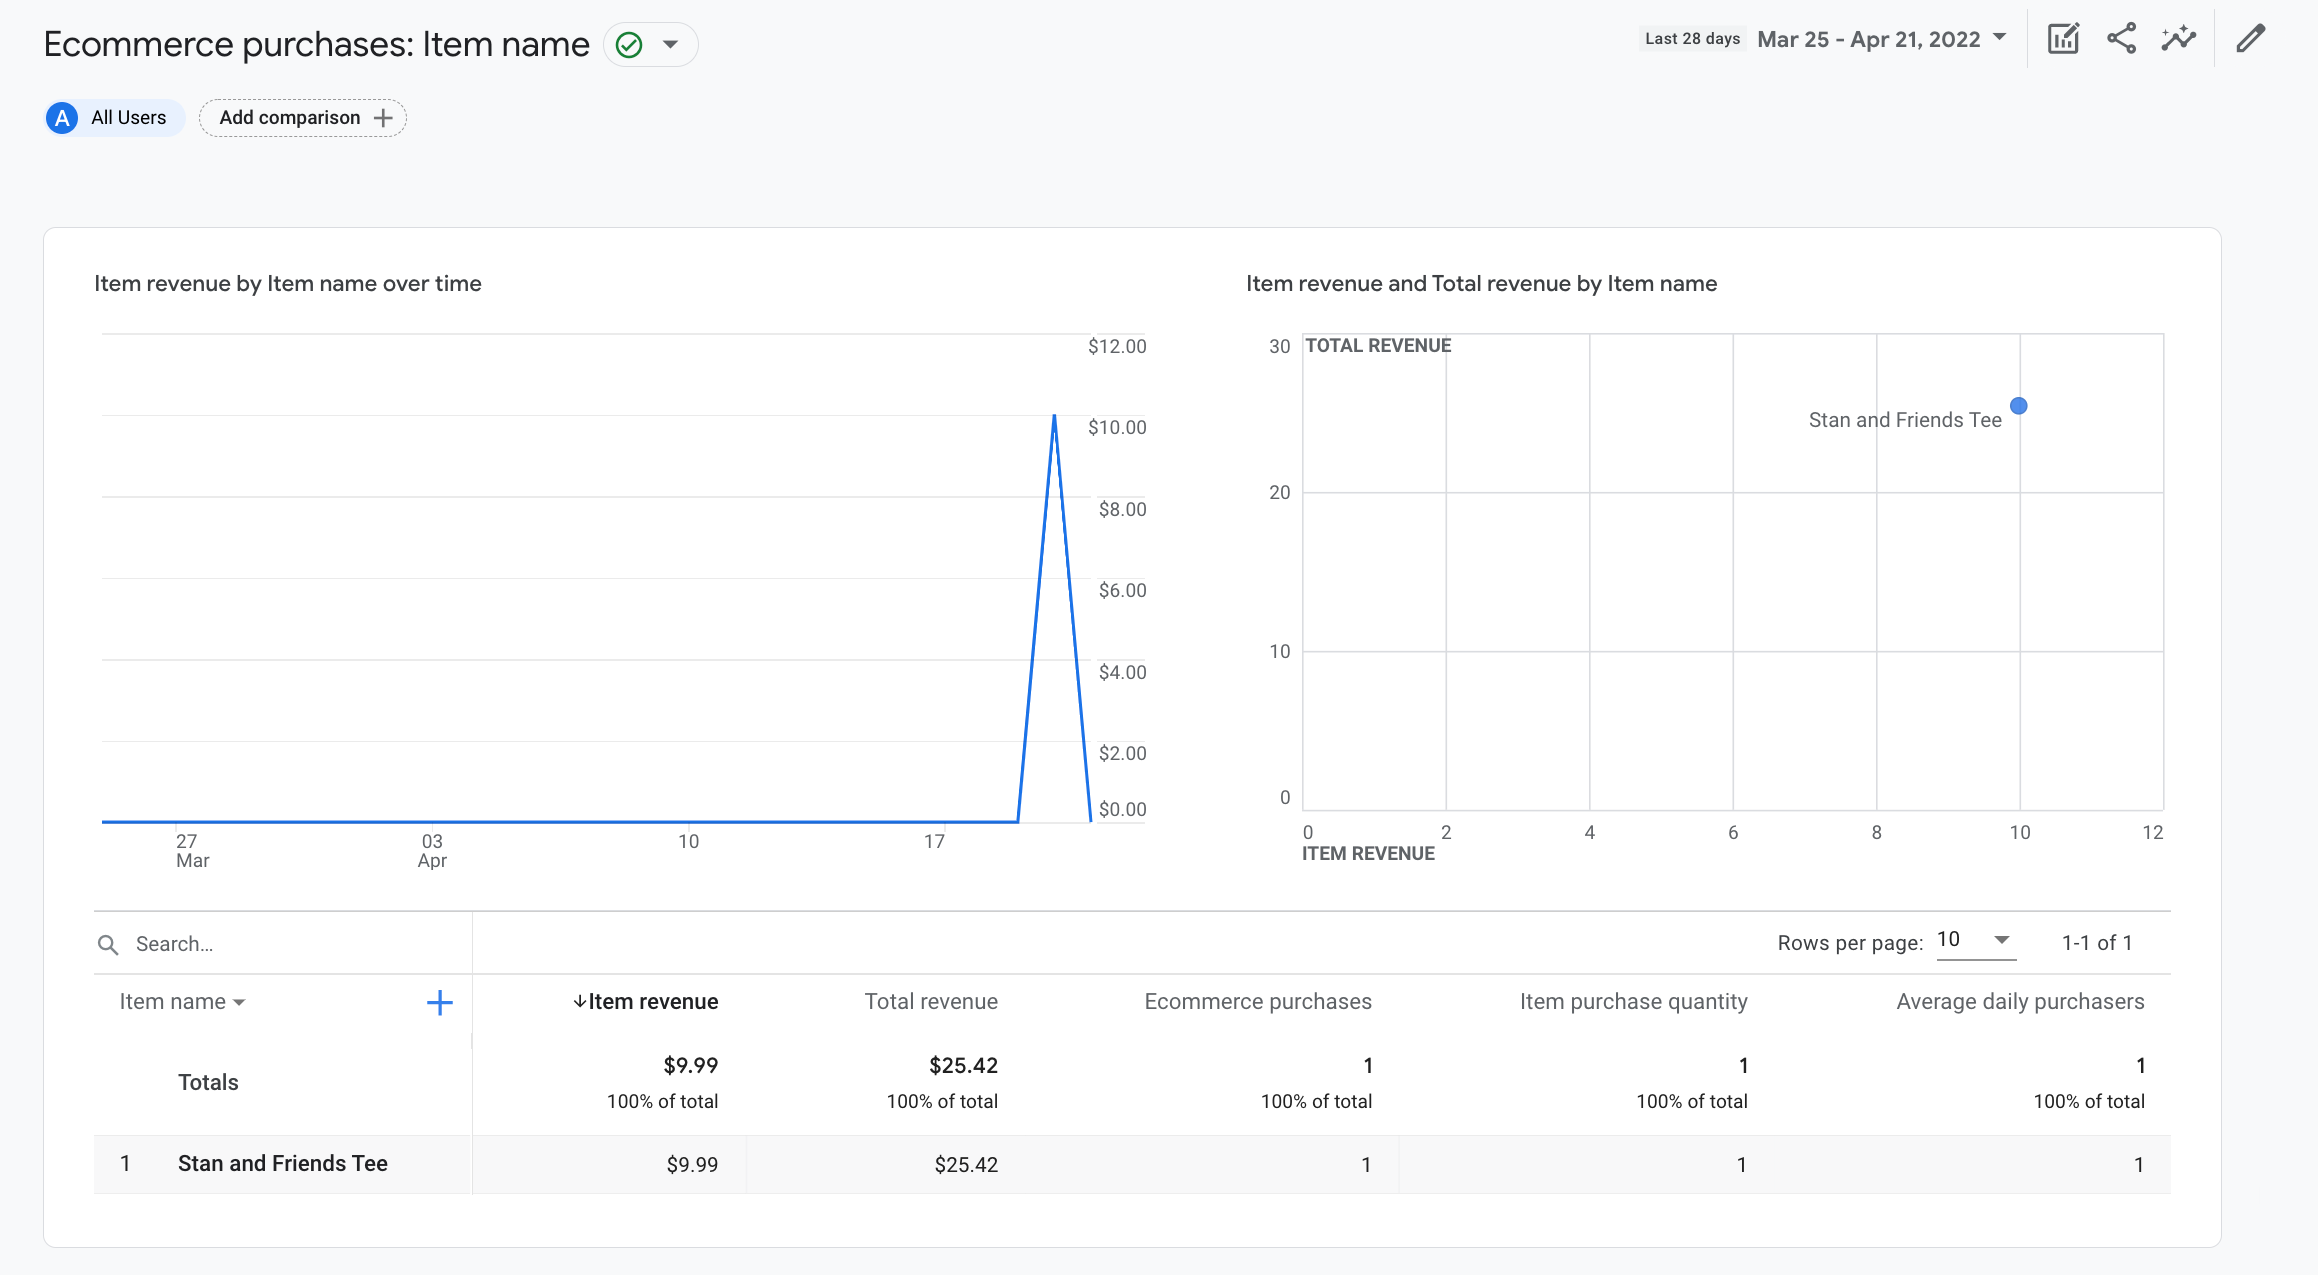
ขั้นตอนที่ 4: ดูข้อมูลอีคอมเมิร์ซ
หลังจากผ่านไปประมาณ 24 ชั่วโมง ข้อมูลที่คุณส่งพร้อมกับเหตุการณ์ purchase จะเปลี่ยนไป
ที่อยู่ในรายงาน การสํารวจ และ Data API ของ Google Analytics
นอกจากนี้ คุณยังเข้าถึงข้อมูลใน BigQuery เมื่อตั้งค่า BigQuery Export ได้ด้วย
"การซื้อ" เหตุการณ์จะสร้างมิติข้อมูลต่างๆ ที่สร้างไว้ล่วงหน้าโดยอัตโนมัติ
และเมตริก ซึ่งใช้ในรายงานและการสํารวจ
ต่อไปนี้คือมิติข้อมูลบางส่วนที่สร้างจากข้อมูลจาก
purchase ในขั้นตอนแรก:
| พารามิเตอร์ | มิติข้อมูล | ค่า |
|---|---|---|
affiliation |
แอฟฟิลิเอตสินค้า | Google Merchandise Store |
currency |
สกุลเงิน | USD |
discount |
จํานวนส่วนลดสินค้า | 2.22 |
index |
ตำแหน่งรายการสินค้า | 0 |
item_brand |
แบรนด์สินค้า | |
item_category |
หมวดหมู่สินค้า | เครื่องแต่งกาย |
item_id |
รหัสรายการ | SKU_12345 |
item_list_id |
รหัสรายการสินค้า | related_products |
item_list_name |
ชื่อรายการสินค้า | ผลิตภัณฑ์ที่เกี่ยวข้อง |
item_name |
ชื่อรายการ | เสื้อยืด Stan and Friends |
item_variant |
ผลิตภัณฑ์ย่อย | green |
location_id |
รหัสสถานที่ตั้งสินค้า | ChIJIQBpAG2ahYAR_6128GcTUEo (รหัส Google Place สำหรับซานฟรานซิสโก) |
shipping |
ค่าจัดส่ง | 5.99 |
tax |
จำนวนภาษี | 4.90 |
transaction_id |
รหัสธุรกรรม | T_12345 |
นอกจากมิติข้อมูลแล้ว Google Analytics ยังป้อนข้อมูลอีคอมเมิร์ซ และเมตริกที่เกี่ยวกับรายได้ ตัวอย่างเช่น หากผู้ใช้คลิกปุ่ม "ซื้อ" ปุ่ม จะมีการป้อนข้อมูลเมตริกต่อไปนี้ใน Google Analytics
- เมตริกรายได้จากสินค้ามีมูลค่า $30.03
- เมตริกรายได้ทั้งหมดมีมูลค่า $30.03
- เมตริกการซื้อผ่านอีคอมเมิร์ซมีค่าเป็น 1
คุณสามารถใช้มิติข้อมูลและเมตริกเหล่านี้เพื่อสร้างการสํารวจและ ของคุณ แต่คุณยังสามารถใช้การซื้อผ่านอีคอมเมิร์ซที่สร้างไว้ล่วงหน้าต่อไปนี้ รายงาน เพื่อดูข้อมูลอีคอมเมิร์ซของคุณ: