设置日期和时间格式
使用集合让一切井井有条
根据您的偏好保存内容并对其进行分类。
本页介绍了如何在 Google 问题跟踪器中设置日期和时间格式。
如需设置日期和时间格式,请执行以下操作:
在网络浏览器中打开问题跟踪器。
点击“问题跟踪器”右上角的齿轮图标。

选择设置。
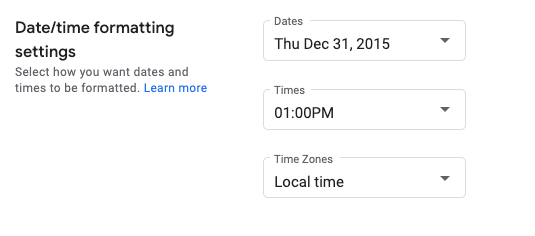
在“设置”叠加层的日期/时间格式设置部分,使用下拉菜单选择您的偏好设置。
使用日期下拉菜单设置日期的显示方式。
使用时间下拉菜单设置时间的显示方式。
使用时区下拉菜单设置所用时区。

后续步骤
保留所有权利。Java 是 Oracle 和/或其关联公司的注册商标。
最后更新时间 (UTC):2025-07-25。
[null,null,["最后更新时间 (UTC):2025-07-25。"],[[["\u003cp\u003eThis page provides instructions on customizing date and time formats within Google Issue Tracker.\u003c/p\u003e\n"],["\u003cp\u003eUsers can adjust date, time, and time zone displays according to their preferences through the Issue Tracker settings.\u003c/p\u003e\n"],["\u003cp\u003eAccessing these settings involves navigating to the gear icon, selecting "Settings," and modifying the options within the "Date/time formatting settings" section.\u003c/p\u003e\n"]]],[],null,["# Set Date and Time Formats\n\nThis page shows how to set date and time formats in Google Issue Tracker.\n\nSet date and time formats\n-------------------------\n\nTo set date and time formats:\n\n1. [Open Issue Tracker](../guides/access-ui) in your web browser.\n\n2. Click the gear icon in the upper right corner of Issue Tracker.\n\n3. Select **Settings**.\n\n4. In the **Date/time formatting settings** section of the Settings overlay,\n use the drop-downs to select your preferences.\n\n 1. Use the **Dates** drop-down to set how dates appear.\n\n 2. Use the **Times** drop-down to set how times appear.\n\n 3. Use the **Time Zones** drop-down to set the time zone used.\n\nWhat's next\n-----------\n\n- [Learn more about Issue Tracker settings](../concepts/settings)."]]