日付と時刻の形式を設定する
コレクションでコンテンツを整理
必要に応じて、コンテンツの保存と分類を行います。
このページでは、Google Issue Tracker で日付と時刻の形式を設定する方法について説明します。
日付と時刻の形式を設定するには:
ウェブブラウザで 公開バグトラッカーを開く。
問題トラッカーの右上にある歯車アイコンをクリックします。

[設定] を選択します。
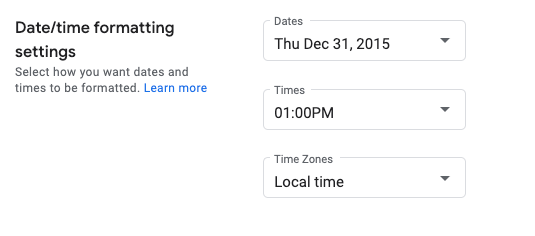
設定オーバーレイの [日時形式の設定] セクションで、プルダウンを使用して設定を選択します。
[日付] プルダウンを使用して、日付の表示方法を設定します。
[時刻] プルダウンを使用して、時刻の表示方法を設定します。
[タイムゾーン] プルダウンを使用して、使用するタイムゾーンを設定します。
次のステップ
All rights reserved. Java は Oracle および関連会社の登録商標です。
最終更新日 2025-07-25 UTC。
[null,null,["最終更新日 2025-07-25 UTC。"],[[["\u003cp\u003eThis page provides instructions on customizing date and time formats within Google Issue Tracker.\u003c/p\u003e\n"],["\u003cp\u003eUsers can adjust date, time, and time zone displays according to their preferences through the Issue Tracker settings.\u003c/p\u003e\n"],["\u003cp\u003eAccessing these settings involves navigating to the gear icon, selecting "Settings," and modifying the options within the "Date/time formatting settings" section.\u003c/p\u003e\n"]]],[],null,["# Set Date and Time Formats\n\nThis page shows how to set date and time formats in Google Issue Tracker.\n\nSet date and time formats\n-------------------------\n\nTo set date and time formats:\n\n1. [Open Issue Tracker](../guides/access-ui) in your web browser.\n\n2. Click the gear icon in the upper right corner of Issue Tracker.\n\n3. Select **Settings**.\n\n4. In the **Date/time formatting settings** section of the Settings overlay,\n use the drop-downs to select your preferences.\n\n 1. Use the **Dates** drop-down to set how dates appear.\n\n 2. Use the **Times** drop-down to set how times appear.\n\n 3. Use the **Time Zones** drop-down to set the time zone used.\n\nWhat's next\n-----------\n\n- [Learn more about Issue Tracker settings](../concepts/settings)."]]