ตั้งค่ารูปแบบวันที่และเวลา
จัดทุกอย่างให้เป็นระเบียบอยู่เสมอด้วยคอลเล็กชัน
บันทึกและจัดหมวดหมู่เนื้อหาตามค่ากำหนดของคุณ
หน้านี้จะแสดงวิธีตั้งค่ารูปแบบวันที่และเวลาในเครื่องมือติดตามปัญหาของ Google
วิธีตั้งค่ารูปแบบวันที่และเวลา
เปิดเครื่องมือติดตามปัญหาในเว็บเบราว์เซอร์
คลิกไอคอนรูปเฟืองที่มุมขวาบนของเครื่องมือติดตามปัญหา

เลือกการตั้งค่า
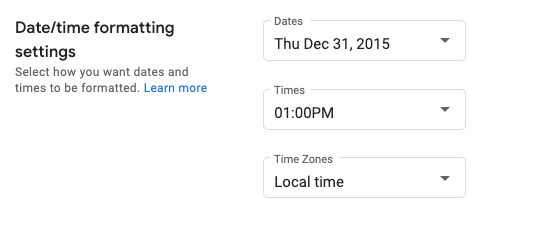
ในส่วนการตั้งค่าการจัดรูปแบบวันที่/เวลาของการวางซ้อนการตั้งค่า ให้ใช้เมนูแบบเลื่อนลงเพื่อเลือกค่ากำหนด
ใช้เมนูแบบเลื่อนลงวันที่เพื่อตั้งค่าลักษณะที่วันที่จะปรากฏ
ใช้เมนูแบบเลื่อนลงเวลาเพื่อตั้งค่าลักษณะที่เวลาจะปรากฏ
ใช้เมนูแบบเลื่อนลงเขตเวลาเพื่อตั้งค่าเขตเวลาที่ใช้

ขั้นตอนถัดไป
สงวนลิขสิทธิ์ Java เป็นเครื่องหมายการค้าจดทะเบียนของ Oracle และ/หรือบริษัทในเครือ
อัปเดตล่าสุด 2025-07-25 UTC
[null,null,["อัปเดตล่าสุด 2025-07-25 UTC"],[[["\u003cp\u003eThis page provides instructions on customizing date and time formats within Google Issue Tracker.\u003c/p\u003e\n"],["\u003cp\u003eUsers can adjust date, time, and time zone displays according to their preferences through the Issue Tracker settings.\u003c/p\u003e\n"],["\u003cp\u003eAccessing these settings involves navigating to the gear icon, selecting "Settings," and modifying the options within the "Date/time formatting settings" section.\u003c/p\u003e\n"]]],[],null,["# Set Date and Time Formats\n\nThis page shows how to set date and time formats in Google Issue Tracker.\n\nSet date and time formats\n-------------------------\n\nTo set date and time formats:\n\n1. [Open Issue Tracker](../guides/access-ui) in your web browser.\n\n2. Click the gear icon in the upper right corner of Issue Tracker.\n\n3. Select **Settings**.\n\n4. In the **Date/time formatting settings** section of the Settings overlay,\n use the drop-downs to select your preferences.\n\n 1. Use the **Dates** drop-down to set how dates appear.\n\n 2. Use the **Times** drop-down to set how times appear.\n\n 3. Use the **Time Zones** drop-down to set the time zone used.\n\nWhat's next\n-----------\n\n- [Learn more about Issue Tracker settings](../concepts/settings)."]]