設定日期和時間格式
透過集合功能整理內容
你可以依據偏好儲存及分類內容。
本頁面說明如何在 Google Issue Tracker 中設定日期和時間格式。
如要設定日期和時間格式,請按照下列步驟操作:
在網路瀏覽器中開啟問題追蹤器。
按一下「Issue Tracker」右上角的齒輪圖示。

選取 [設定]。
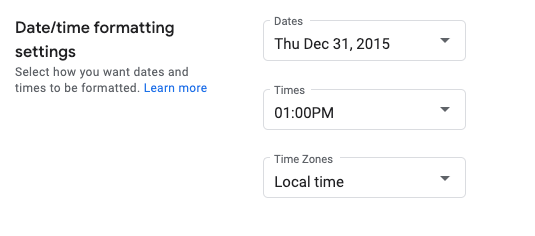
在「設定」重疊視窗的「日期/時間格式設定」部分,使用下拉式選單選取偏好設定。
使用「日期」下拉式選單,設定日期的顯示方式。
使用「Times」下拉式選單,設定時間顯示方式。
使用「時區」下拉式選單設定所使用的時區。

後續步驟
保留所有權利。Java 是 Oracle 和/或其關聯企業的註冊商標。
上次更新時間:2025-07-25 (世界標準時間)。
[null,null,["上次更新時間:2025-07-25 (世界標準時間)。"],[[["\u003cp\u003eThis page provides instructions on customizing date and time formats within Google Issue Tracker.\u003c/p\u003e\n"],["\u003cp\u003eUsers can adjust date, time, and time zone displays according to their preferences through the Issue Tracker settings.\u003c/p\u003e\n"],["\u003cp\u003eAccessing these settings involves navigating to the gear icon, selecting "Settings," and modifying the options within the "Date/time formatting settings" section.\u003c/p\u003e\n"]]],[],null,["# Set Date and Time Formats\n\nThis page shows how to set date and time formats in Google Issue Tracker.\n\nSet date and time formats\n-------------------------\n\nTo set date and time formats:\n\n1. [Open Issue Tracker](../guides/access-ui) in your web browser.\n\n2. Click the gear icon in the upper right corner of Issue Tracker.\n\n3. Select **Settings**.\n\n4. In the **Date/time formatting settings** section of the Settings overlay,\n use the drop-downs to select your preferences.\n\n 1. Use the **Dates** drop-down to set how dates appear.\n\n 2. Use the **Times** drop-down to set how times appear.\n\n 3. Use the **Time Zones** drop-down to set the time zone used.\n\nWhat's next\n-----------\n\n- [Learn more about Issue Tracker settings](../concepts/settings)."]]