
啟用帳單功能並建立 API 金鑰後,請設定要用來開發應用程式的 Xcode 專案。
每次發布版本都會提供版本資訊。
步驟 1:安裝必要軟體
如要使用 Maps SDK for iOS 建立專案,請下載並安裝:
- Xcode 26.0 以上版本
步驟 2:建立 Xcode 專案並安裝 Maps SDK for iOS
SDK 安裝大小會有所不同。舉例來說,Maps SDK for iOS 9.0 版的安裝大小約為 18 MB。
Swift Package Manager
您可以透過 Swift Package Manager 安裝 Maps SDK for iOS。如要新增 SDK,請務必先移除所有現有的 Maps SDK for iOS 依附元件。
如要在新專案或現有專案中新增 SDK,請按照下列步驟操作:
-
開啟 Xcode
project或workspace,然後依序前往「File」>「Add Package Dependencies」。 - 輸入 https://github.com/googlemaps/ios-maps-sdk 做為網址,按 Enter 鍵 提取套件,然後按一下「Add Package」(新增套件)。
-
如要安裝特定
version,請將「依附元件規則」欄位設為其中一個版本選項。新專案建議指定最新版本,並使用「Exact Version」選項。完成後,按一下「新增套裝組合」。
如要更新現有專案的 package,請按照下列步驟操作:
如果從 9.0.0 之前的版本升級,升級後必須移除下列依附元件:
GoogleMapsBase、GoogleMapsCore和GoogleMapsM4B。請勿移除GoogleMaps的依附元件。詳情請參閱「9.0.0 版版本資訊」。在 Xcode 專案設定中,找出「Frameworks, Libraries, and Embedded Content」。使用減號(-) 移除下列框架:
GoogleMapsBase(僅適用於從 9.0.0 以下版本升級)GoogleMapsCore(僅適用於從 9.0.0 以下版本升級)GoogleMapsM4B(僅適用於從 9.0.0 以下版本升級)
- 在 Xcode 中,依序前往「File」>「Packages」>「Update To Latest Package Versions」。
- 如要驗證安裝作業,請前往「Project Navigator」的「Package Dependencies」部分,驗證套件及其版本。
如要移除使用 CocoaPods 新增的現有 Maps SDK for iOS 依附元件,請按照下列步驟操作:
- 關閉 Xcode 工作區。開啟終端機並執行下列指令:
sudo gem install cocoapods-deintegrate cocoapods-clean
pod deintegrate
pod cache clean --all
-
如果
Podfile、Podfile.resolved和 Xcodeworkspace除了 CocoaPods 以外沒有其他用途,請移除這些項目。
-
在 Xcode 專案設定中,找出「Frameworks, Libraries, and Embedded Content」。使用減號 (-) 移除下列架構:
GoogleMapsGoogleMapsBase(僅適用於 9.2.0 之前的版本)GoogleMapsCore(僅適用於 9.2.0 以下版本)GoogleMapsM4B(僅適用於 9.0.0 以下版本)
-
從 Xcode 專案的頂層目錄中,移除
GoogleMaps套件。
手動安裝
本指南說明如何將包含 Maps SDK for iOS 的 XCFrameworks 手動新增至專案,並在 Xcode 中設定建構設定。XCFramework 是二進位檔套件,可在多個平台使用,包括使用 Apple 晶片的機器。
- 下載下列 SDK 二進位檔和資源檔:
- 解壓縮檔案,存取 XCFrameworks 和資源。
- 如果您還沒有 Xcode 專案,請立即建立一個並儲存至本機電腦 如果您是 iOS 開發新手:
- 建立新專案。
- 選取「iOS」>「App」範本。
- 在專案選項畫面中:
- 輸入專案名稱。
- 記下「軟體包 ID」欄位的值。您可以使用該值限制下方的 API 金鑰。
- 將專案「介面」設為「分鏡腳本」。
- 將「Language」(語言) 設為「Swift」或「Objective-C」。
-
開啟「一般」分頁標籤。將下列 XCFrameworks 拖曳至專案的「Frameworks, Libraries, and Embedded Content」下方。請務必選取「不要內嵌」:
GoogleMaps.xcframework
-
將下載的 GoogleMapsResources 中的
GoogleMaps.bundle複製到 Xcode 專案的頂層目錄。系統顯示提示時,請務必選取「Copy items into destination group's folder」。 - 從「Project Navigator」中選取您的專案,然後為您的應用程式選擇目標。
-
開啟應用程式目標的「Build Phases」分頁。
在「Link Binary with Libraries」內,新增下列架構和程式庫:
Accelerate.frameworkContacts.frameworkCoreData.frameworkCoreGraphics.frameworkCoreImage.frameworkCoreLocation.frameworkCoreTelephony.frameworkCoreText.frameworkGLKit.frameworkImageIO.frameworklibc++.tbdlibz.tbdMetal.frameworkMetricKit.frameworkOpenGLES.framework(僅限使用 OpenGL 時)QuartzCore.frameworkSecurity.frameworkSystemConfiguration.frameworkUIKit.framework
-
選擇您的專案 (而不是特定目標),然後開啟「Build Settings」分頁標籤。在「Linking - General -> Other Linker Flags」部分中,將
-ObjC新增至「Debug」和「Release」。如果沒有看到這些設定,請將「Build Settings」列中的篩選器從「Basic」變更為「All」。 -
如要安裝 Places SDK for iOS XCFramework,請參閱「開始使用 Places SDK for iOS」一文。
CocoaPods
Maps SDK for iOS 以 CocoaPods Pod 的形式提供。CocoaPods 是一種適用於 Swift 和 Objective-C Cocoa 專案的開放原始碼依附元件管理員。
如果您還沒有 CocoaPods 工具,請在終端機上執行下列指令,即可在 macOS 中安裝這項工具。詳情請參閱 CocoaPods 入門指南。
sudo gem install cocoapods
為 Maps SDK for iOS 建立 Podfile,並使用該檔案安裝 API 及其依附元件:
- 如果您還沒有 Xcode 專案,請立即建立一個並儲存至本機電腦 如果您是 iOS 開發新手:
- 建立新專案。
- 選取「iOS」>「App」範本。
- 在專案選項畫面中:
- 輸入專案名稱。
- 記下「軟體包 ID」欄位的值。您可以使用該值限制下方的 API 金鑰。
- 將專案「介面」設為「分鏡腳本」。
- 將「Language」(語言) 設為「Swift」或「Objective-C」。
- 在專案目錄中建立名為
Podfile的檔案。這個檔案定義了專案的依附元件。 - 編輯
Podfile並新增依附元件及其版本。以下範例包含 Maps SDK for iOS 所需的依附元件:source 'https://github.com/CocoaPods/Specs.git' platform :ios, '16.0' target 'YOUR_APPLICATION_TARGET_NAME_HERE' do pod 'GoogleMaps', '10.15.0' end
pod outdated,偵測是否有新版本,確保您一律使用最新版本。如有必要,請升級至最新版本。 - 儲存
Podfile。 開啟終端機並前往包含
Podfile的目錄:cd <path-to-project>
執行
pod install指令。此動作會安裝Podfile中指定的 API 及其所有依附元件。pod install
關閉 Xcode,接著按兩下來開啟專案的
.xcworkspace檔案來啟動 Xcode。從現在起,請使用.xcworkspace檔案開啟專案。
如要更新現有專案的 API,請按照下列步驟操作:
- 開啟終端機,然後前往包含
Podfile的專案目錄。 - 執行
pod update指令。這會將Podfile中指定的所有 API 更新至最新版本。
步驟 3:將 API 金鑰加進專案
您先前已按照「取得 API 金鑰」的說明,為應用程式產生了 API 金鑰,現在請將金鑰加進 Xcode 專案。
請將以下範例中的 YOUR_API_KEY 替換成您的 API 金鑰。
Swift
將 API 金鑰新增到您的 AppDelegate.swift 中,如下所示:
- 新增下列匯入陳述式:
import GoogleMaps
- 將以下內容新增到您的
application(_:didFinishLaunchingWithOptions:)方法中,並使用您的 API 金鑰:GMSServices.provideAPIKey("YOUR_API_KEY")
- 如果您也使用 Places API,請再次新增金鑰,如下所示:
GMSPlacesClient.provideAPIKey("YOUR_API_KEY")
Objective-C
將 API 金鑰新增到您的 AppDelegate.m 中,如下所示:
- 新增下列匯入陳述式:
@import GoogleMaps;
- 將以下內容新增到您的
application:didFinishLaunchingWithOptions:方法中,並使用您的 API 金鑰:[GMSServices provideAPIKey:@"YOUR_API_KEY"];
- 如果您也使用 Places API,請再次新增金鑰,如下所示:
[GMSPlacesClient provideAPIKey:@"YOUR_API_KEY"];
步驟 4 (選用):檢查 Apple 隱私權資訊清單檔案
Apple 規定,App Store 上的應用程式必須提供應用程式隱私權詳細資料。如需最新消息和詳細資訊,請前往 Apple App Store 隱私權詳細資料頁面。
Apple 隱私權資訊清單檔案會納入 SDK 的資源套件。如要確認隱私權資訊清單檔案已納入,並檢查檔案內容,請建立應用程式的封存檔,然後從封存檔產生隱私權報告。
步驟 5 (選用):宣告 API 使用的網址架構
從 iOS 9 和 Xcode 7 開始,應用程式會透過在應用程式的 Info.plist 檔案中指定架構,宣告要開啟的網址架構。使用者點選地圖上的 Google 標誌時,iOS 版 Maps SDK 會開啟 Google 地圖行動應用程式,因此您的應用程式可以宣告相關的網址架構。
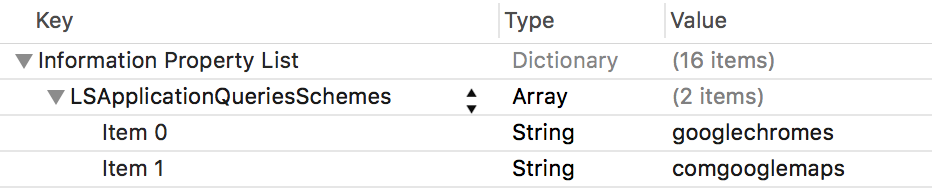
如要宣告 Maps SDK for iOS 使用的網址架構,請在 Info.plist 中加入下列程式碼:
 <key>LSApplicationQueriesSchemes</key>
 <array>
        <string>googlechromes</string>
        <string>comgooglemaps</string>
    </array>
下圖顯示 Xcode 使用者介面中的設定:
如果沒有上述宣告,使用者輕觸地圖上的 Google 標誌時,可能會發生下列錯誤:
-canOpenURL: failed for URL: "comgooglemaps://" - error: "This app is not
allowed to query for scheme comgooglemaps"
-canOpenURL: failed for URL: "googlechromes://" - error: "This app is not allowed to query for scheme googlechromes"
如要消除這些錯誤,請在 Info.plist 中新增聲明。
後續步驟
您已取得 API 金鑰並設定 Xcode 專案,接下來可以建立並執行應用程式。Navigation SDK for iOS 提供許多教學課程和範例應用程式,協助您踏出第一步。相關詳情請參閱:
- 加入含有標記的地圖。
- 選取「在地圖上選取目前位置並顯示相關詳細資料」。
- 反向地理編碼。
- 查看可用的程式碼範例和程式碼研究室。
- 如需端對端解決方案,請查看可用的 Google 地圖解決方案。