
ویژگیهای مبتنی بر WebGL برای API جاوا اسکریپت نقشهها به شما امکان کنترل شیب و چرخش، اضافه کردن اشیاء سهبعدی مستقیماً به نقشه و موارد دیگر را میدهد. ویژگیهای زیر گنجانده شده است:
- نمای پوششی وبجیال به شما امکان میدهد گرافیکهای دوبعدی و سهبعدی سفارشی و محتوای متحرک را به نقشههای خود اضافه کنید.
- اکنون میتوان شیب و جهت را به صورت برنامهنویسی شده و با استفاده از حرکات ماوس و صفحهکلید تنظیم کرد.
- تابع map.moveCamera() به شما امکان میدهد تا بهطور همزمان ویژگیهای چندین دوربین را تغییر دهید.
- زوم اکنون از مقادیر کسری پشتیبانی میکند.
شروع کنید
برای استفاده از ویژگیهای جدید WebGL، باید از یک نقشه برداری (vector map) استفاده کنید. این بخش نحوهی انجام این کار را به شما نشان میدهد.
گزینه renderingType مشخص کنید
از گزینه renderingType برای مشخص کردن نوع رندر رستری یا برداری برای نقشه خود استفاده کنید (نیازی به شناسه نقشه نیست):
کتابخانه
RenderingTypeبارگذاری کنید؛ این کار را میتوان هنگام بارگذاری کتابخانه Maps انجام داد:const { Map, RenderingType } = await google.maps.importLibrary("maps") as google.maps.MapsLibrary;هنگام مقداردهی اولیه نقشه، از گزینه
renderingTypeبرای تعیینRenderingType.VECTORیاRenderingType.RASTERاستفاده کنید:map = new Map( document.getElementById('map') as HTMLElement, { zoom: 4, center: position, renderingType: RenderingType.VECTOR, } );
گزینه renderingType هرگونه تنظیمات نوع رندر انجام شده با پیکربندی شناسه نقشه را لغو میکند.
- برای فعال کردن کج کردن و چرخش، گزینه
tiltInteractionEnabledmap را روی true تنظیم کنید یاmap.setTiltInteractionEnabledرا فراخوانی کنید. - برای فعال کردن قابلیت panning، گزینه نقشه
headingInteractionEnabledرا رویtrueتنظیم کنید یاmap.setHeadingInteractionEnabledرا فراخوانی کنید.
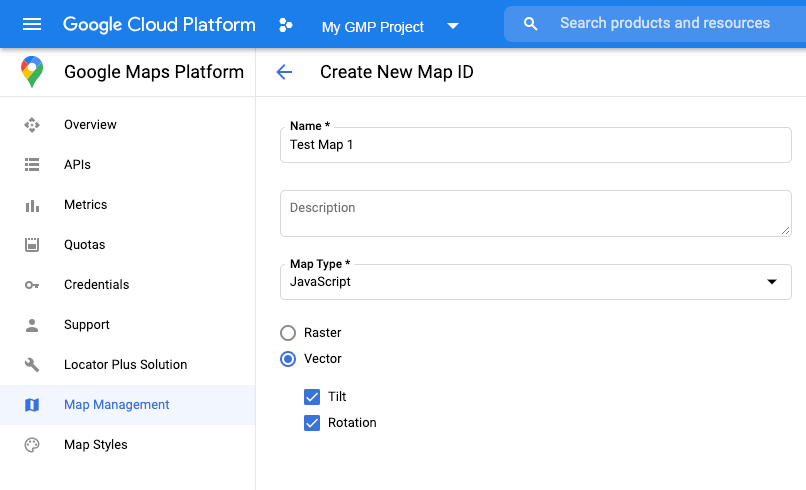
برای تنظیم نوع رندر از شناسه نقشه استفاده کنید
همچنین میتوانید نوع رندر را با استفاده از شناسه نقشه مشخص کنید. برای ایجاد یک شناسه نقشه جدید، مراحل موجود در «استفاده از سبکدهی نقشه مبتنی بر ابر - دریافت شناسه نقشه» را دنبال کنید. حتماً نوع نقشه را روی جاوا اسکریپت تنظیم کنید و گزینه برداری را انتخاب کنید. برای فعال کردن شیب و چرخش روی نقشه، گزینه Tilt یا Rotation را علامت بزنید. انجام این کار به شما امکان میدهد این مقادیر را به صورت برنامهنویسی تنظیم کنید و همچنین به کاربران اجازه میدهد شیب و جهت را مستقیماً روی نقشه تنظیم کنند. اگر استفاده از شیب یا جهت تأثیر منفی بر برنامه شما میگذارد، تیک گزینه Tilt و Rotation را بردارید تا کاربران نتوانند شیب و چرخش را تنظیم کنند.
در مرحله بعد، کد مقداردهی اولیه نقشه خود را با شناسه نقشهای که ایجاد کردهاید، بهروزرسانی کنید. میتوانید شناسههای نقشه خود را در صفحه مدیریت نقشهها پیدا کنید. هنگام نمونهسازی نقشه با استفاده از ویژگی mapId ، همانطور که در اینجا نشان داده شده است، یک شناسه نقشه ارائه دهید:
map = new google.maps.Map(document.getElementById('map'), {
  center: {lat: -34.397, lng: 150.644},
  zoom: 8,
  mapId: 'MAP_ID'
});
از عنصر <gmp-map> استفاده کنید
نقشههای برداری، شیب و عنوان به طور پیشفرض هنگام استفاده از عنصر <gmp-map> فعال هستند که به شما امکان میدهد با استفاده از HTML نقشهای به صفحه خود اضافه کنید. اطلاعات بیشتر .
مثالها
برای نشان دادن این ویژگیها، مثالهایی ارائه شده است: