reviewsהשקת Places UI Kit: ספריית רכיבים מוכנה לשימוש בעלות נמוכה, שמאפשרת לכם להוסיף לכל מפה שתבחרו את ממשק המשתמש המוכר של 'מקומות' במפות Google. כדאי לנסות אותו ולשלוח לנו משוב כדי לעזור לנו לעצב את העתיד של GMP.
קל לארגן דפים בעזרת אוספים
אפשר לשמור ולסווג תוכן על סמך ההעדפות שלך.
תכונות שמבוססות על WebGL בממשק API של JavaScript במפות Google מאפשרות לכם לשלוט בהטיה ובסיבוב, להוסיף אובייקטים תלת-ממדיים ישירות למפה ועוד. התכונות הבאות כלולות:
שכבת על מבוססת-WebGL מאפשרת להוסיף למפות גרפיקה דו-ממדית ותלת-ממדית בהתאמה אישית ותוכן מונפש.
עכשיו אפשר לשנות את ההטיה והכותרת באופן אוטומטי, וגם באמצעות תנועות של העכבר והמקלדת.
האפשרות renderingType מבטלת את ההגדרות של סוג העיבוד שנקבעו באמצעות הגדרת מזהה מפה.
כדי להפעיל הטיה וסיבוב, מגדירים את tiltInteractionEnabled map option לערך true או קוראים ל-map.setTiltInteractionEnabled.
כדי להפעיל את ההזזה, מגדירים את אפשרות המפה headingInteractionEnabled ל-true
או מתקשרים אל map.setHeadingInteractionEnabled.
שימוש במזהה מפה כדי להגדיר את סוג העיבוד
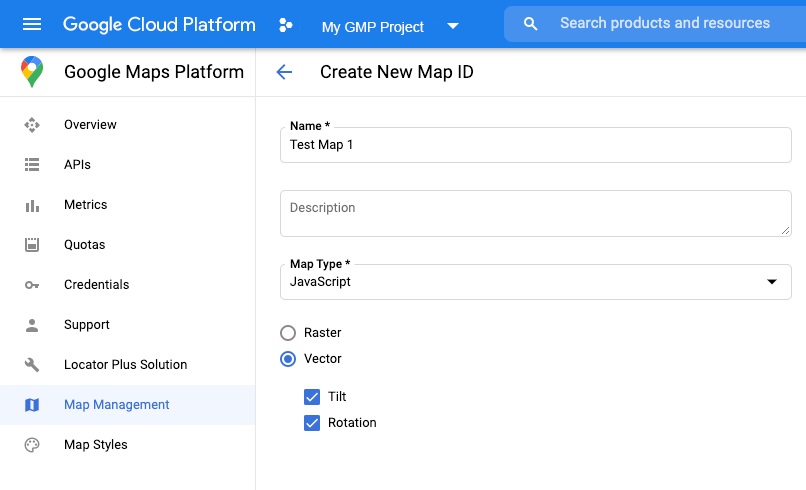
אפשר גם לציין את סוג העיבוד באמצעות מזהה מפה. כדי ליצור מזהה מפה חדש, פועלים לפי השלבים במאמר שימוש בסגנונות מפה מבוססי-Cloud – קבלת מזהה מפה.
חשוב להגדיר את סוג המפה ל-JavaScript ולבחור באפשרות Vector. מסמנים את התיבה הטיה או סיבוב כדי להפעיל את ההטיה והסיבוב במפה. כך תוכלו לשנות את הערכים האלה באופן אוטומטי, וגם לאפשר למשתמשים לשנות את ההטיה והכיוון ישירות במפה. אם השימוש בהטיה או בכיוון ישפיע לרעה על האפליקציה, אל תסמנו את התיבות הטיה וסיבוב כדי שהמשתמשים לא יוכלו לשנות את ההטיה והסיבוב.
לאחר מכן, מעדכנים את קוד האתחול של המפה עם מזהה המפה שיצרתם. אפשר למצוא את מזהי המפות בדף ניהול מפות. מזינים מזהה מפה כשיוצרים מופע של המפה באמצעות המאפיין mapId כמו שמוצג כאן:
[null,null,["עדכון אחרון: 2025-08-31 (שעון UTC)."],[[["\u003cp\u003eWebGL-powered features for Maps JavaScript API enable control over tilt and rotation, addition of 3D objects, and custom 2D/3D graphics with WebGL Overlay View.\u003c/p\u003e\n"],["\u003cp\u003eTo utilize WebGL features, use a vector map by specifying \u003ccode\u003erenderingType: RenderingType.VECTOR\u003c/code\u003e during map initialization or by using a map ID with the vector option enabled.\u003c/p\u003e\n"],["\u003cp\u003eTilt and rotation can be controlled programmatically or through user interaction by enabling \u003ccode\u003etiltInteractionEnabled\u003c/code\u003e and \u003ccode\u003eheadingInteractionEnabled\u003c/code\u003e map options.\u003c/p\u003e\n"],["\u003cp\u003eThe \u003ccode\u003e<gmp-map>\u003c/code\u003e element automatically enables vector maps, tilt, and heading by default, simplifying integration.\u003c/p\u003e\n"],["\u003cp\u003eSeveral examples and demos are available to explore the capabilities and implementation of WebGL features in Maps JavaScript API.\u003c/p\u003e\n"]]],[],null,["\u003cbr /\u003e\n\nWebGL-powered features for Maps JavaScript API let you\ncontrol tilt and rotation, add 3D objects directly to the map, and more. The\nfollowing features are included:\n\n- [WebGL Overlay View](/maps/documentation/javascript/webgl/webgl-overlay-view) lets you add custom 2D and 3D graphics and animated content to your maps.\n- [Tilt and heading](/maps/documentation/javascript/vector-map#tilt-rotation) can now be adjusted programmatically, and by using mouse and keyboard gestures.\n- [map.moveCamera()](/maps/documentation/javascript/vector-map#control-camera) lets you simultaneously change multiple camera properties.\n- Zoom now supports [fractional values](/maps/documentation/javascript/vector-map#fractional-zoom).\n\nGet started\n\nIn order to use the new WebGL features, you must use a vector map. This section\nshows you how.\n\nSpecify the `renderingType` option\n\nUse the `renderingType` option to specify either the raster or vector\nrendering type for your map (no map ID required):\n\n1. Load the `RenderingType` library; this can be done when loading the Maps\n library:\n\n const { Map, RenderingType } = await google.maps.importLibrary(\"maps\") as google.maps.MapsLibrary;\n\n2. When initializing the map, use the `renderingType` option to specify either\n `RenderingType.VECTOR` or `RenderingType.RASTER`:\n\n map = new Map(\n document.getElementById('map') as HTMLElement,\n {\n zoom: 4,\n center: position,\n renderingType: RenderingType.VECTOR,\n }\n );\n\nThe `renderingType` option overrides any rendering type settings made by\nconfiguring a map ID.\n\n- To enable tilt and rotation, set the `tiltInteractionEnabled` map option to true or call `map.setTiltInteractionEnabled`.\n- To enable panning, set the `headingInteractionEnabled` map option to `true` or call `map.setHeadingInteractionEnabled`.\n\nUse a map ID to set rendering type\n\nYou can also specify the rendering type by using a map ID. To create a new map\nID, follow the steps in [Using Cloud-based Map Styling - Get a map ID](/maps/documentation/javascript/styling#creating-map-ids).\nBe sure to set the Map type to **JavaScript** , and select the **Vector**\noption. Check **Tilt** or **Rotation** to enable tilt and rotation on the\nmap. Doing so lets you programmatically adjust these values, and also\nlets users adjust tilt and heading directly on the map. If the use of tilt or\nheading will adversely affect your app, leave **Tilt** and **Rotation** un-\nchecked so users cannot adjust tilt and rotation.\n\nNext, update your map initialization code with the map ID you created. You can\nfind your map IDs on the\n[Maps\nManagement](https://console.cloud.google.com/google/maps-apis/studio/maps) page. Provide a map ID when you instantiate the map using the\n`mapId` property as shown here: \n\n```javascript\nmap = new google.maps.Map(document.getElementById('map'), {\n center: {lat: -34.397, lng: 150.644},\n zoom: 8,\n mapId: '\u003cvar translate=\"no\"\u003eMAP_ID\u003c/var\u003e'\n});\n```\n| **Important:** It is recommended to associate your map ID and API key with the same Google Cloud console project.\n\nUse the `\u003cgmp-map\u003e` element\n\nVector maps, tilt, and heading are enabled by default when using he `\u003cgmp-map\u003e`\nelement, which lets you add a map to your page using HTML. [Learn more](/maps/documentation/javascript/add-google-map-wc-tut).\n\nExamples\n\nExamples have been provided to demonstrate these features:\n\n- [WebGL Overlay View](/maps/documentation/javascript/examples/webgl/webgl-overlay-simple)\n- [WebGL Tilt and Rotation](/maps/documentation/javascript/examples/webgl/webgl-tilt-rotation)\n- [WebGL Feature Tour](https://goo.gle/maps-platform-webgl-tour)\n- [WebGL Travel App Demo](https://goo.gle/maps-platform-webgl-travel-demo)"]]