renderingType 옵션은 지도 ID를 구성하여 설정된 렌더링 유형 설정을 재정의합니다.
기울기 및 회전을 사용 설정하려면 tiltInteractionEnabled 지도 옵션을 true로 설정하거나 map.setTiltInteractionEnabled를 호출합니다.
이동을 사용 설정하려면 headingInteractionEnabled 지도 옵션을 true로 설정하거나 map.setHeadingInteractionEnabled를 호출합니다.
지도 ID를 사용하여 렌더링 유형 설정
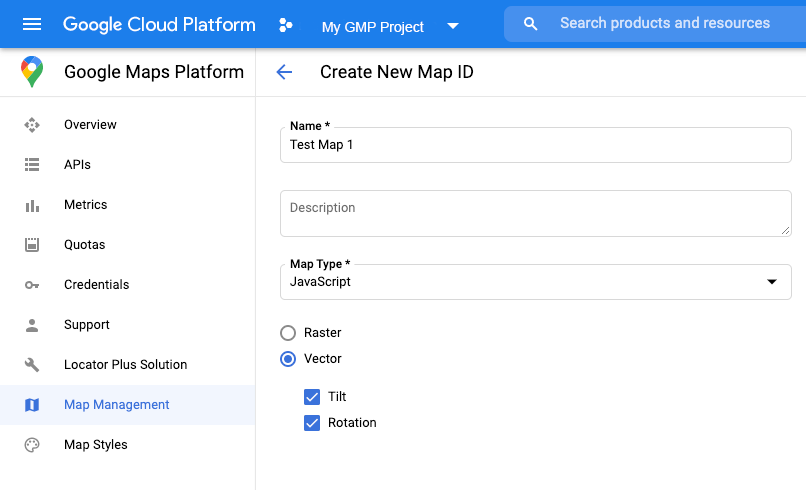
지도 ID를 사용하여 렌더링 유형을 지정할 수도 있습니다. 새 지도 ID를 만들려면 클라우드 기반 지도 스타일 지정 사용 - 지도 ID 가져오기의 단계를 따르세요.
지도 유형을 JavaScript로 설정하고 벡터 옵션을 선택해야 합니다. 기울기 또는 회전을 선택하여 지도에서 기울기 및 회전을 사용 설정합니다. 이렇게 하면 이러한 값을 프로그래매틱 방식으로 조정할 수 있으며 사용자가 지도에서 직접 기울기 및 회전을 조정할 수도 있습니다. 기울기 또는 회전을 사용하면 앱에 부정적인 영향을 미치는 경우, 사용자가 기울기 및 회전을 조정할 수 없도록 기울기와 회전을 선택 해제한 상태로 두세요.
그런 다음 생성한 지도 ID로 지도 초기화 코드를 업데이트합니다. 지도 ID는 지도 관리 페이지에서 찾을 수 있습니다. 다음과 같이 mapId 속성을 사용하여 지도를 인스턴스화할 때 지도 ID를 제공하세요.
[null,null,["최종 업데이트: 2025-08-31(UTC)"],[[["\u003cp\u003eWebGL-powered features for Maps JavaScript API enable control over tilt and rotation, addition of 3D objects, and custom 2D/3D graphics with WebGL Overlay View.\u003c/p\u003e\n"],["\u003cp\u003eTo utilize WebGL features, use a vector map by specifying \u003ccode\u003erenderingType: RenderingType.VECTOR\u003c/code\u003e during map initialization or by using a map ID with the vector option enabled.\u003c/p\u003e\n"],["\u003cp\u003eTilt and rotation can be controlled programmatically or through user interaction by enabling \u003ccode\u003etiltInteractionEnabled\u003c/code\u003e and \u003ccode\u003eheadingInteractionEnabled\u003c/code\u003e map options.\u003c/p\u003e\n"],["\u003cp\u003eThe \u003ccode\u003e<gmp-map>\u003c/code\u003e element automatically enables vector maps, tilt, and heading by default, simplifying integration.\u003c/p\u003e\n"],["\u003cp\u003eSeveral examples and demos are available to explore the capabilities and implementation of WebGL features in Maps JavaScript API.\u003c/p\u003e\n"]]],[],null,["\u003cbr /\u003e\n\nWebGL-powered features for Maps JavaScript API let you\ncontrol tilt and rotation, add 3D objects directly to the map, and more. The\nfollowing features are included:\n\n- [WebGL Overlay View](/maps/documentation/javascript/webgl/webgl-overlay-view) lets you add custom 2D and 3D graphics and animated content to your maps.\n- [Tilt and heading](/maps/documentation/javascript/vector-map#tilt-rotation) can now be adjusted programmatically, and by using mouse and keyboard gestures.\n- [map.moveCamera()](/maps/documentation/javascript/vector-map#control-camera) lets you simultaneously change multiple camera properties.\n- Zoom now supports [fractional values](/maps/documentation/javascript/vector-map#fractional-zoom).\n\nGet started\n\nIn order to use the new WebGL features, you must use a vector map. This section\nshows you how.\n\nSpecify the `renderingType` option\n\nUse the `renderingType` option to specify either the raster or vector\nrendering type for your map (no map ID required):\n\n1. Load the `RenderingType` library; this can be done when loading the Maps\n library:\n\n const { Map, RenderingType } = await google.maps.importLibrary(\"maps\") as google.maps.MapsLibrary;\n\n2. When initializing the map, use the `renderingType` option to specify either\n `RenderingType.VECTOR` or `RenderingType.RASTER`:\n\n map = new Map(\n document.getElementById('map') as HTMLElement,\n {\n zoom: 4,\n center: position,\n renderingType: RenderingType.VECTOR,\n }\n );\n\nThe `renderingType` option overrides any rendering type settings made by\nconfiguring a map ID.\n\n- To enable tilt and rotation, set the `tiltInteractionEnabled` map option to true or call `map.setTiltInteractionEnabled`.\n- To enable panning, set the `headingInteractionEnabled` map option to `true` or call `map.setHeadingInteractionEnabled`.\n\nUse a map ID to set rendering type\n\nYou can also specify the rendering type by using a map ID. To create a new map\nID, follow the steps in [Using Cloud-based Map Styling - Get a map ID](/maps/documentation/javascript/styling#creating-map-ids).\nBe sure to set the Map type to **JavaScript** , and select the **Vector**\noption. Check **Tilt** or **Rotation** to enable tilt and rotation on the\nmap. Doing so lets you programmatically adjust these values, and also\nlets users adjust tilt and heading directly on the map. If the use of tilt or\nheading will adversely affect your app, leave **Tilt** and **Rotation** un-\nchecked so users cannot adjust tilt and rotation.\n\nNext, update your map initialization code with the map ID you created. You can\nfind your map IDs on the\n[Maps\nManagement](https://console.cloud.google.com/google/maps-apis/studio/maps) page. Provide a map ID when you instantiate the map using the\n`mapId` property as shown here: \n\n```javascript\nmap = new google.maps.Map(document.getElementById('map'), {\n center: {lat: -34.397, lng: 150.644},\n zoom: 8,\n mapId: '\u003cvar translate=\"no\"\u003eMAP_ID\u003c/var\u003e'\n});\n```\n| **Important:** It is recommended to associate your map ID and API key with the same Google Cloud console project.\n\nUse the `\u003cgmp-map\u003e` element\n\nVector maps, tilt, and heading are enabled by default when using he `\u003cgmp-map\u003e`\nelement, which lets you add a map to your page using HTML. [Learn more](/maps/documentation/javascript/add-google-map-wc-tut).\n\nExamples\n\nExamples have been provided to demonstrate these features:\n\n- [WebGL Overlay View](/maps/documentation/javascript/examples/webgl/webgl-overlay-simple)\n- [WebGL Tilt and Rotation](/maps/documentation/javascript/examples/webgl/webgl-tilt-rotation)\n- [WebGL Feature Tour](https://goo.gle/maps-platform-webgl-tour)\n- [WebGL Travel App Demo](https://goo.gle/maps-platform-webgl-travel-demo)"]]