मांग पर यात्रा की सुविधा क्या है?
संग्रह की मदद से व्यवस्थित रहें
अपनी प्राथमिकताओं के आधार पर, कॉन्टेंट को सेव करें और कैटगरी में बांटें.
इस सेक्शन में मौजूद दस्तावेज़ में, Google Maps की मांग के हिसाब से यात्रा की सुविधा का इस्तेमाल करके, यात्राएं बनाने और उन्हें मैनेज करने का तरीका बताया गया है. यह माना जाता है कि आपको इनके बारे में जानकारी है:
इस्तेमाल किया जाने वाला TripService
, gRPC और REST के लिए उपलब्ध है.
आसानी से समझने के लिए, फ़ील्ड रेफ़रंस gRPC के नियमों के मुताबिक होते हैं.
मांग पर उपलब्ध सेवाओं के लिए Fleet Engine में, ट्रिप एक तरह की यात्रा होती है. यह आपके उपभोक्ताओं के खाने की डिलीवरी या यात्रा के अनुरोध को पूरा करने के लिए मॉडल तैयार करती है. यात्रा की स्थिति होती है, जिसे यात्रा के दौरान Fleet Engine को रिपोर्ट किया जाता है. जैसे, NEW
, ENROUTE_TO_PICKUP
वगैरह. यात्रा की स्थिति, वाहन को असाइन किए गए जियो-लोकेटेड वेपॉइंट से मेल खाती है. साथ ही, Fleet Engine, यात्रा के हर अपडेट के साथ इन वेपॉइंट में बदलाव करता है. यात्राओं और वाहनों के बीच के संबंध के बारे में ज़्यादा जानने के लिए, Fleet Engine की बुनियादी बातों में मांग के हिसाब से यात्राएं देखें.
यात्रा की अवधि
Fleet Engine में हर यात्रा को ट्रैक करने के लिए, आपको सबसे पहले Trip
इकाई बनानी होगी. रेफ़रंस के लिए, gRPC या REST देखें.
नीचे दी गई टेबल में, आपके सिस्टम में बनाई गई यात्रा के एंड-टू-एंड फ़्लो का उदाहरण दिया गया है. साथ ही, Fleet Engine में यात्रा की लाइफ़साइकल स्टेज के बारे में बताया गया है. इसमें यह माना जाता है कि आपने Fleet Engine सेट अप कर लिया है और आपके पास यात्रा के लिए कोई वाहन है. साथ ही, ड्राइवर ऐप्लिकेशन में जगह की जानकारी के अपडेट चालू हैं. Driver SDK: मांग पर की जाने वाली यात्राएं देखें.
1 |
बुकिंग का अनुरोध पाना. |
Fleet Engine ट्रिप शुरू होने से पहले, आपका बुकिंग सिस्टम सबसे पहले आपके ऐप्लिकेशन या किसी अन्य बुकिंग सिस्टम के ज़रिए, किसी उपभोक्ता से राइड या डिलीवरी का अनुरोध पाता है. इसके बाद, आपका सिस्टम ट्रिप की इकाई बनाता है. इसके लिए, वह CreateTrip का इस्तेमाल करता है. इसमें पिकअप की जगह जैसी ज़रूरी जानकारी शामिल होती है.
इसके अलावा, इस समय अन्य फ़ील्ड भी सेट किए जा सकते हैं. जैसे, यात्री और ड्रॉपऑफ़ की जगह. इसके अलावा, वाहन असाइन होने तक इंतज़ार किया जा सकता है. एक डेस्टिनेशन वाली यात्रा बनाना लेख पढ़ें. |
2 |
वाहन असाइन करें. |
आपके पास दो विकल्प हैं. पहला, अपने सिस्टम में सीधे तौर पर यात्राओं के लिए वाहन असाइन करें और Fleet Engine को असाइनमेंट की जानकारी दें. दूसरा, वाहन खोजें सेवा का इस्तेमाल करके वाहन खोजें. इसके लिए, यात्रा और वाहन, दोनों की विशेषताओं के हिसाब से फ़िल्टर करें, ताकि यात्रा पूरी करने के लिए सबसे सही वाहन मिल सके. खोज के दायरे में मौजूद कोई भी वाहन, Driver SDK से मिले जगह की जानकारी के अपडेट के ज़रिए, अपनी दूरी की जानकारी देता है.
जब SearchVehicle , यात्रा से मेल खाने वाला वाहन दिखाता है, तब आपका सिस्टम UpdateTrip एंडपॉइंट को कॉल करता है. इससे, NEW यात्रा के लिए असाइन किया गया वाहन आईडी रिपोर्ट किया जाता है.
|
3 |
यात्रा की जानकारी अपडेट करें. |
जब ड्राइवर यात्रा स्वीकार कर लेता है और पिकअप की जगह पर नेविगेट करना शुरू कर देता है, तो आपका सिस्टम यात्रा की स्थिति को NEW से ENROUTE_TO_PICKUP में अपडेट कर देता है. आपको यात्रा के दौरान, वाहन की जगह की जानकारी को लगातार पोल करना होगा. इसके लिए, ऐप्लिकेशन को सीधे तौर पर अपने बैकएंड से कनेक्ट करें या Fleet Engine को पोल करें. Fleet Engine को Driver SDK से, वाहन की जगह की जानकारी के अपडेट लगातार मिलते रहते हैं. इसके बाद, आपका सिस्टम हर यात्रा के माइलस्टोन की जानकारी Fleet Engine को भेजता है. इसके बाद, Fleet Engine वाहन के वेपॉइंट की सूची को अपडेट करता है.
|
4 |
उपयोगकर्ता के साथ यात्रा की जानकारी शेयर करें. |
Fleet Engine, यात्रा की जानकारी और वाहन की जगह की जानकारी को Consumer SDK के लिए उपलब्ध कराता है. Consumer SDK, यात्रा के अपडेट पाने के लिए लिसनर का इस्तेमाल करता है और उन्हें खरीदार के ऐप्लिकेशन में दिखाता है. Fleet Engine, पहुंचने का अनुमानित समय, बची हुई दूरी, रास्ते, और वाहन के बचे हुए वेपॉइंट को अपने-आप अपडेट करता है. ज़्यादा जानकारी के लिए, मांग पर उपलब्ध यात्राओं के लिए यात्राएं शेयर करना लेख पढ़ें. |
5 |
पूरी यात्रा. |
जब वाहन यात्रा के डेस्टिनेशन वेपॉइंट पर पहुंच जाता है और आपका ड्राइवर यात्रा पूरी होने की जानकारी देता है, तो आपका सिस्टम Fleet Engine में TripStatus को COMPLETE पर सेट कर देता है. ध्यान रखें कि वाहनों की तरह, यात्रा की इकाइयां भी Fleet Engine में सात दिनों तक सक्रिय रहती हैं. भले ही, उनकी स्थिति कुछ भी हो. इसके बाद, उन्हें हटा दिया जाता है. |
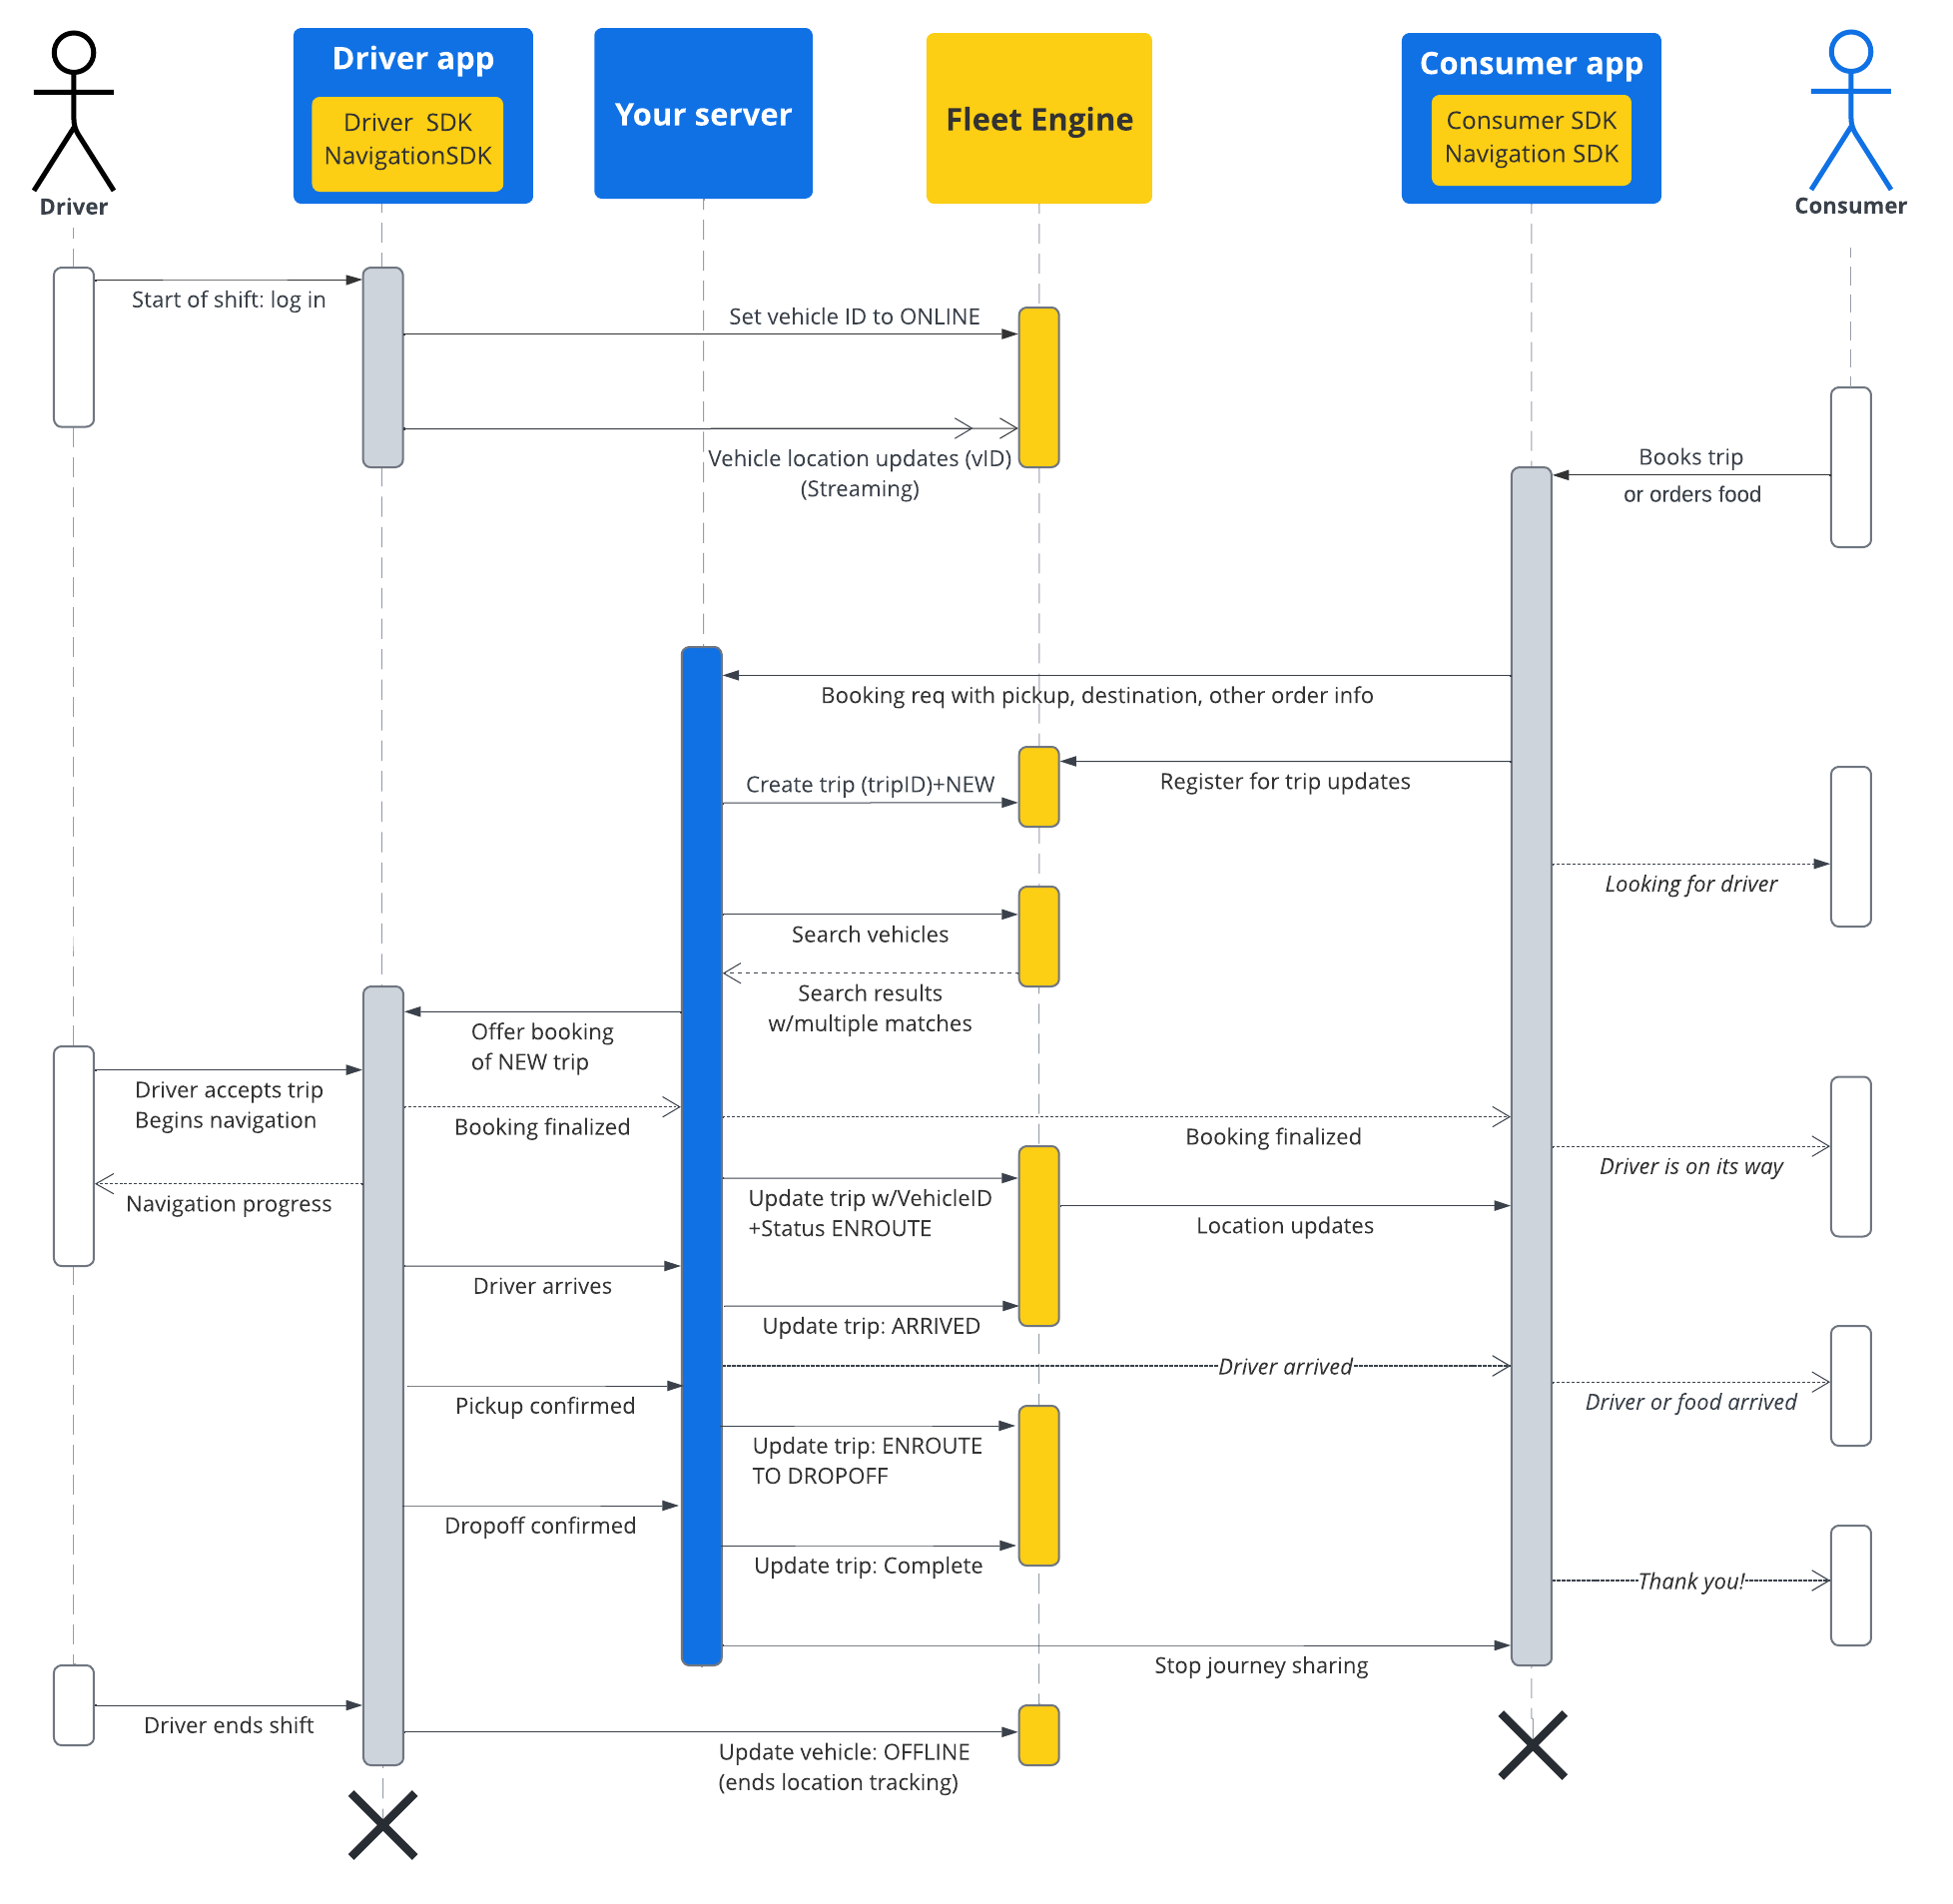
यात्रा के क्रम का फ़्लो
इस डायग्राम में, इस फ़्लो के बारे में ज़्यादा जानकारी दी गई है.

आगे क्या करना है
जब तक कुछ अलग से न बताया जाए, तब तक इस पेज की सामग्री को Creative Commons Attribution 4.0 License के तहत और कोड के नमूनों को Apache 2.0 License के तहत लाइसेंस मिला है. ज़्यादा जानकारी के लिए, Google Developers साइट नीतियां देखें. Oracle और/या इससे जुड़ी हुई कंपनियों का, Java एक रजिस्टर किया हुआ ट्रेडमार्क है.
आखिरी बार 2025-08-31 (UTC) को अपडेट किया गया.
[null,null,["आखिरी बार 2025-08-31 (UTC) को अपडेट किया गया."],[[["\u003cp\u003eThis documentation provides a comprehensive guide on utilizing the Google Maps Mobility on-demand trips service for managing and tracking trips.\u003c/p\u003e\n"],["\u003cp\u003eYou should have a foundational understanding of Fleet Engine, Vehicle Basics, and Trip Basics for on-demand services.\u003c/p\u003e\n"],["\u003cp\u003eFleet Engine's \u003ccode\u003eTripService\u003c/code\u003e enables the creation, assignment, updating, and completion of trips through gRPC or REST.\u003c/p\u003e\n"],["\u003cp\u003eTrips represent journeys fulfilling consumer requests, evolving through various statuses like \u003ccode\u003eNEW\u003c/code\u003e, \u003ccode\u003eENROUTE_TO_PICKUP\u003c/code\u003e, and \u003ccode\u003eCOMPLETE\u003c/code\u003e, influencing vehicle waypoints.\u003c/p\u003e\n"],["\u003cp\u003eThe trip lifecycle includes booking, vehicle assignment, status updates, consumer journey sharing, and completion, all managed through Fleet Engine interactions.\u003c/p\u003e\n"]]],[],null,["The documentation in this section shows how to create and work with trips using\nthe Google Maps Mobility on-demand trips service. It assumes familiarity with\nthe following:\n\n- **Fleet Engine** : You should be familiar with Fleet Engine implementation details, request mechanisms, and security. For that, see [What is the Fleet\n Engine service?](/maps/documentation/mobility/fleet-engine/essentials) and the security topics in [Set up Fleet Engine](/maps/documentation/mobility/fleet-engine/essentials/set-up-fleet).\n- **Vehicles basics** for on-demand services. See [Introduction to vehicles](/maps/documentation/mobility/fleet-engine/essentials/vehicles-intro).\n- **Trip basics** for on-demand services. See [On-demand trips](/maps/documentation/mobility/fleet-engine/essentials/trip-intro).\n\nThe `TripService` that you'll use is available for [gRPC](/maps/documentation/mobility/fleet-engine/reference/trips/rpc/maps.fleetengine.v1#tripservice) and [REST](/maps/documentation/mobility/fleet-engine/reference/trips/rest/v1/providers.trips).\nFor simplicity sake, field references follow the gRPC convention.\n\nIn Fleet Engine for on-demand services, a trip is a type of journey that models\nthe fulfillment of a food delivery or ride request from your consumers. A trip\nhas a status that you report to Fleet Engine as the journey evolves, such as\n`NEW`, `ENROUTE_TO_PICKUP`, and more. The trip status corresponds to geo-located\nwaypoints assigned to the vehicle, and Fleet Engine modifies these vehicle\nwaypoints with each trip update you make. See [On demand trips](/maps/documentation/mobility/fleet-engine/essentials/trip-intro) in **Fleet\nEngine essentials** for more about trips and their relationship to vehicles.\n\nLife of a trip\n\nIn order to track each trip in Fleet Engine, you must first create a `Trip`\nentity. See either [gRPC](/maps/documentation/mobility/fleet-engine/reference/trips/rpc/maps.fleetengine.v1#maps.fleetengine.v1.Trip) or [REST](/maps/documentation/mobility/fleet-engine/reference/trips/rest/v1/providers.trips) for reference.\n\nThe following table describes an example end-to-end flow of a trip created in\nyour system and its lifecycle stages in Fleet Engine. It assumes you have set up\nFleet Engine and have a vehicle to assign to the trip, with location updates\nenabled in the driver app. See [Driver SDK: On-demand trips](/maps/documentation/mobility/driver-sdk/on-demand).\n\n|---|----------------------------------|--------------------------------------------------------------------------------------------------------------------------------------------------------------------------------------------------------------------------------------------------------------------------------------------------------------------------------------------------------------------------------------------------------------------------------------------------------------------------------------------------------------------------------------------------------------------------------------------------------------------------------------------------------------------------------|\n| 1 | **Receive booking request.** | Before a Fleet Engine trip begins, your booking system first receives a request for a ride or delivery from a consumer through your app or other booking system. Your system then creates the trip entity using `CreateTrip` with required fields, such as the pickup location. It can also set other fields at this point, such passengers and dropoff location, or wait until it assigns a vehicle. See [Create a single-destination trip](/maps/documentation/mobility/fleet-engine/journeys/trips/create-trip). |\n| 2 | **Assign vehicle.** | You can either assign vehicles to trips directly within your system and report the assignment to Fleet Engine, or you can use the [Search Vehicle](/maps/documentation/mobility/fleet-engine/essentials/vehicles/on-demand-search-vehicle) service to search for vehicles, filtering by both trip and vehicle attributes to find the best vehicle to complete the journey. Any online vehicle within your search radius makes their proximity known through location updates provided by the Driver SDK. Once `SearchVehicle` returns a vehicle that you match to a trip, your system calls the `UpdateTrip` endpoint to report the vehicle ID you assigned to the `NEW` trip. |\n| 3 | **Update trip.** | Once the driver accepts the trip and begins navigating to the pickup location, your system updates the trip status from `NEW` to `ENROUTE_TO_PICKUP`. You continue to poll the vehicle location throughout the journey, either through a direct connection from the app to your backend, or by polling Fleet Engine, which receives an ongoing stream of vehicle location updates from the Driver SDK. Your system then reports each journey milestone to Fleet Engine, which updates the vehicle's waypoint list accordingly. |\n| 4 | **Share journey with consumer.** | Fleet Engine makes trip details and vehicle location available to the Consumer SDK, which uses a listener to receive trip updates and display them in the consumer app. Fleet Engine automatically updates ETA, remaining distance, routes, and remaining vehicle waypoints. See [Share journeys for on-demand trips](/maps/documentation/mobility/journey-sharing/on-demand) for more information. |\n| 5 | **Complete trip.** | Once the vehicle reaches the destination waypoint of the trip and your driver indicates a successful trip, your system sets the `TripStatus` to `COMPLETE` in Fleet Engine. Keep in mind that, like vehicles, trip entities remain active within Fleet Engine for 7 days regardless of status, at which point they are removed. |\n\nTrip sequence flow\n\nThe following diagram shows a more detailed view of this flow.\n\nWhat's next\n\n- [Create a single-destination trip](/maps/documentation/mobility/fleet-engine/journeys/trips/create-trip)"]]