本指南介绍了各种最佳应用编码实践,方便您在 iPhone X 上正确地呈现广告。
前提条件
- 完成入门指南的学习。
横幅广告
横幅广告必须放置在“安全区域”内,以免被圆角、传感器外壳和底部横条遮挡。此页面向您提供了各种示例,说明如何通过添加限制来将横幅广告固定到安全区域的顶部或底部。分镜画面约束和程序化约束均在支持 iOS 9 及更高版本和 Xcode 9 及更高版本的环境中演示。针对早期版本的 iOS 和 Xcode 的解决方法也已注明。
Storyboard/Interface Builder
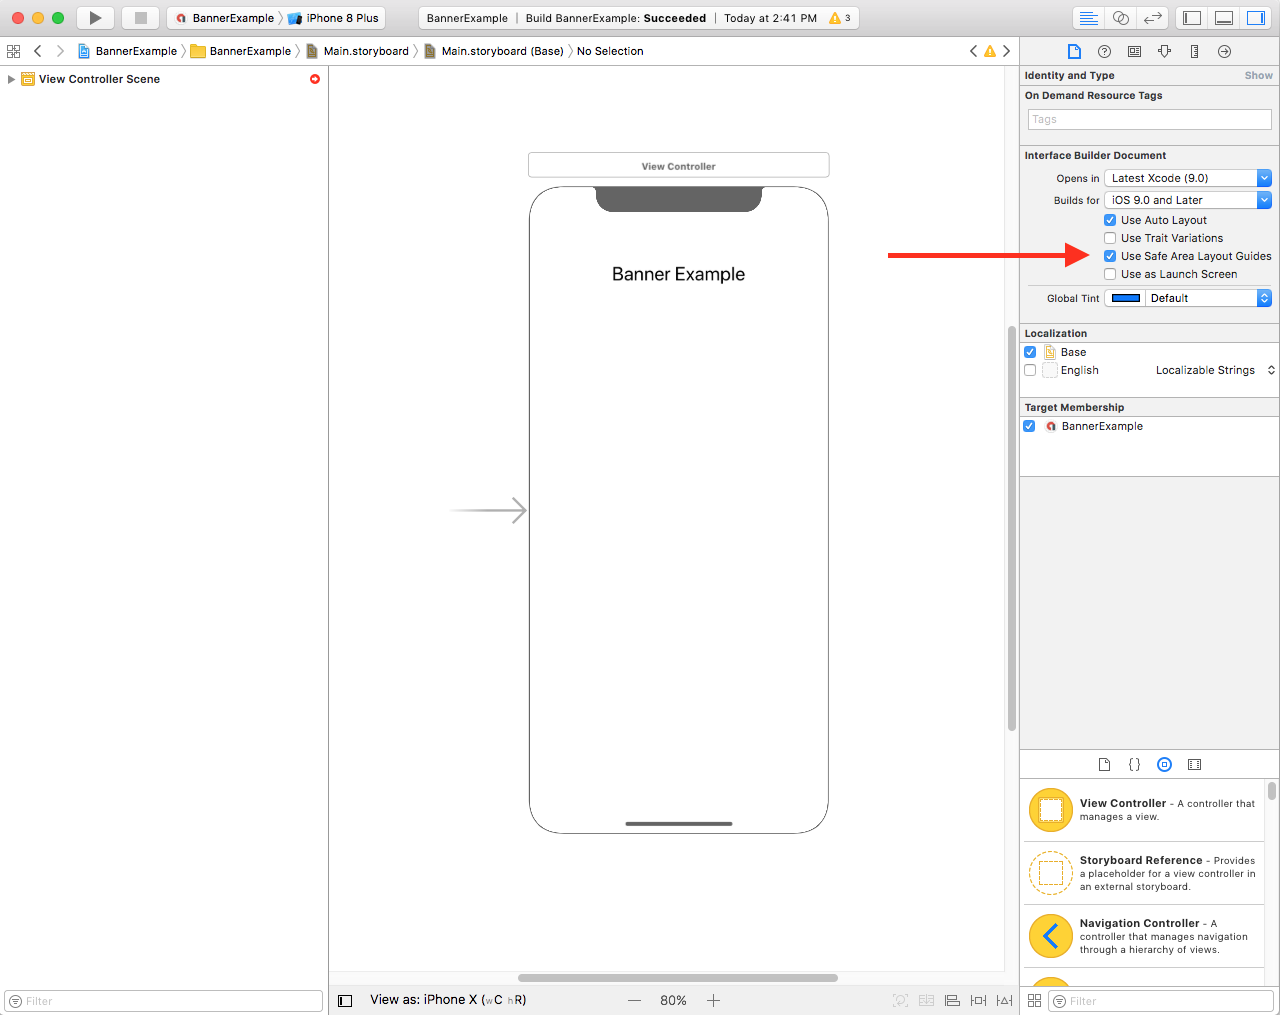
如果您的应用使用的是 Interface Builder,请先确保已启用安全区域布局指南。为此,您需要运行 Xcode 9 及更高版本,并以 iOS 9 及更高版本为目标。
打开 Interface Builder 文件,然后点击视图控制器场景。此时您将在右侧看到 Interface Builder 文档选项。选中使用安全区域布局指南,并确保您的构建目标是 iOS 9.0 及更高版本(最低版本)。
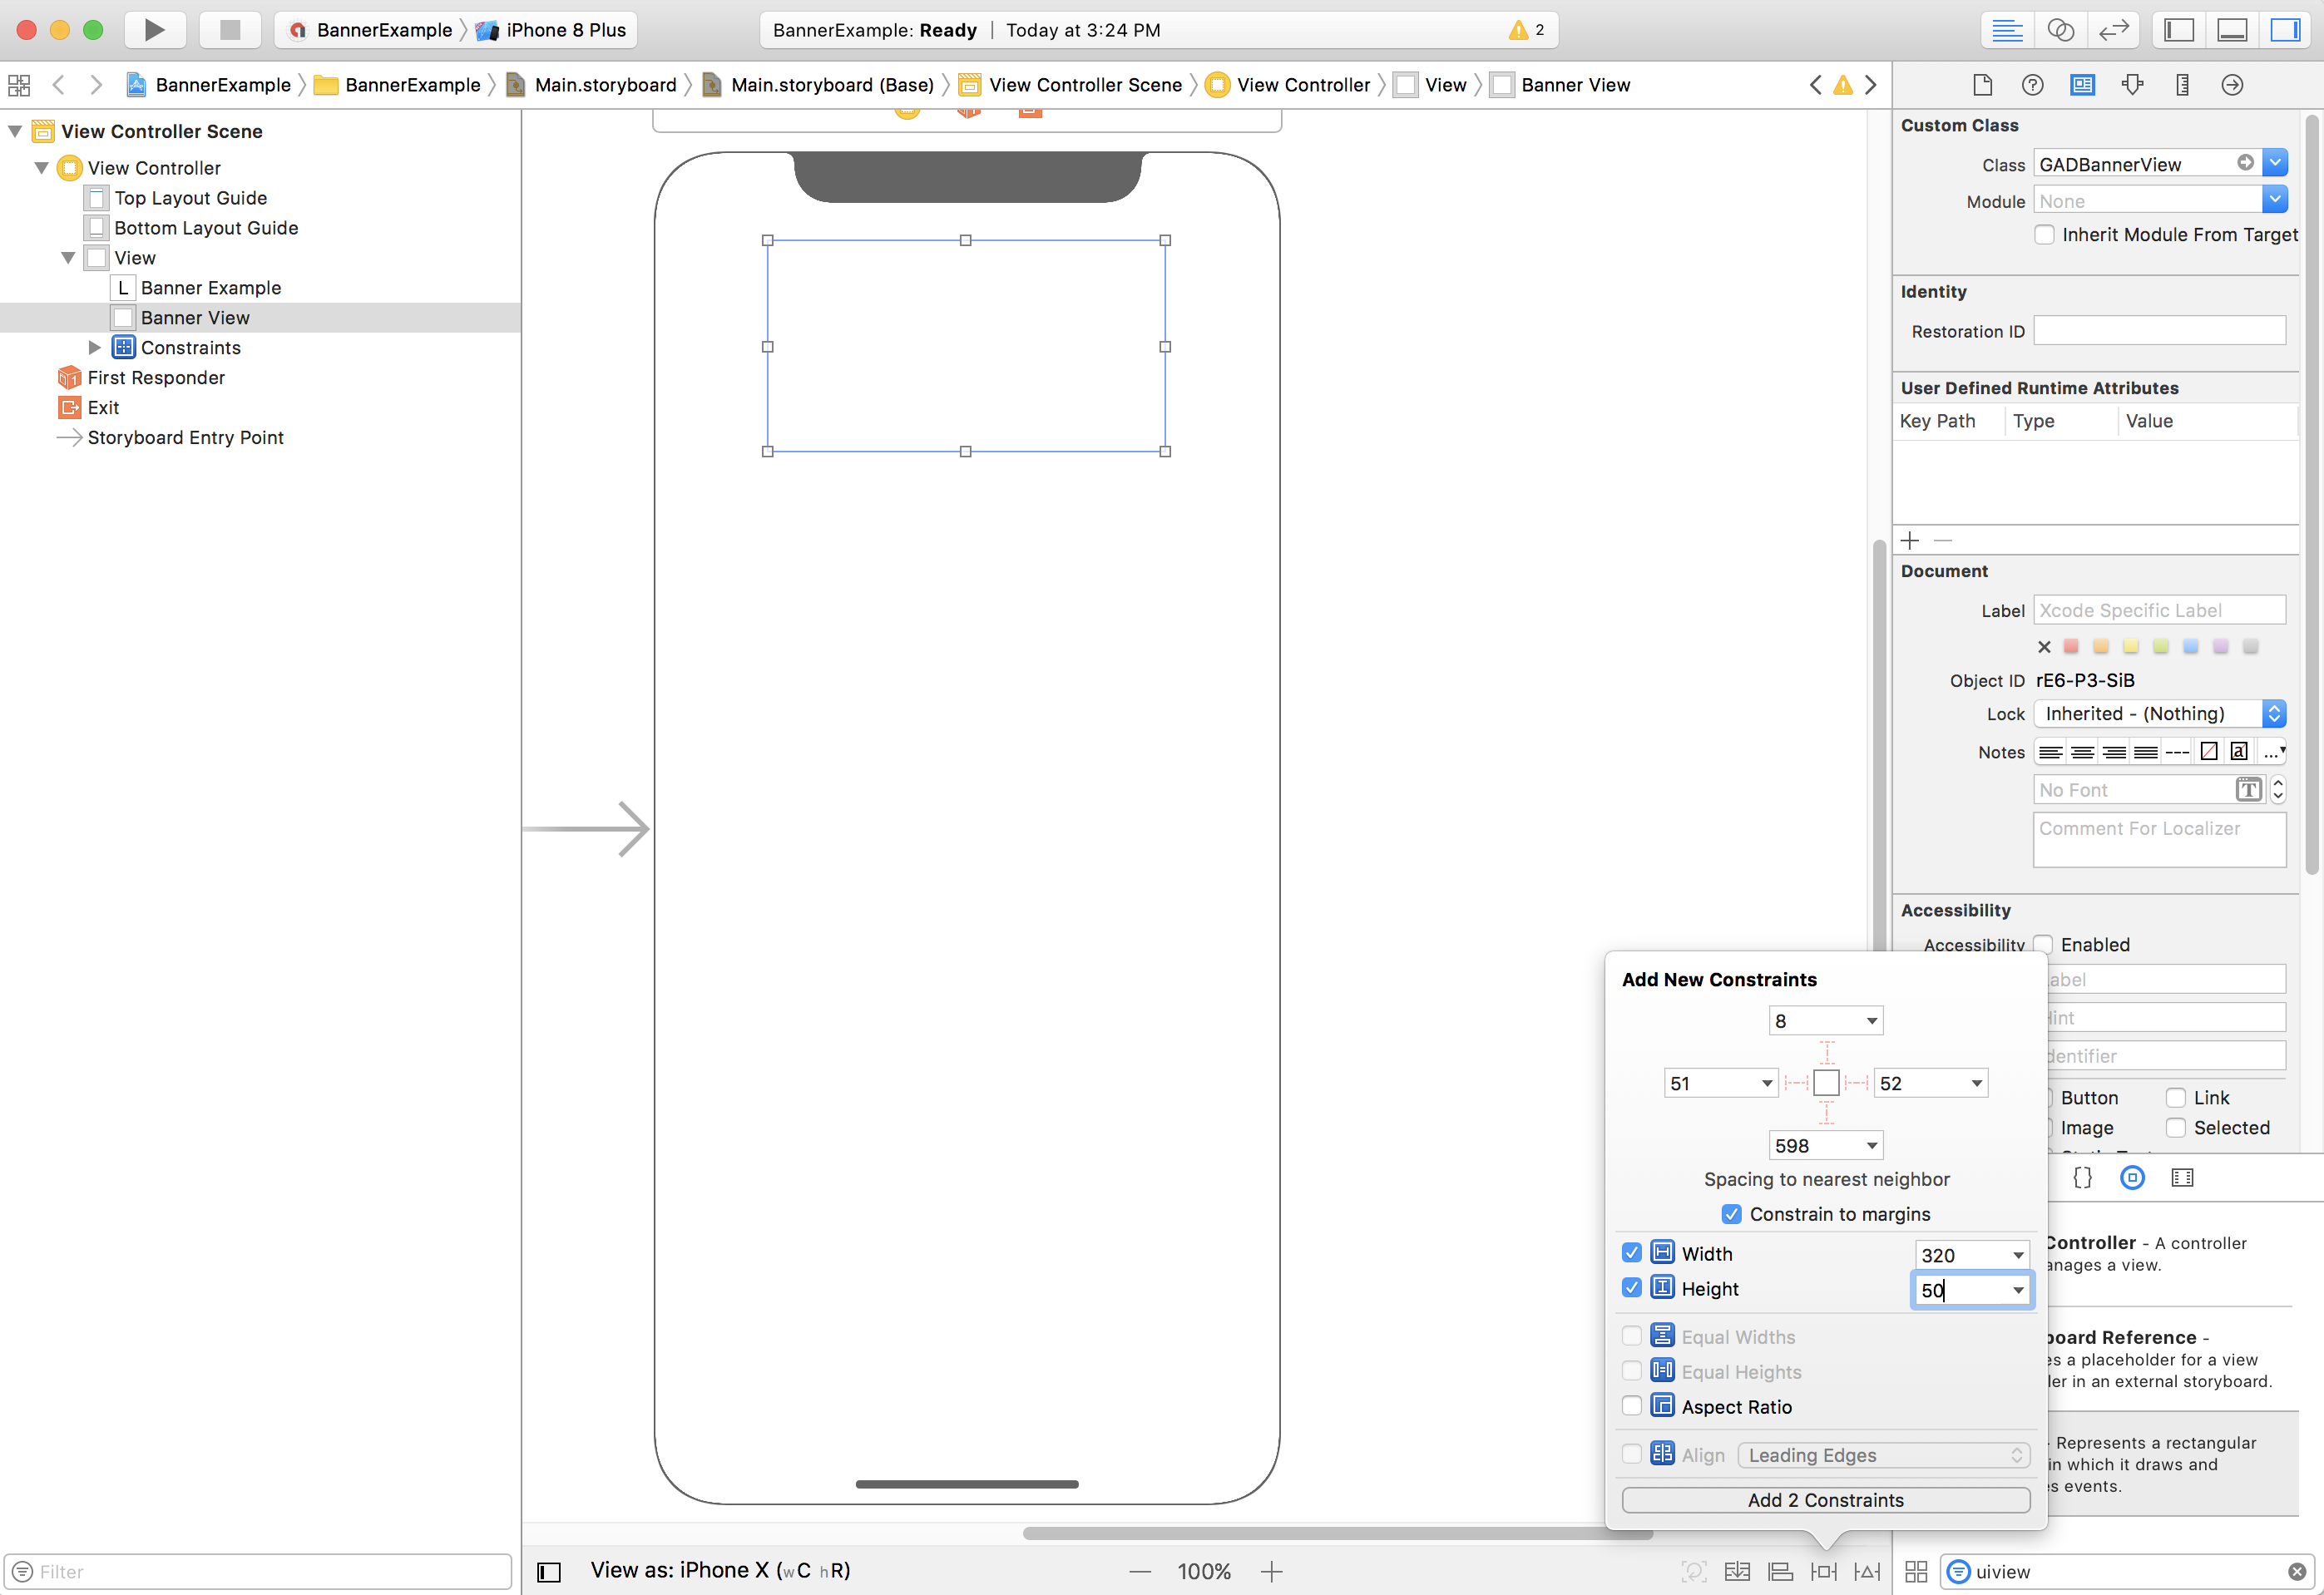
我们建议您输入宽度和高度限制值,从而将横幅广告调整为所需的尺寸。
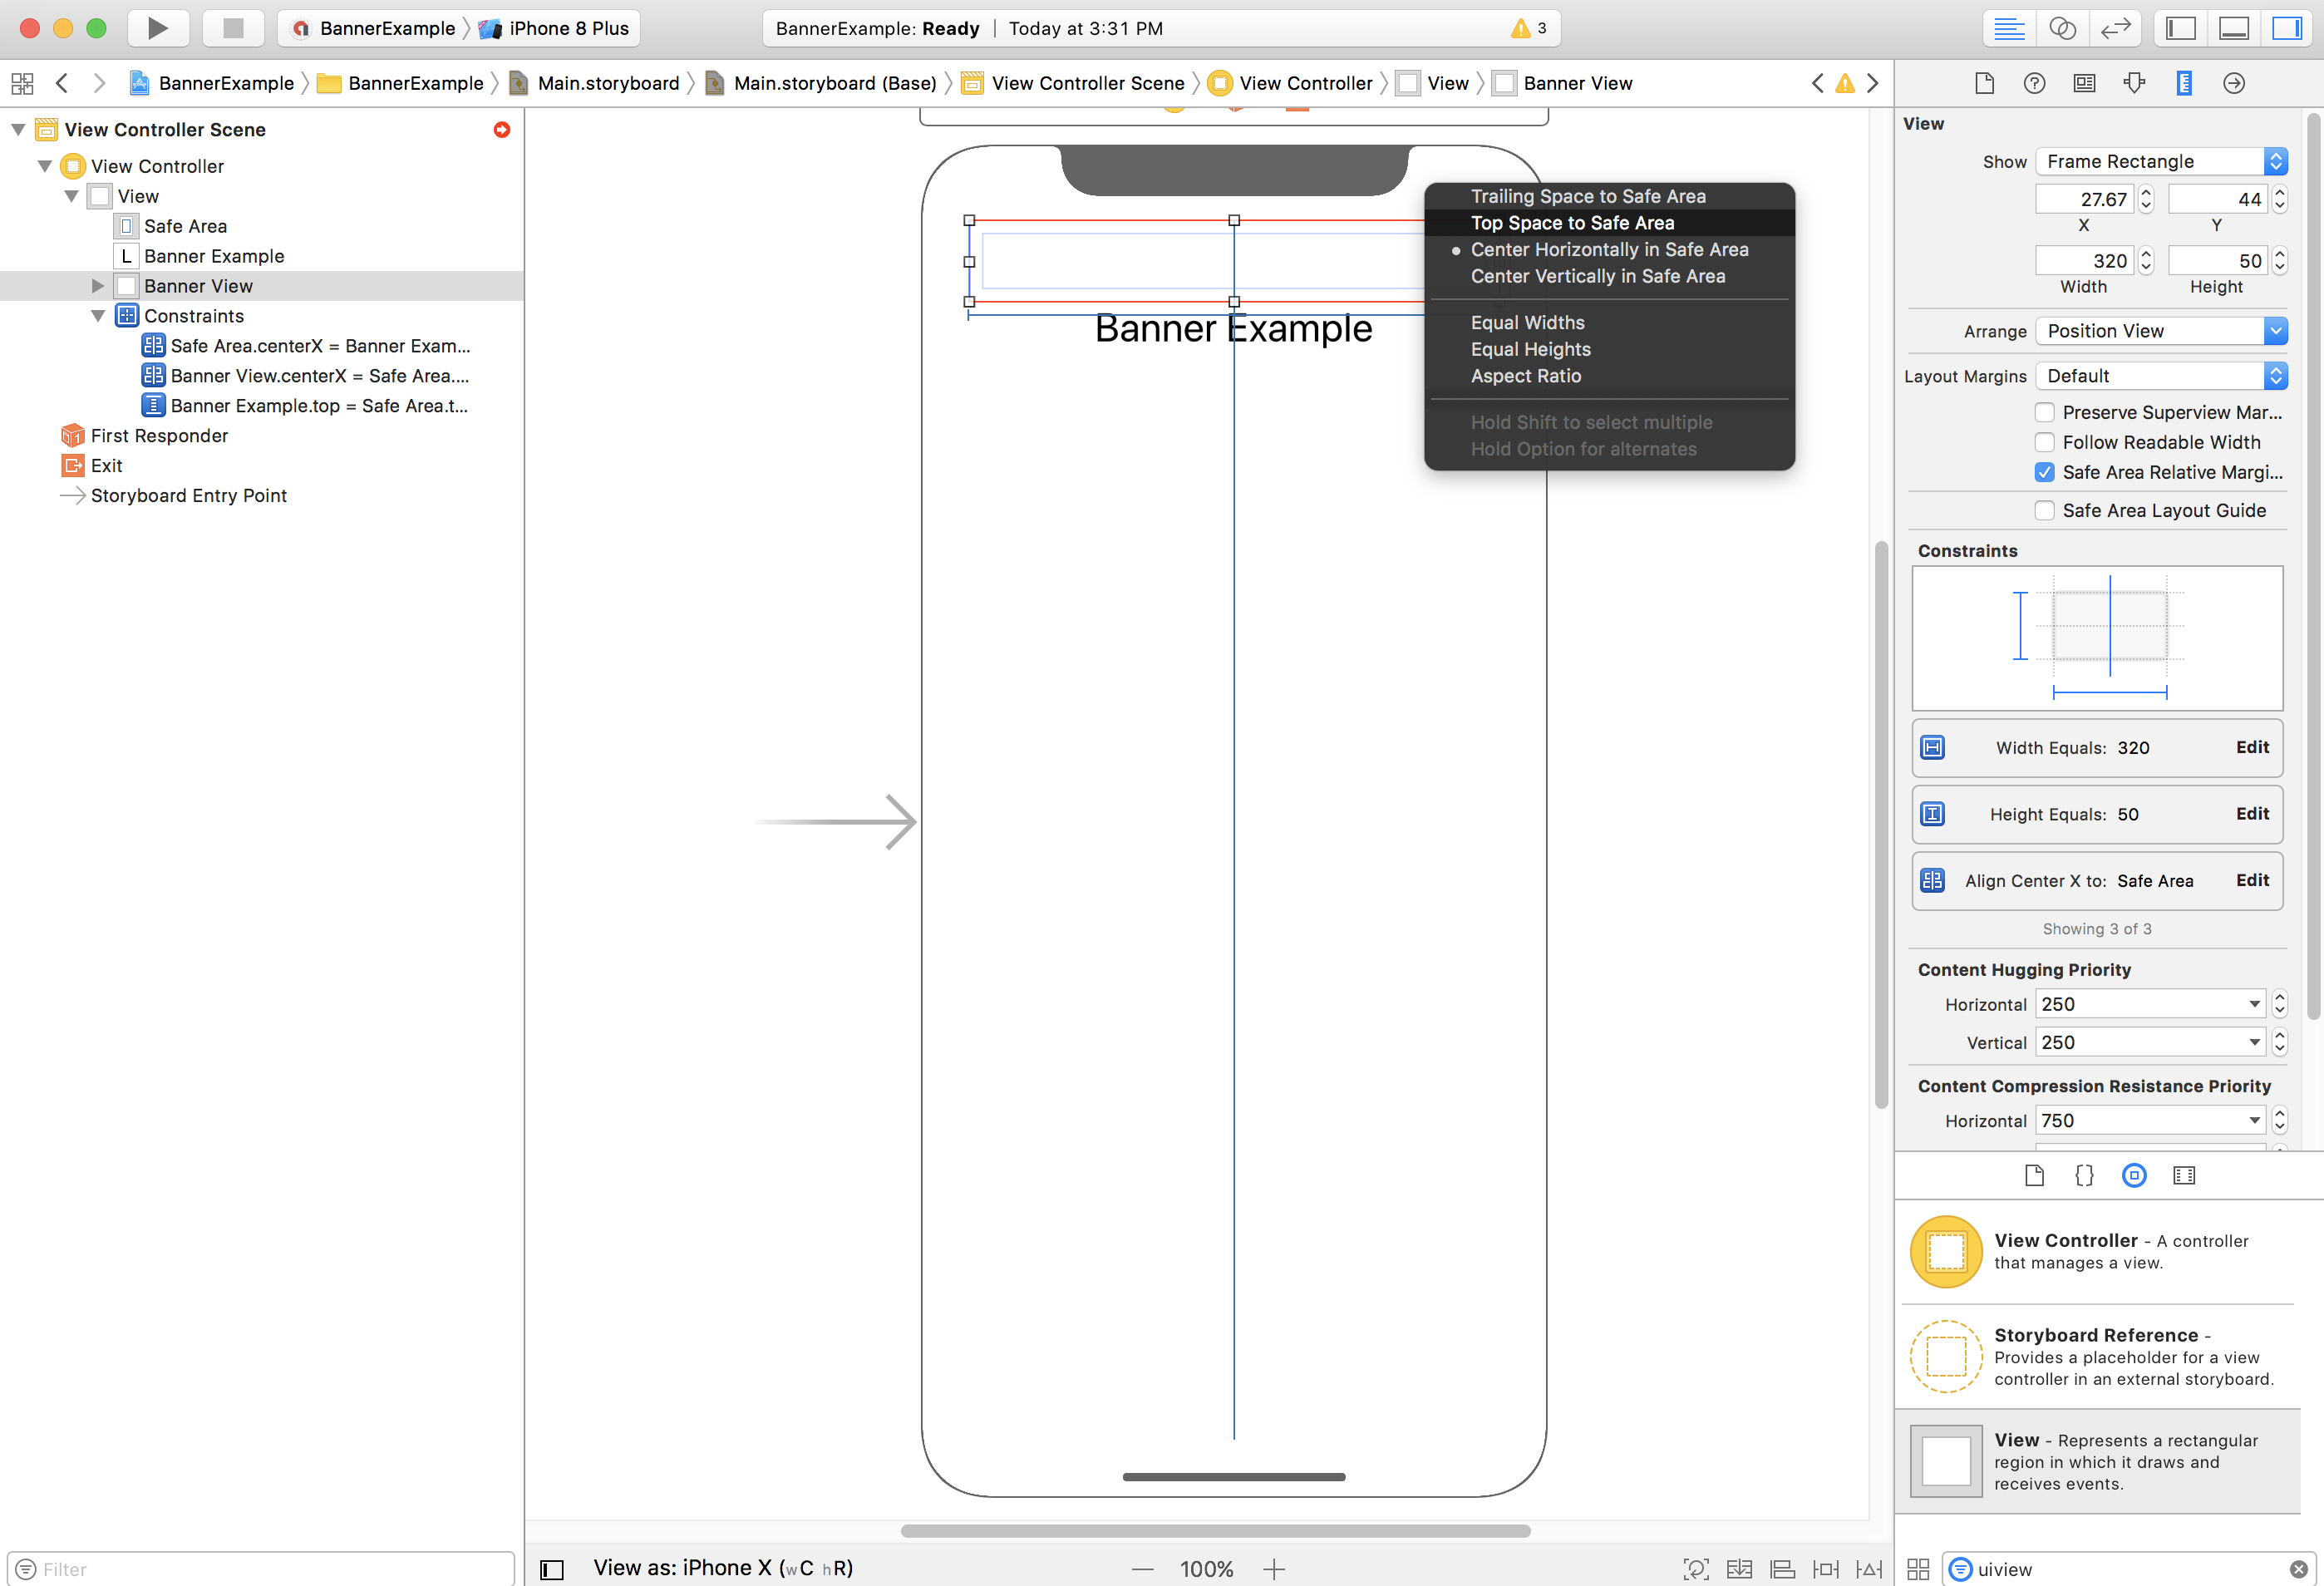
现在,您可以将 GAMBannerView 的顶部属性限制设为安全区域的顶部,从而使横幅广告与安全区域的顶部对齐:
同样,您可以将 GAMBannerView 的底部属性限制设为安全区域的底部,从而使横幅广告与安全区域的底部对齐:
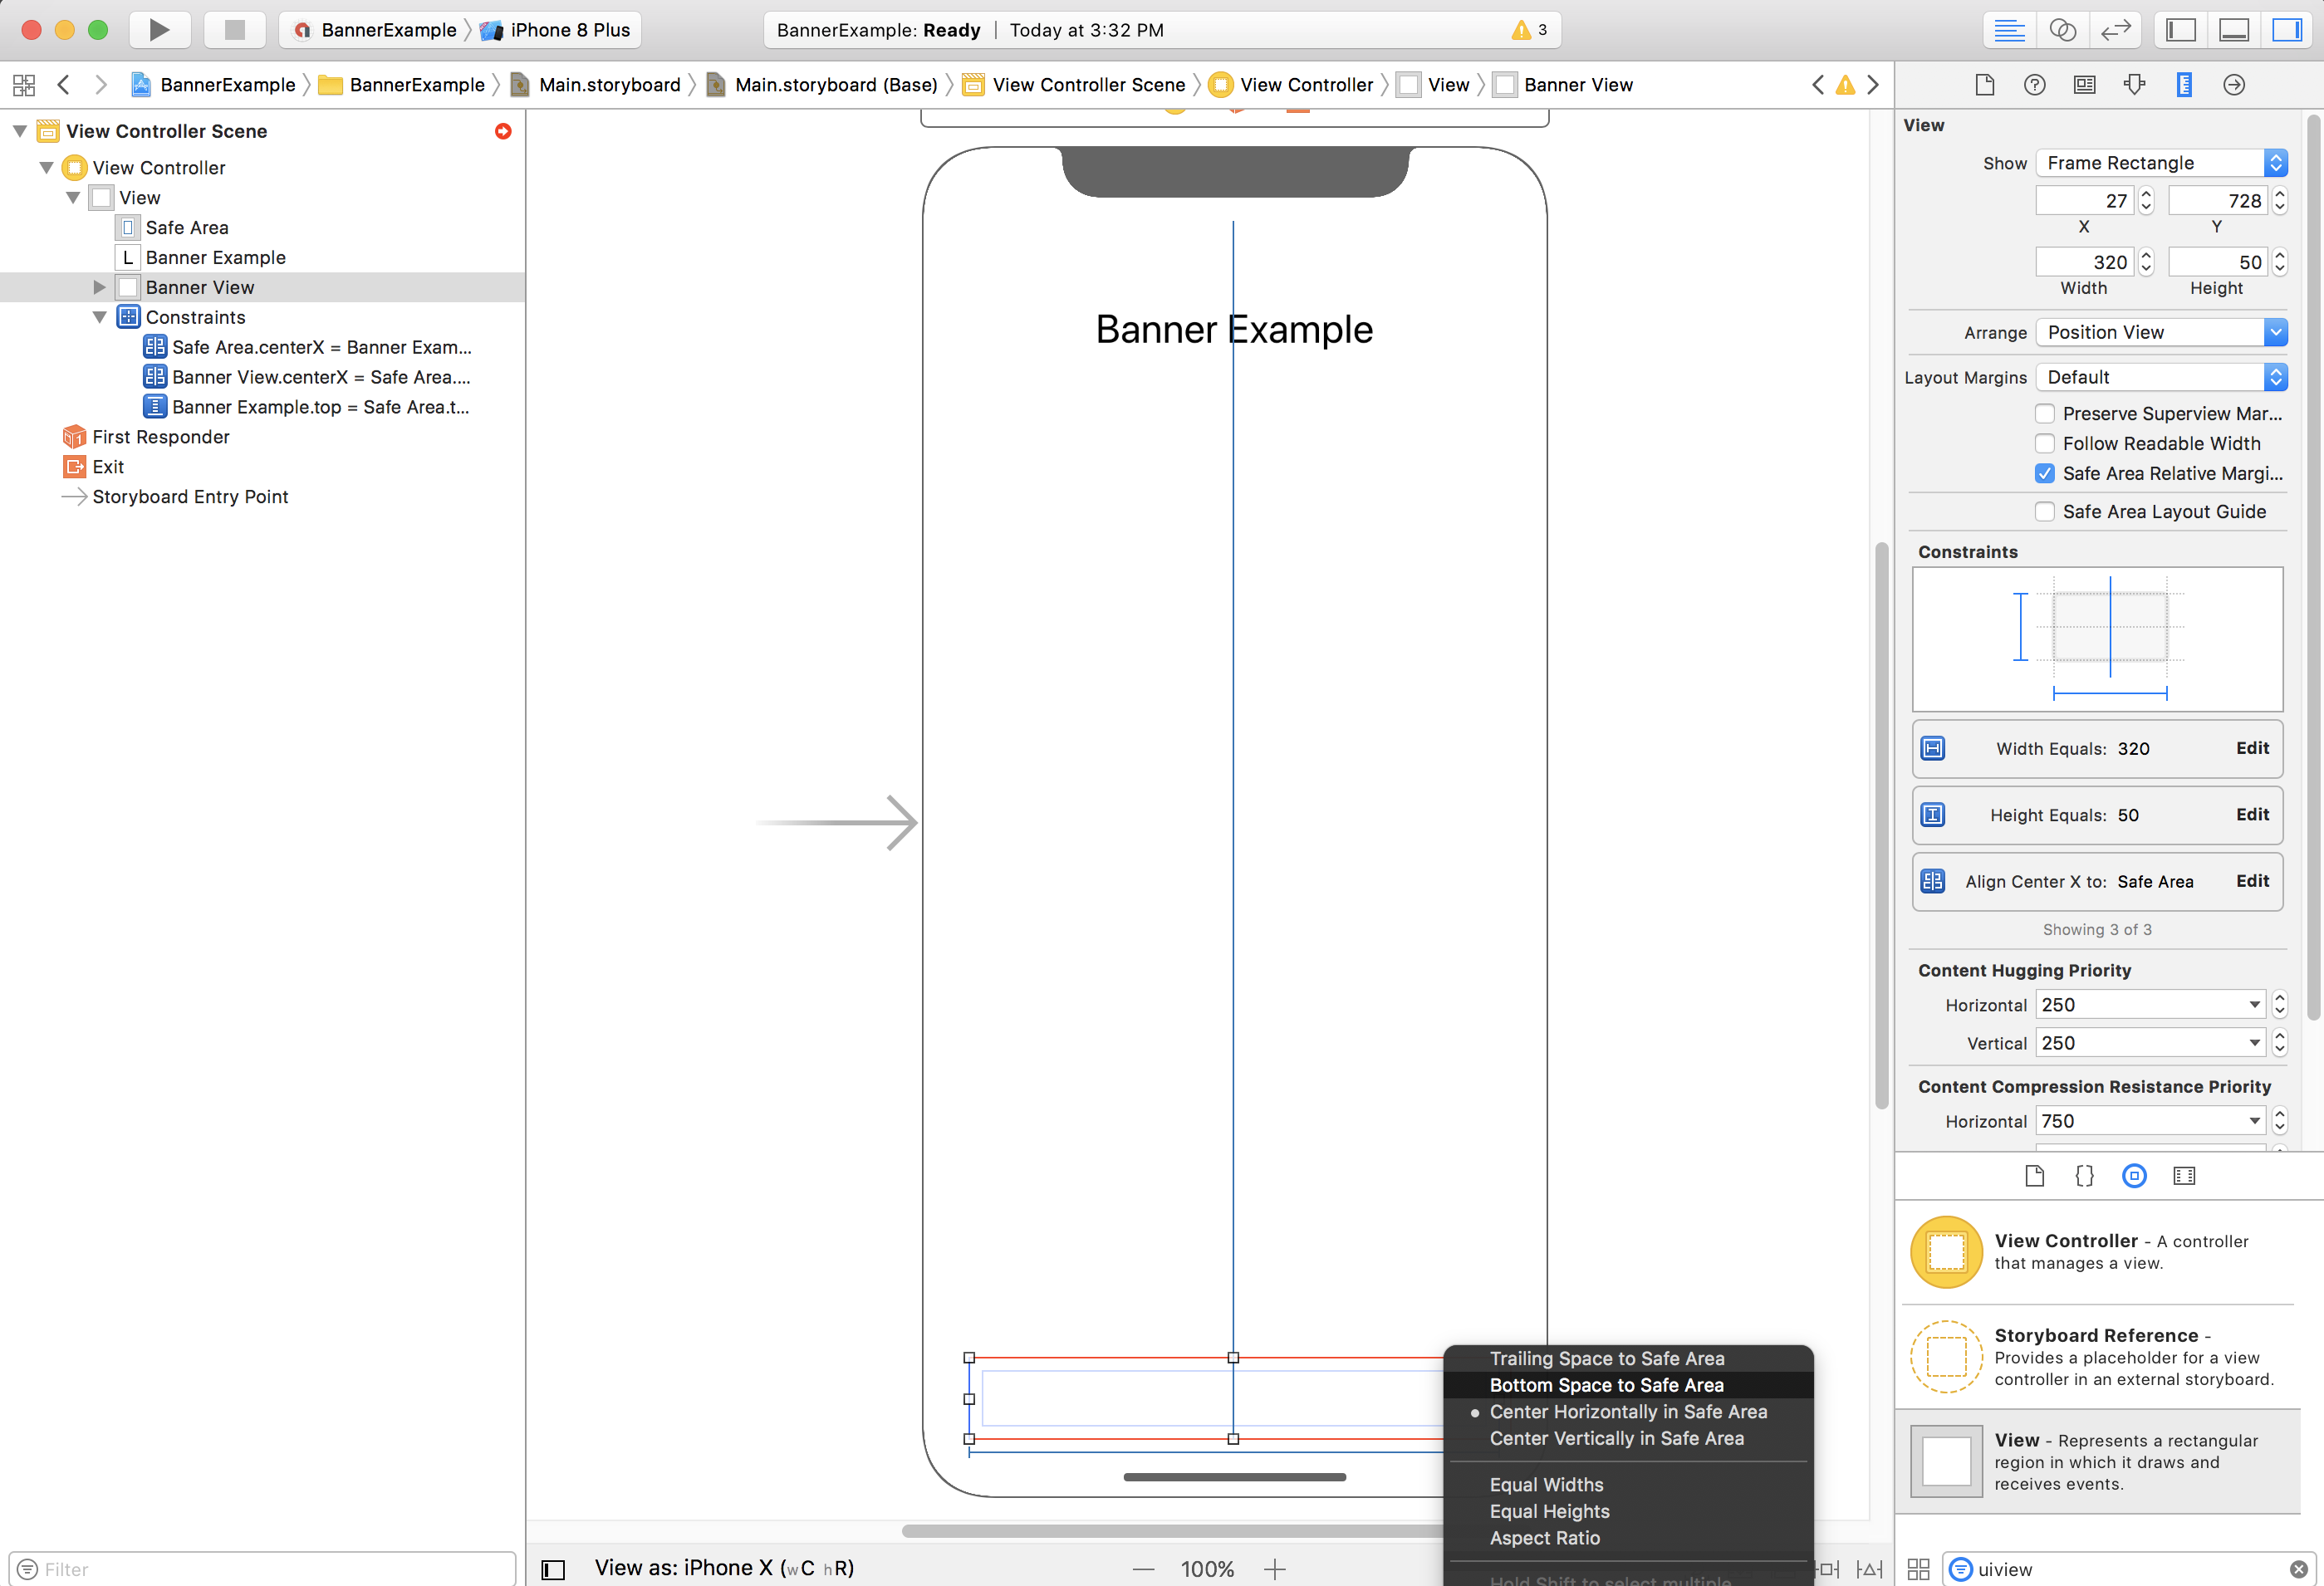
现在,您设置的限制值应与以下屏幕截图类似(尺寸/定位可能不尽相同):
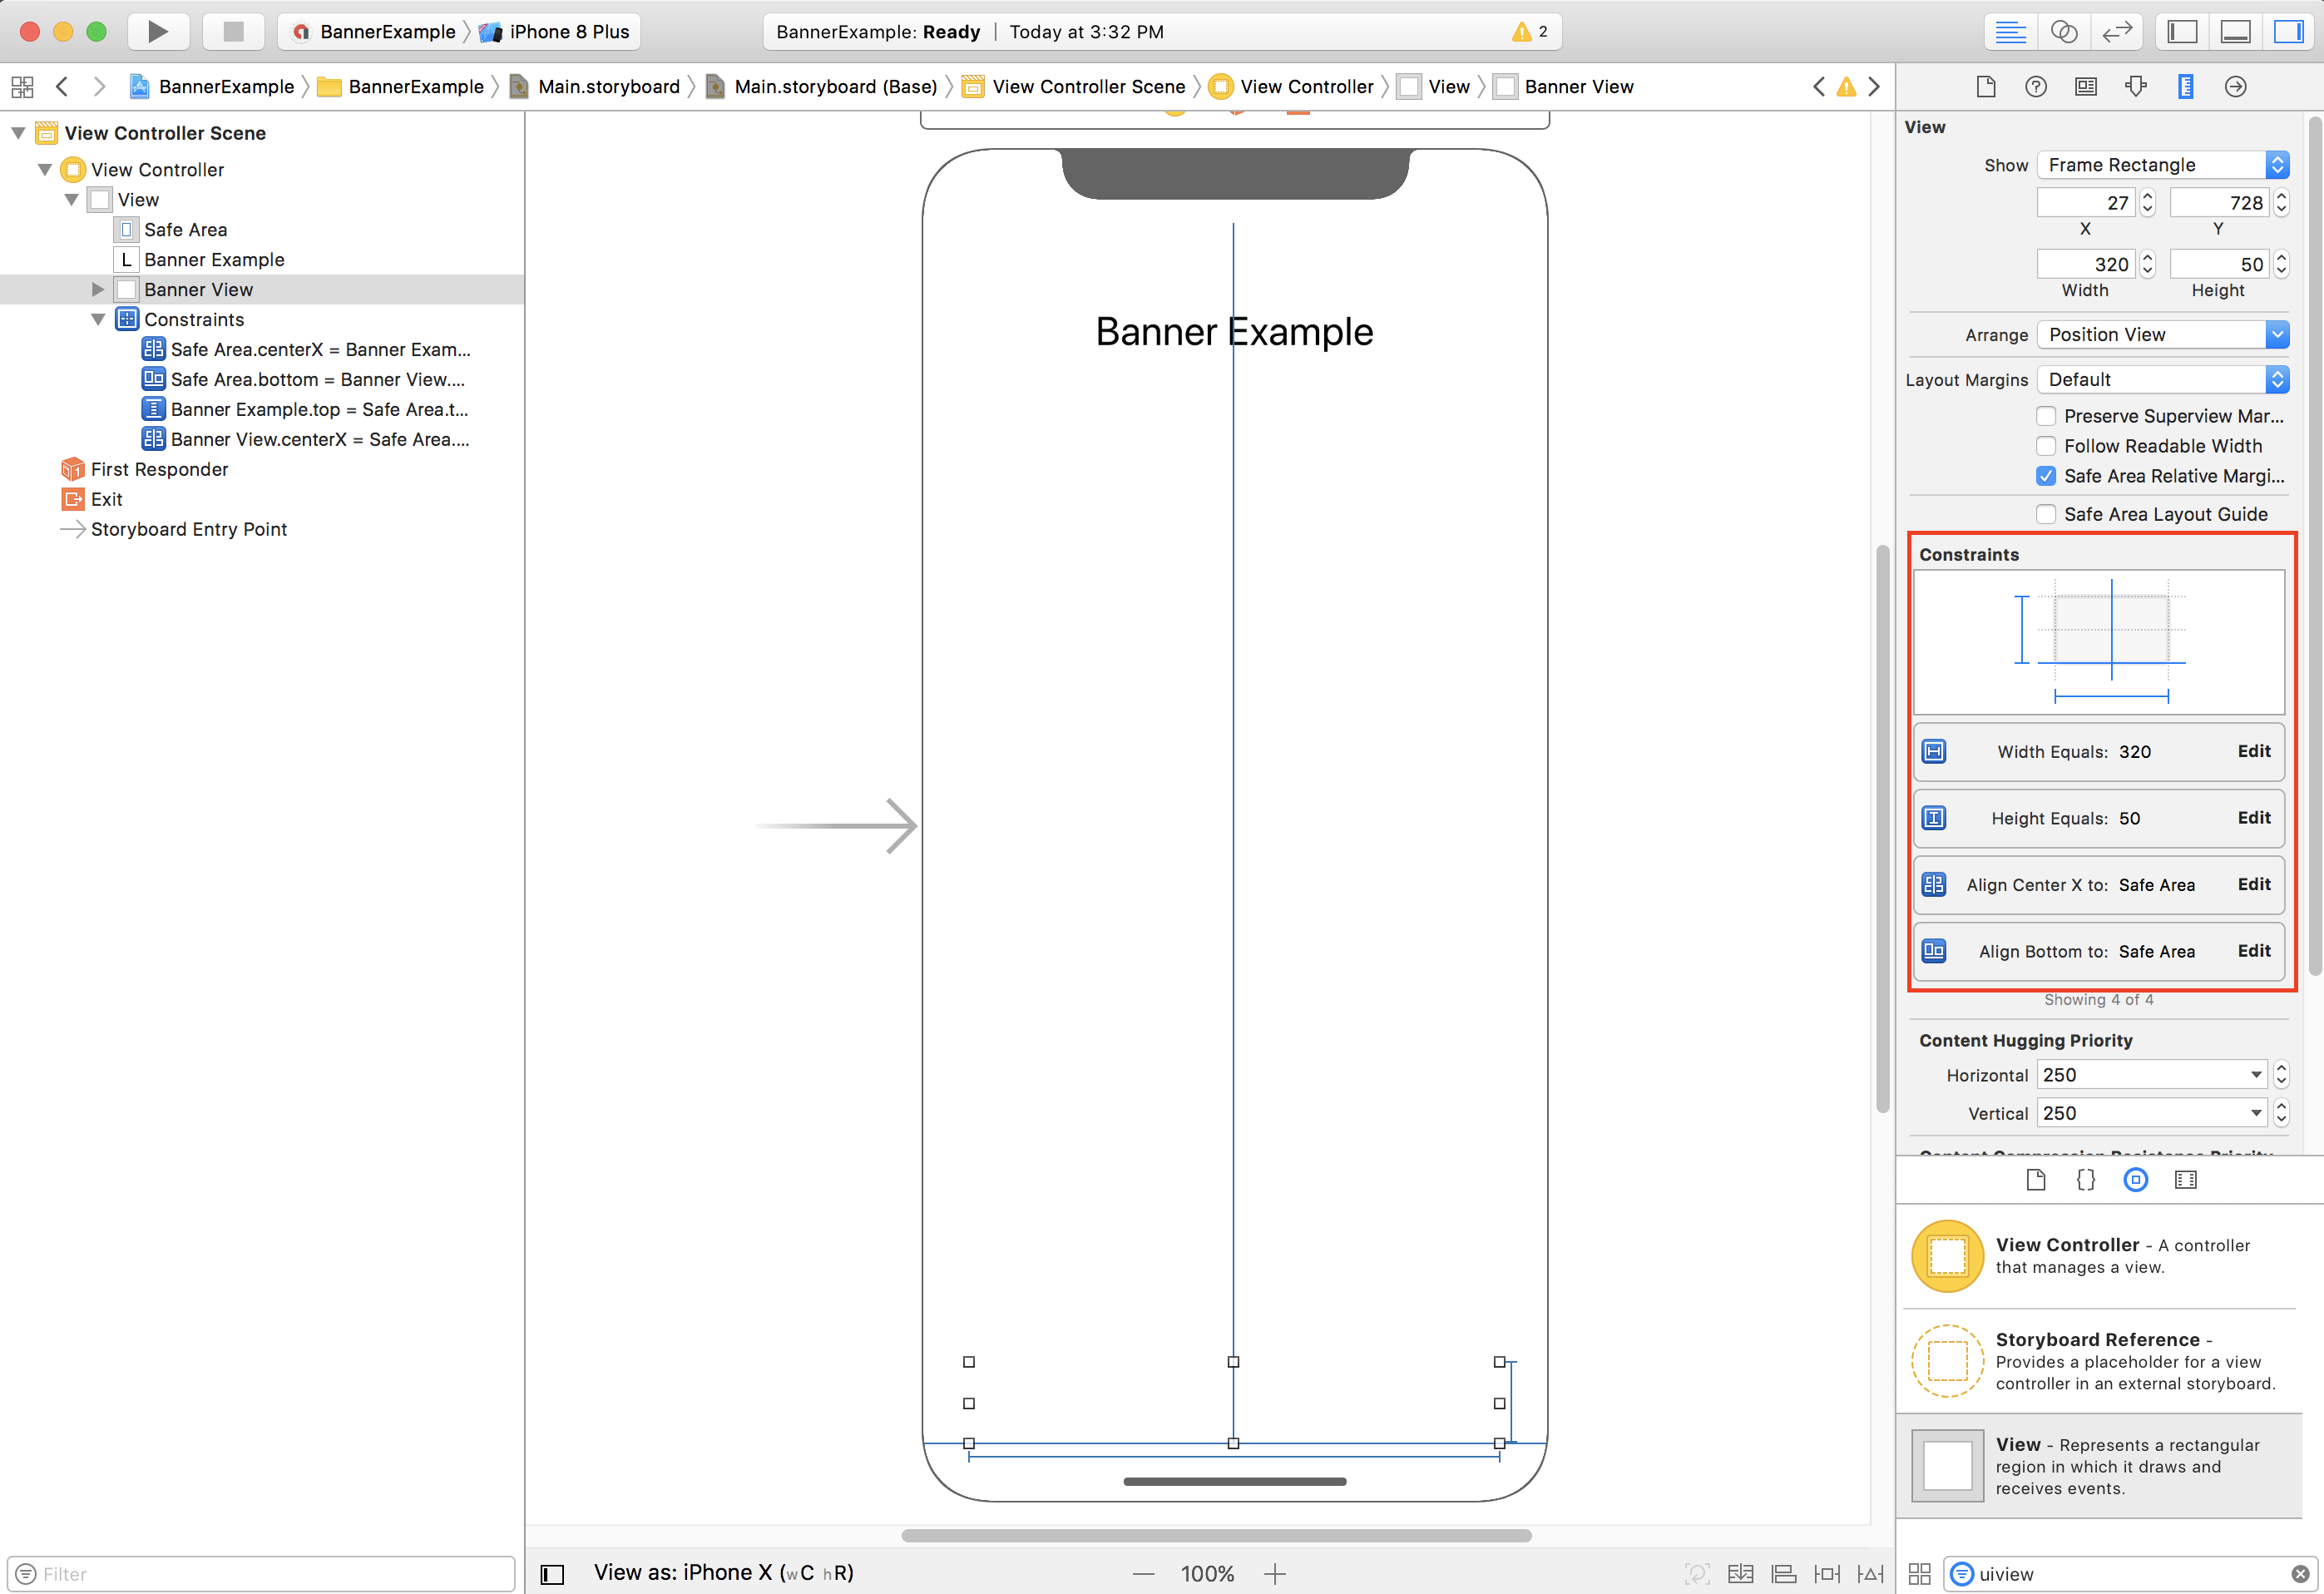
ViewController
以下是一个简单的视图控制器代码段,执行在上述 Storyboard 中配置的 GAMBannerView 中展示横幅广告所需的最低要求:
Swift
class ViewController: UIViewController {

  /// The banner view.
  @IBOutlet var bannerView: AdManagerBannerView!

  override func viewDidLoad() {
    super.viewDidLoad()
    // Replace this ad unit ID with your own ad unit ID.
    bannerView.adUnitID = "/21775744923/example/adaptive-banner"
    bannerView.rootViewController = self
    bannerView.load(AdManagerRequest())
  }

}
Objective-C
@interface ViewController()

@property(nonatomic, strong) IBOutlet GAMBannerView *bannerView;

@end

@implementation ViewController

- (void)viewDidLoad {
  [super viewDidLoad];

  // Replace this ad unit ID with your own ad unit ID.
  self.bannerView.adUnitID = @"/21775744923/example/adaptive-banner";
  self.bannerView.rootViewController = self;
  GAMRequest *request = [GAMRequest request];
  [self.bannerView loadRequest:request];
}
将横幅广告与安全区域边缘对齐
如果您希望让横幅广告左对齐或右对齐并显示为全宽,请输入横幅广告左/右侧的限制值,使其与安全区域的左/右侧对齐,而不是父视图的左/右侧。
如果您已启用使用安全区域布局指南,那么在给视图设置限制值时,Interface Builder 将默认使用安全区域边缘。
支持 iOS 8 及更低版本
如果您希望 Interface Builder 支持 iOS 8 或更低版本,则应取消选中 Interface Builder 文件和 Storyboard 的使用安全区域布局指南。
现在,您可以为顶部布局指南的底部(而非安全区域的顶部)设置限制值:

您也可以为底部布局指南的顶部(而非安全区域的底部)设置限制值:

对于全宽横幅广告,它们仅在横向显示时才会受安全区域的影响,所以不会存在这些布局指南。如果启用 Interface Builder 中的安全选项,那么,左对齐/右对齐限制值所对应的参照位置是外边距:

这会使得横幅广告的边缘稍微偏离父视图/安全区域的边缘,从而确保您的横幅广告在 iPhone X 中横向显示时不会被遮挡。此外,您也可以通过编程的方式获得理想的效果。
程序化
如果您的应用以编程方式制作横幅广告,则可以定义限制条件,并通过代码设置横幅广告的位置。此示例适用于 iOS 7.0 及更高版本,展示的是如何设置横幅广告的限制值,使其在安全区域底部水平居中:
Swift
class ViewController: UIViewController {

  var bannerView: AdManagerBannerView!

  override func viewDidLoad() {
    super.viewDidLoad()

    // Instantiate the banner view with your desired banner size.
    bannerView = AdManagerBannerView(adSize: AdSizeBanner)
    addBannerViewToView(bannerView)
    bannerView.rootViewController = self
    // Set the ad unit ID to your own ad unit ID here.
    bannerView.adUnitID = "/21775744923/example/adaptive-banner"
    bannerView.load(AdManagerRequest())
  }

  func addBannerViewToView(_ bannerView: UIView) {
    bannerView.translatesAutoresizingMaskIntoConstraints = false
    view.addSubview(bannerView)
    if #available(iOS 11.0, *) {
      positionBannerAtBottomOfSafeArea(bannerView)
    }
    else {
      positionBannerAtBottomOfView(bannerView)
    }
  }

  @available (iOS 11, *)
  func positionBannerAtBottomOfSafeArea(_ bannerView: UIView) {
    // Position the banner. Stick it to the bottom of the Safe Area.
    // Centered horizontally.
    let guide: UILayoutGuide = view.safeAreaLayoutGuide

    NSLayoutConstraint.activate(
      [bannerView.centerXAnchor.constraint(equalTo: guide.centerXAnchor),
       bannerView.bottomAnchor.constraint(equalTo: guide.bottomAnchor)]
    )
  }

  func positionBannerAtBottomOfView(_ bannerView: UIView) {
    // Center the banner horizontally.
    view.addConstraint(NSLayoutConstraint(item: bannerView,
                                          attribute: .centerX,
                                          relatedBy: .equal,
                                          toItem: view,
                                          attribute: .centerX,
                                          multiplier: 1,
                                          constant: 0))
    // Lock the banner to the top of the bottom layout guide.
    view.addConstraint(NSLayoutConstraint(item: bannerView,
                                          attribute: .bottom,
                                          relatedBy: .equal,
                                          toItem: self.bottomLayoutGuide,
                                          attribute: .top,
                                          multiplier: 1,
                                          constant: 0))
  }

}
Objective-C
@interface ViewController()

@property(nonatomic, strong) GAMBannerView *bannerView;

@end

@implementation ViewController

- (void)viewDidLoad {
  [super viewDidLoad];

  // Instantiate the banner view with your desired banner size.
  self.bannerView = [[GAMBannerView alloc] initWithAdSize:kGADAdSizeBanner];
  [self addBannerViewToVIew:self.bannerView];

  // Replace this ad unit ID with your own ad unit ID.
  self.bannerView.adUnitID = @"/21775744923/example/adaptive-banner";
  self.bannerView.rootViewController = self;
  GAMRequest *request = [GAMRequest request];
  [self.bannerView loadRequest:request];
}

#pragma mark - view positioning

-(void)addBannerViewToView:(UIView *_Nonnull)bannerView {
  self.bannerView.translatesAutoresizingMaskIntoConstraints = NO;
  [self.view addSubview:self.bannerView];
  if (@available(ios 11.0, *)) {
    [self positionBannerViewAtBottomOfSafeArea:bannerView];
  } else {
    [self positionBannerViewAtBottomOfView:bannerView];
  }
}

- (void)positionBannerViewAtBottomOfSafeArea:(UIView *_Nonnull)bannerView NS_AVAILABLE_IOS(11.0) {
  // Position the banner. Stick it to the bottom of the Safe Area.
  // Centered horizontally.
  UILayoutGuide *guide = self.view.safeAreaLayoutGuide;
  [NSLayoutConstraint activateConstraints:@[
    [bannerView.centerXAnchor constraintEqualToAnchor:guide.centerXAnchor],
    [bannerView.bottomAnchor constraintEqualToAnchor:guide.bottomAnchor]
  ]];
}

- (void)positionBannerViewAtBottomOfView:(UIView *_Nonnull)bannerView {
  [self.view addConstraint:[NSLayoutConstraint constraintWithItem:bannerView
                                                        attribute:NSLayoutAttributeCenterX
                                                        relatedBy:NSLayoutRelationEqual
                                                           toItem:self.view
                                                        attribute:NSLayoutAttributeCenterX
                                                       multiplier:1
                                                         constant:0]];
  [self.view addConstraint:[NSLayoutConstraint constraintWithItem:bannerView
                                                        attribute:NSLayoutAttributeBottom
                                                        relatedBy:NSLayoutRelationEqual
                                                           toItem:self.bottomLayoutGuide
                                                        attribute:NSLayoutAttributeTop
                                                       multiplier:1
                                                         constant:0]];
}

@end
通过修改所用的属性和锚点,您可以轻松地使用上述方法将限制值设置为安全区域的顶部。
原生广告
如果您的应用将原生广告固定到屏幕顶部或底部,那么适用于横幅广告的原则同样适用于原生广告。主要区别在于:为了遵循安全区域布局指南,您需要为 GADNativeAppInstallAdView 和 GADNativeContentAdView(或广告的父级视图)设置限制值,而不是为 GAMBannerView 设置限制值。对于原生广告视图,我们建议您提供更明确的尺寸限制值。
插页式广告和激励广告
全屏广告格式(包括插页式广告和激励广告)由 Google Mobile Ads SDK 呈现。Google Mobile Ads SDK SDK 将进行更新,以确保关闭按钮等广告元素在正确的位置呈现。此变更生效后,我们将更新版本说明和此文档页面。
