
构建 webhook 执行方式后,将其部署到生产环境并连接 添加到你的 Action。以下步骤展示了如何设置环境 部署到 Cloud Functions for Firebase 以进行生产托管。不过, 您可以选择任何支持 HTTPS 请求的网站托管平台 来托管您的执行方式。
如果您已将网络钩子部署到网站托管平台,则可以 请跳至将 webhook 连接到您的 Action。请注意,最后一个 根据您使用的是 Dialogflow 还是 Actions SDK。
部署到 Cloud Functions for Firebase
- 下载并安装 Node.js。
设置并初始化 Firebase CLI。如果以下命令失败并显示
EACCES错误,您可能需要 更改 npm 权限。npm install -g firebase-tools使用 Google 账号对 Firebase 工具进行身份验证:
firebase login前往您的 Action 项目目录,然后初始化 Firebase。你会 要求您选择要为 Actions 项目。选择您可能想要使用的
Functions及其他功能。 (例如 Firestore),然后按 Enter 键确认并继续:cd <cloud_function_dir> firebase init使用以下方法将 Firebase 工具与 Actions 项目相关联: 按箭头键可浏览项目列表:
选择项目后,Firebase 工具会开始设置 Functions 询问你要使用什么语言使用箭头键进行选择,然后 按 Enter 键继续。
=== Functions Setup

A functions directory will be created in your project with a Node.js
package pre-configured. Functions can be deployed with firebase deploy.

? What language would you like to use to write Cloud Functions? (Use arrow keys)
> JavaScript
TypeScript
选择是否要使用 ESLint 捕获可能出现的 bug 并强制执行样式 输入
Y或N:? Do you want to use ESLint to catch probable bugs and enforce style? (Y/n)
在提示符中输入
Y来获取项目依赖项:? Do you want to install dependencies with npm now? (Y/n)
设置完成后,您将看到类似于以下内容的输出:
✔ Firebase initialization complete!
安装 actions-on-google 依赖项:
cd <cloud_function_dir>/functions
npm install actions-on-google
获取 fulfillment 依赖项并部署 fulfillment 函数:
npm install
firebase deploy --only functions
部署需要几分钟时间。完成后,您将看到 与以下代码类似。您需要输入函数网址 Dialogflow。
✔  Deploy complete!

Project Console: https://console.firebase.google.com/project/exampleproject-123/overview
Function URL (cloudFunctionName): https://us-central1-exampleproject-123.cloudfunctions.net/cloudFunctionName
将网络钩子连接到您的 Action
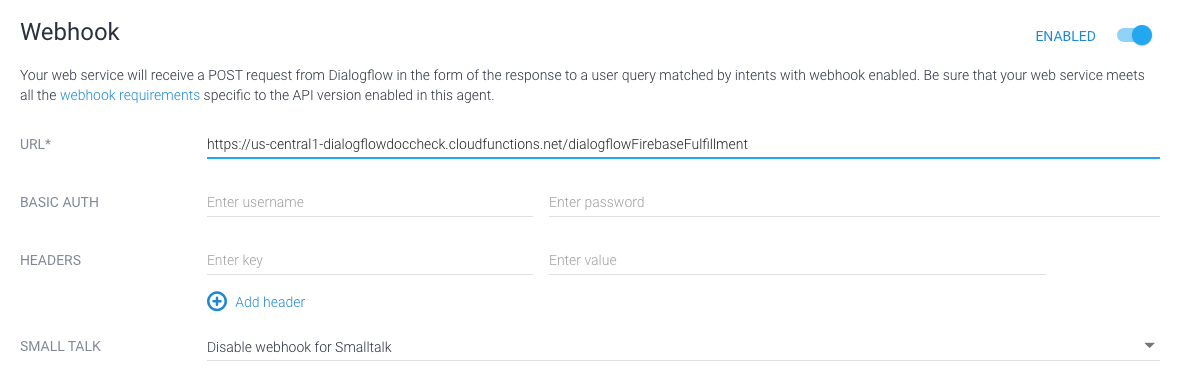
如果您使用的是 Dialogflow:在 Dialogflow 控制台,前往 Fulfillment,将 Webhook 按钮切换为已启用,并将 将 网址 字段中的网址替换为 Function 网址。
如果您使用的是 Actions SDK:请创建一个对象
在 conversations 对象内,在 Action 中声明执行方式
软件包:
{
  "actions": [
    {
      "description": "Default Welcome Intent",
      "name": "MAIN",
      "fulfillment": {
        "conversationName": "myFulfillmentFunction"
      },
      "intent": {
        "name": "actions.intent.MAIN",
        "trigger": {
          "queryPatterns": [
            "talk to myFulfillmentFunction"
          ]
        }
      }
    }
  ],
  "conversations": {
    "myFulfillmentFunction": {
      "name": "myFulfillmentFunction",
      "url": "https://us-central1-myprojectname-ab123.cloudfunctions.net/cloudFunctionName"
    }
  },
  "locale": "en"
}