Organiza tus páginas con colecciones
Guarda y categoriza el contenido según tus preferencias.
Una vez que hayas compilado la entrega de webhook, impleméntala en producción y conéctala.
a tu Action. En los siguientes pasos, se muestra cómo configurar tu entorno
a fin de implementarlos en Cloud Functions para Firebase para el hosting de producción. Sin embargo,
puedes elegir cualquier plataforma de hosting web que admita solicitudes HTTPS y
para alojar tu entrega.
Si ya implementaste tu webhook en una plataforma de hosting web, puedes hacer lo siguiente:
ve directamente a Conecta el webhook a tu Acción. Ten en cuenta que la última
los pasos del proceso que se indican a continuación difieren en función de si usas Dialogflow o
SDK de Actions.
Realiza la implementación en Cloud Functions para Firebase
Configura y, luego, inicializa Firebase CLI. Si el siguiente comando falla con
un error EACCES, es posible que debas
cambiar los permisos de npm.
npminstall-gfirebase-tools
Autentica la herramienta de Firebase con tu Cuenta de Google:
firebase login
Navega al directorio de tu proyecto de acción y, luego, inicializa Firebase. Serás
que selecciones las funciones de Firebase CLI que quieres configurar para tu
Proyecto de acciones. Elige Functions y otras funciones que quieras usar.
como Firestore, luego presiona Intro para confirmar y continuar:
cd <cloud_function_dir>
firebase init
Selecciona la herramienta de Firebase con tu proyecto de acciones para asociarla con
las teclas de flecha para navegar por la lista de proyectos:
Después de elegir el proyecto, la herramienta de Firebase inicia la configuración de Functions.
y te pregunta qué idioma quieres usar. Selecciona con las teclas de flecha y
presiona Intro para continuar.
=== Functions Setup A functions directory will be created in your project with a Node.js
package pre-configured. Functions can be deployed with firebase deploy.
? What language would you like to use to write Cloud Functions? (Use arrow keys)
> JavaScript
TypeScript
Elige si deseas usar ESLint para detectar posibles errores y aplicar estilo
Escribe Y o N:
? Do you want to use ESLint to catch probable bugs and enforce style? (Y/n)
Para obtener las dependencias del proyecto, escribe Y en el mensaje:
? Do you want to install dependencies with npm now? (Y/n)
Cuando finalice la configuración, verás un resultado similar al siguiente:
✔ Firebase initialization complete!
Instala la dependencia actions-on-google:
cd <cloud_function_dir>/functions
npm install actions-on-google
Obtén las dependencias de entrega y, luego, implementa la función de entrega:
npm install
firebase deploy --only functions
La implementación tarda unos minutos. Cuando termines, verás el resultado
similares a los siguientes. Necesitarás la URL de la función para ingresar
Dialogflow
✔ Deploy complete! Project Console: https://console.firebase.google.com/project/exampleproject-123/overview
Function URL (cloudFunctionName): https://us-central1-exampleproject-123.cloudfunctions.net/cloudFunctionName
Conecta el webhook a tu acción
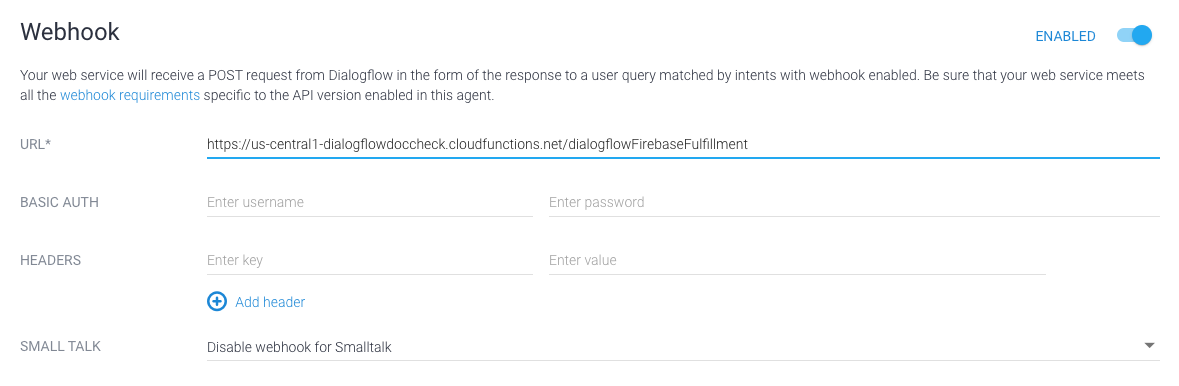
Si usas Dialogflow, haz lo siguiente:
Consola de Dialogflow, ve a
Fulfillment, cambia el botón Webhook a HABILITADO y reemplaza el
la URL en el campo URL con la URL de función.
Si usas el SDK de Actions, crea un objeto.
dentro del objeto conversations para declarar tu entrega en tu acción
paquete:
[null,null,["Última actualización: 2025-07-26 (UTC)"],[[["\u003cp\u003eThis guide explains how to deploy your Action's webhook fulfillment to a production environment, primarily focusing on Cloud Functions for Firebase.\u003c/p\u003e\n"],["\u003cp\u003eYou need Node.js and the Firebase CLI installed and authenticated to deploy your fulfillment function to Firebase.\u003c/p\u003e\n"],["\u003cp\u003eThe deployment process involves initializing Firebase within your Action project, selecting the desired language and configuration options, installing necessary dependencies, and finally deploying the function.\u003c/p\u003e\n"],["\u003cp\u003eAfter successful deployment, you'll receive a Function URL which needs to be connected to your Action in Dialogflow or declared in your Action package for Actions SDK.\u003c/p\u003e\n"],["\u003cp\u003eFor quicker development iterations, consider using tools like ngrok to expose your local fulfillment to the internet, but exercise caution as this can introduce security vulnerabilities.\u003c/p\u003e\n"]]],["To deploy a webhook to production, set up a hosting environment like Cloud Functions for Firebase. First, install Node.js and the Firebase CLI, then authenticate and initialize Firebase in your project directory. Choose `Functions` and your preferred language (JavaScript or TypeScript). Install dependencies, including `actions-on-google`. Deploy using `firebase deploy --only functions`. Finally, connect the webhook to your Action: in Dialogflow, enable the webhook and input the Function URL; in Actions SDK, declare the fulfillment within the `conversations` object of your Action package.\n"],null,["# Deploy fulfillment (Dialogflow)\n\nOnce you've built your webhook fulfillment, deploy it to production and connect\nit to your Action. The following steps show you how to set up your environment\nto deploy to [Cloud Functions for Firebase](/assistant/console/firebase-services) for production hosting. However,\nyou can choose any web hosting platform that supports HTTPS requests and\nresponses to host your fulfillment.\n\nIf you have already deployed your webhook to a web hosting platform, you can\nskip to [Connect the webhook to your Action](#connect). Note that the final\nsteps in the process below differ based on whether you use Dialogflow or the\nActions SDK.\n| **Note:** Your fulfillment must respond within 5 seconds or the Assistant ends your conversation due to a timeout.\n\nDeploy to Cloud Functions for Firebase\n--------------------------------------\n\n1. [Download and install Node.js](https://nodejs.org/).\n2. Set up and initialize the Firebase CLI. If the following command fails with\n an `EACCES` error, you may need to\n [change npm permissions](https://docs.npmjs.com/getting-started/fixing-npm-permissions).\n\n npm install -g firebase-tools\n\n3. Authenticate the Firebase tool with your Google account:\n\n firebase login\n\n4. Navigate to your Action project directory and initialize Firebase. You'll be\n asked to select which Firebase CLI features you want to set up for your\n Actions project. Choose `Functions` and other features you might want to use,\n like Firestore, then press Enter to confirm and continue:\n\n cd \u003ccloud_function_dir\u003e\n firebase init\n\n5. Associate the Firebase tool with your Actions project by selecting it using\n the arrow keys to navigate the projects list:\n\n | **Note:** You can skip this step by selecting **\\[don't setup a default project\\]** , but then you will need to do this association later using the command **firebase use --project**.\n6. After choosing the project, the Firebase tool starts the Functions setup\n asking you what language you want to use. Select using the arrow keys and\n press Enter to continue.\n\n ```\n === Functions Setup\n\n A functions directory will be created in your project with a Node.js\n package pre-configured. Functions can be deployed with firebase deploy.\n\n ? What language would you like to use to write Cloud Functions? (Use arrow keys)\n \u003e JavaScript\n TypeScript\n ```\n7. Choose if you want to use ESLint to catch probable bugs and enforce style\n typing `Y` or `N`:\n\n ```\n ? Do you want to use ESLint to catch probable bugs and enforce style? (Y/n)\n ```\n8. Get the project dependencies by typing `Y` to the prompt:\n\n ```\n ? Do you want to install dependencies with npm now? (Y/n)\n ```\n\n Once the setup is completed, you'll see an output similar to the following: \n\n ```\n ✔ Firebase initialization complete!\n ```\n9. Install the **actions-on-google** dependency:\n\n cd \u003ccloud_function_dir\u003e/functions\n npm install actions-on-google\n\n10. Get the fulfillment dependencies and deploy the fulfillment function:\n\n npm install\n firebase deploy --only functions\n\n The deployment takes a few minutes. Once completed, you'll see output\n similar to the following. You'll need the **Function URL** to enter in\n Dialogflow. \n\n ```\n ✔ Deploy complete!\n\n Project Console: https://console.firebase.google.com/project/exampleproject-123/overview\n Function URL (cloudFunctionName): https://us-central1-exampleproject-123.cloudfunctions.net/cloudFunctionName\n ```\n\nConnect the webhook to your Action\n----------------------------------\n\n**If you're using Dialogflow:** In the\n[Dialogflow console](https://console.dialogflow.com), go to\n**Fulfillment** , toggle the **Webhook** button to **ENABLED** , and replace\nthe url in the **URL** field with your **Function URL**.\n\n\n**If you're using Actions SDK:** Create an object\ninside the `conversations` object to declare your fulfillment in your Action\npackage: \n\n```text\n{\n \"actions\": [\n {\n \"description\": \"Default Welcome Intent\",\n \"name\": \"MAIN\",\n \"fulfillment\": {\n \"conversationName\": \"myFulfillmentFunction\"\n },\n \"intent\": {\n \"name\": \"actions.intent.MAIN\",\n \"trigger\": {\n \"queryPatterns\": [\n \"talk to myFulfillmentFunction\"\n ]\n }\n }\n }\n ],\n \"conversations\": {\n \"myFulfillmentFunction\": {\n \"name\": \"myFulfillmentFunction\",\n \"url\": \"https://us-central1-myprojectname-ab123.cloudfunctions.net/cloudFunctionName\"\n }\n },\n \"locale\": \"en\"\n}\n```\n| **Note:** You sometimes might want to do development and testing locally on your development machine for quicker iterations. However, your fulfillment must be addressable from the internet. To work around this, you can use a tool like [ngrok](https://ngrok.io), which allows you to create a tunnel from the internet into your development machine. Be aware that this makes your machine vulnerable to attacks, so use caution if you choose this development model."]]