با مجموعهها، منظم بمانید
ذخیره و طبقهبندی محتوا براساس اولویتهای شما.
این صفحه نحوه ایجاد مشکل در Google Issue Tracker را نشان می دهد.
برای ایجاد مشکل، باید به یک حساب Google وارد شوید. همچنین باید مجوزCreate Issues یا Admin Components برای مؤلفه ای که مشکل ایجاد می شود داشته باشید. اگر مجوز نظر در مورد مسائل را دارید، میتوانید فقط عنوان و شرح موضوع را تنظیم کنید. اگر مجوز ویرایش مسائل را دارید، می توانید فیلدهای دیگر را تنظیم کنید.
قالب ها
الگوها در Google Issue Tracker مقادیر پیشفرض فیلدها را در شمارههای جدید یک جزء مشخص میکنند. هر مؤلفه یک الگوی پیشفرض دارد، اما ممکن است الگوهای دیگری داشته باشد که توسط کارمند Google که مسئول مدیریت آن است، پیکربندی شده است. کاربران عمومی و شریک نمی توانند الگوهای مرتبط با یک جزء را ایجاد یا تغییر دهند.
یک الگو را انتخاب کنید
وقتی مشکلی را در Issue Tracker ایجاد میکنید ، الگوی پیشفرض برای مؤلفه بهطور خودکار انتخاب میشود. اگر الگوهای اضافی در دسترس هستند، میتوانید آنها را از فهرست کشویی الگو در صفحه ایجاد مشکل انتخاب کنید.
هنگامی که یک الگو را انتخاب می کنید، فیلدهای صفحه به طور خودکار با مقادیر پیش فرض تعریف شده پر می شوند.
Issue Tracker صفحه Create Issue را باز می کند و قسمت Component را انتخاب می کند. این فیلد یک لیست کشویی از اجزا را نشان می دهد.
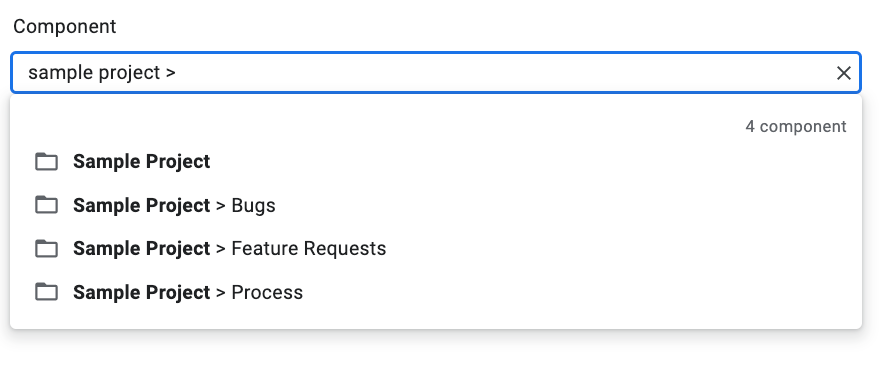
از لیست کشویی برای پیدا کردن مؤلفه ای که می خواهید مشکل را در آن ایجاد کنید، استفاده کنید. فقط میتوانید اجزایی را پیدا کنید که مجوز ایجاد مشکلات یا اجزای مدیریت را داشته باشید.
(اختیاری) الگویی را انتخاب کنید که به بهترین وجه برای مشکلی که گزارش میکنید، کاربرد دارد. برخی از کامپوننت ها فقط یک قالب پیش فرض دارند.
عنوانی را در قسمت عنوان وارد کنید. عنوان زمانی که جزئیات موضوع را مشاهده می کنید و همچنین در نتایج جستجو، لیست های داغ و سایر مکان هایی که در حال مشاهده لیست مشکلات هستید، نمایش داده می شود.
یک اولویت را از لیست کشویی اولویت انتخاب کنید. فیلد اولویت تنها در صورتی قابل مشاهده است که مجوز ویرایش مسائل را داشته باشید.
نوع مشکل را از لیست کشویی Type انتخاب کنید. فیلد نوع فقط در صورتی قابل مشاهده است که مجوز ویرایش مسائل را داشته باشید.
(اختیاری) یک گیرنده تعیین کنید یا آدرسهای ایمیل (از جمله آدرسهای فهرست پستی) را به فهرستهای همکاران و CC اضافه کنید. این فیلدها فقط در صورتی قابل مشاهده هستند که مجوز ویرایش مسائل را داشته باشید.
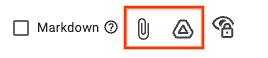
(توصیه می شود) توضیحاتی را برای مشکل در قسمت توضیحات وارد کنید. اگر متن توضیحات توسط الگوی انتخابی ارائه شده باشد، ممکن است این فیلد قبلاً تا حدی برای شما پر شده باشد. همچنین می توانید گزینه Markdown را تیک بزنید تا توضیحات را به عنوان متن نشانه گذاری بنویسید.
(اختیاری) پیوست ها را از رایانه خود یا از یک مکان Drive اضافه کنید.
(اختیاری) فیلدهای پیشرفته را برای موضوع پر کنید.
با جابجایی پنل فیلدهای پیشرفته می توانید این فیلدها را مشاهده کنید. پانل فیلدهای پیشرفته فقط در صورتی قابل مشاهده است که مجوز ویرایش مسائل را داشته باشید. در بیشتر موارد، هنگام ایجاد مشکل، میتوانید از فیلدهای پیشرفته رد شوید. با این حال، برخی از مؤلفه ها از شما می خواهند که مقادیری را برای آنها وارد کنید. در این صورت، قسمت Advanced fields به صورت خودکار ظاهر می شود و فیلدهای مورد نیاز با ستاره (*) مشخص می شوند.
برای ارسال مشکل روی دکمه ایجاد کلیک کنید یا برای ارسال مشکل روی Create & Start Another کلیک کنید و صفحه ایجاد مشکل جدید را باز کنید که از قبل با مقادیر استفاده شده برای مسئله ای که ایجاد کرده اید از قبل پر شده است.
یک مسئله را بر اساس یک موضوع موجود ایجاد کنید
شما همچنین می توانید یک مشکل را بر اساس یک موجود ایجاد کنید. این روش با استفاده از مشکل موجود برای پر کردن فیلدهای خاص می تواند در وقت شما صرفه جویی کند.
برای ایجاد یک مشکل بر اساس مشکل موجود:
موضوع موجود را باز کنید.
روی دکمه کنار ایجاد کلیک کنید.
نحوه ایجاد شماره جدید را از لیست کشویی انتخاب کنید. گزینه های موجود در لیست کشویی بسته به صفحه ای که مشاهده می کنید متفاوت است. دکمه فقط در صورتی قابل مشاهده می شود که حداقل یک گزینه در دسترس باشد.
7 گزینه ممکن وجود دارد.
گزینه
توضیحات
زمانی ظاهر می شود
در همان کامپوننت
مشکل جدیدی را با کامپوننت تنظیم شده روی مؤلفه فعلی شروع می کند.
(1) مدیریت یک جزء، (2) مشاهده مسائل در یک جزء، (3) مشاهده یک مشکل
مشابه موضوع فعلی
یک شماره جدید را با فیلدهای شماره فعلی کپی شده در شماره جدید شروع می کند.
مشاهده یک مسئله
مسدود شده توسط مشکل فعلی
یک شماره جدید را با مشکل فعلی به عنوان یک مشکل مسدود کردن شروع می کند.
مشاهده یک مسئله
مسدود کردن مشکل فعلی
یک شماره جدید را با مشکل فعلی به عنوان یک مشکل مسدود شده شروع می کند.
مشاهده یک مسئله
پدر و مادر از موضوع فعلی
یک شماره جدید را با شماره فعلی به عنوان یک مسئله کودک شروع می کند.
مشاهده یک مسئله
فرزند از موضوع فعلی
یک شماره جدید را با شماره فعلی به عنوان یک مشکل والدین شروع می کند.
مشاهده یک مسئله
در همان فهرست داغ
یک شماره جدید با لیست داغ فعلی که به آن اضافه شده است، شروع می کند.
(1) مدیریت یک لیست داغ، (2) مشاهده مسائل تحت یک لیست داغ
کلیه حقوق محفوظ است. Java علامت تجاری ثبتشده Oracle و/یا شرکتهای وابسته به آن است.
تاریخ آخرین بهروزرسانی 2025-07-24 بهوقت ساعت هماهنگ جهانی.
[null,null,["تاریخ آخرین بهروزرسانی 2025-07-24 بهوقت ساعت هماهنگ جهانی."],[[["\u003cp\u003eIssue creation in Google Issue Tracker requires a Google account and specific permissions (Create Issue, Admin, Comment on Issues, or Edit Issues) depending on the desired actions.\u003c/p\u003e\n"],["\u003cp\u003eTemplates, defined by Google employees, provide default field values for new issues within a component and can be selected during issue creation to streamline the process.\u003c/p\u003e\n"],["\u003cp\u003eThe process of creating an issue involves selecting a component, entering details such as title, priority, type, and description, and optionally adding attachments and configuring advanced fields.\u003c/p\u003e\n"],["\u003cp\u003eIssue Tracker provides options to create new issues based on existing ones, leveraging information like component, hotlist, or even copying field values for efficiency.\u003c/p\u003e\n"],["\u003cp\u003eUsers can explore further information regarding issues, components, and managing issues through provided links.\u003c/p\u003e\n"]]],[],null,["# Create an Issue\n\nThis page shows how to create an [issue](../concepts/issues) in Google Issue\nTracker.\n\nTo create an issue, you must be signed in to a Google Account. You also must\nhave **Create Issues** or **Admin Components**\n[permission](../concepts/access-control) for the component where the issue will\nbe created. If you have **Comment on Issues** permission, you may set the issue\ntitle and description only. If you have **Edit Issues** permission, you can set\nother fields.\n\nTemplates\n---------\n\nTemplates in Google Issue Tracker specify default values for fields in new\nissues in a [component](../concepts/components). Each component has a default\ntemplate but may have additional templates as configured by the Google employee\nwho is responsible for managing it. Public and partner users cannot create or\nmodify the templates associated with a component.\n\n### Choose a template\n\nWhen you [create an issue](../guides/create-issue-ui) in Issue Tracker, the\ndefault template for the component is automatically selected. If additional\ntemplates are available, you can select them from the **Template** drop-down\nlist on the **Create Issue** page.\n\nWhen you select a template, the fields in the page are automatically populated\nwith the default values defined.\n\nCreate an issue\n---------------\n\nTo create an issue:\n\n1. [Open Issue Tracker](../guides/access-ui) in your web browser.\n\n2. Click **Create Issue**.\n\n Issue Tracker opens the **Create Issue** page and has the **Component**\n field selected. This field shows a drop-down list of components.\n\n3. Use the drop-down list to [find the component](/issue-tracker/guides/find-a-component) where you want to create\n the issue. You can only find components where you have **Create Issues** or\n **Admin Components** permission.\n\n4. (Optional) Choose a [template](../concepts/templates) that best applies to\n the issue you are reporting. Some components only have a default template.\n\n5. Enter a [title](../references/glossary-of-fields#title) in the **Title** field. The title is displayed when you\n view the details of the issue, as well as in search results, hotlists and\n other places where you are viewing lists of issues.\n\n6. Select a [priority](../references/glossary-of-fields#priority) from the **Priority** drop-down list. The\n **Priority** field is only visible if you have **Edit Issues** permission.\n\n7. Select the issue [type](../references/glossary-of-fields#type) from the **Type** drop-down list. The **Type**\n field is only visible if you have **Edit Issues** permission.\n\n8. (Optional) Designate an [assignee](../references/glossary-of-fields#assignee) or add email addresses (including\n mailing list addresses) to the [Collaborators](../references/glossary-of-fields#collaborators) and [CC](../references/glossary-of-fields#cc) lists. These\n fields are only visible if you have **Edit Issues** permission.\n\n | Depending on your [email notification settings](/issue-tracker/guides/set-notification-preferences), you might need to add yourself to the CC list to receive notifications.\n9. (Recommended) Enter a [description](../references/glossary-of-fields#description) for the issue in the **Description**\n field. This field might already be partially populated for you if\n description text is provided by the selected template. You can also check\n the **Markdown** option to write the description as\n [markdown](https://commonmark.org) text.\n\n10. (Optional) Add attachments from your computer or from a Drive location.\n\n11. (Optional) Fill in the advanced fields for the issue.\n\n You can view these fields by toggling the **Advanced fields** panel. The\n **Advanced fields** panel is only visible if you have **Edit Issues**\n permission. In most cases, you can skip advanced fields when creating an\n issue. However, some components require you to enter values for them. If\n this is the case, the **Advanced fields** section appears automatically, and\n the required fields are marked with an asterisk (\\*).\n\n12. Click the **Create** button to submit the issue or click **Create \\& Start\n Another** to submit the issue and open a new **Create Issue** page\n pre-populated with the values used for the issue you just created.\n\n| Hover over the name of a field in the Create Issue page to view a field description.\n\nCreate an issue based on an existing one\n----------------------------------------\n\nYou can also create an issue based on an existing one. This method can save you\ntime by using the existing issue to pre-fill certain fields.\n\nTo create an issue based on an existing one:\n\n1. Open the existing issue.\n\n2. Click the button next to **Create**.\n\n3. Choose how you want to create the new issue from the drop-down list. The\n options in the drop-down list vary depending on the page that you are\n viewing. The button only becomes visible if there is at least one option\n available.\n\nThere are 7 possible options.\n\n| Option | Description | Appears when |\n|------------------------------|----------------------------------------------------------------------------------|-----------------------------------------------------------------------------------|\n| **In Same Component** | Starts a new issue with component set to the current component. | (1) Managing a component, (2) Viewing issues in a component, (3) Viewing an issue |\n| **Similar To Current Issue** | Starts a new issue with the fields of the current issue copied to the new issue. | Viewing an issue |\n| **Blocked By Current Issue** | Starts a new issue with the current issue as a blocking issue. | Viewing an issue |\n| **Blocking Current Issue** | Starts a new issue with the current issue as a blocked issue. | Viewing an issue |\n| **Parent Of Current Issue** | Starts a new issue with the current issue as a child issue. | Viewing an issue |\n| **Child Of Current Issue** | Starts a new issue with the current issue as a parent issue. | Viewing an issue |\n| **In Same Hotlist** | Starts a new issue with the current hotlist added to it. | (1) Managing a hotlist, (2) Viewing issues under a hotlist |\n\n| The **Similar To Current Issue** option does not copy the changelist, duplicate issue ID, CC or reporter fields from the original issue.\n\nWhat's next\n-----------\n\n- [Learn more about issues](../concepts/issues)\n- [Learn more about components](../concepts/components)\n- [View and edit issues](/issue-tracker/guides/edit-issue-ui)"]]