Koleksiyonlar ile düzeninizi koruyun
İçeriği tercihlerinize göre kaydedin ve kategorilere ayırın.
Bu sayfada, Google Issue Tracker'da sorun oluşturma işlemi gösterilmektedir.
Sorun oluşturmak için bir Google Hesabı'nda oturum açmış olmanız gerekir. Ayrıca, sorunun oluşturulacağı bileşen için Sorun Oluşturma veya Bileşenleri Yönetmeiznine sahip olmanız gerekir. Sorunlarda yorum yapma izniniz varsa yalnızca sorun başlığını ve açıklamasını ayarlayabilirsiniz. Sorunları Düzenle izniniz varsa diğer alanları da ayarlayabilirsiniz.
Şablonlar
Google Sorun Takip'teki şablonlar, bileşen içindeki yeni sorunlardaki alanlar için varsayılan değerleri belirtir. Her bileşenin varsayılan bir şablonu vardır ancak bu bileşeni yönetmekten sorumlu Google çalışanı tarafından yapılandırılmış ek şablonlar da olabilir. Herkese açık kullanıcılar ve iş ortakları, bir bileşenle ilişkili şablonları oluşturamaz veya değiştiremez.
Şablon seçin
Sorun Takip Aracı'nda sorun oluşturduğunuzda bileşenin varsayılan şablonu otomatik olarak seçilir. Ek şablonlar varsa bunları Sorun Oluştur sayfasındaki Şablon açılır listesinden seçebilirsiniz.
Bir şablon seçtiğinizde sayfadaki alanlar, tanımlanan varsayılan değerlerle otomatik olarak doldurulur.
Sorun Takip Aracı, Sorun Oluştur sayfasını açar ve Bileşen alanını seçer. Bu alanda bileşenlerin açılır listesi gösterilir.
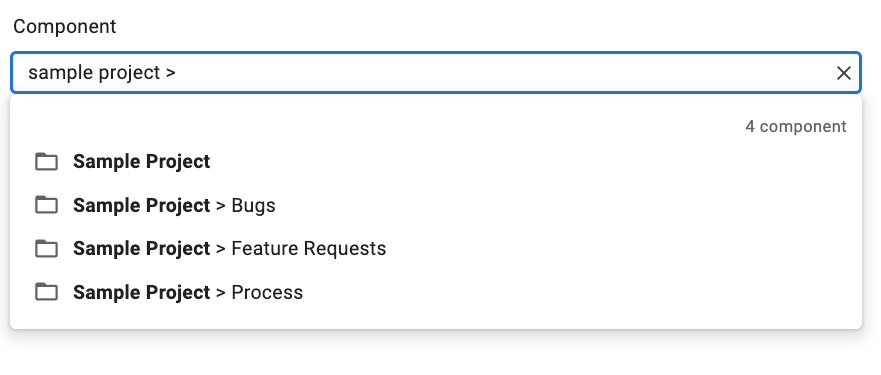
Sorunu oluşturmak istediğiniz bileşeni bulmak için açılır listeyi kullanın. Yalnızca Sorun Oluşturma veya Bileşenleri Yönetme iznine sahip olduğunuz bileşenleri bulabilirsiniz.
(İsteğe bağlı) Bildirdiğiniz sorunla en alakalı şablonu seçin. Bazı bileşenlerde yalnızca varsayılan bir şablon bulunur.
Başlık alanına bir başlık girin. Başlık, sorunun ayrıntılarını görüntülediğinizde, arama sonuçlarında, popüler listelerde ve sorun listelerini görüntülediğiniz diğer yerlerde gösterilir.
Öncelik açılır listesinden bir öncelik seçin. Öncelik alanı yalnızca Sorunları Düzenleme izniniz varsa görünür.
Tür açılır listesinden sorun türünü seçin. Tür alanı yalnızca Sorunları Düzenleme izniniz varsa görünür.
(İsteğe bağlı) Bir atama yapın veya Ortak çalışanlar ve CC listelerine e-posta adresleri (posta listesi adresleri dahil) ekleyin. Bu alanlar yalnızca Sorunları Düzenleme izniniz varsa görünür.
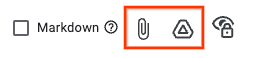
(Önerilir) Açıklama alanına sorunla ilgili bir açıklama girin. Açıklama metni seçilen şablon tarafından sağlanıyorsa bu alan sizin için kısmen doldurulmuş olabilir. Açıklamayı markdown metni olarak yazmak için Markdown seçeneğini de işaretleyebilirsiniz.
(İsteğe bağlı) Bilgisayarınızdan veya Drive'daki bir konumdan ek ekleyin.
(İsteğe bağlı) Sorunun gelişmiş alanlarını doldurun.
Gelişmiş alanlar panelini açarak bu alanları görüntüleyebilirsiniz. Gelişmiş alanlar paneli yalnızca Sorunları düzenle izniniz varsa görünür. Çoğu durumda, sorun oluştururken gelişmiş alanları atlayabilirsiniz. Ancak bazı bileşenler için değerleri girmeniz gerekir. Bu durumda Gelişmiş alanlar bölümü otomatik olarak görünür ve zorunlu alanlar yıldız işareti (*) ile işaretlenir.
Sorunu göndermek için Oluştur düğmesini veya sorunu gönderip yeni oluşturduğunuz sorun için kullanılan değerlerle önceden doldurulmuş yeni bir Sorun Oluştur sayfası açmak üzere Oluştur ve Başka Bir Başlat'ı tıklayın.
Mevcut bir soruna dayalı sorun oluşturma
Mevcut bir sorunu temel alan bir sorun da oluşturabilirsiniz. Bu yöntem, belirli alanları önceden doldurmak için mevcut sorunu kullanarak zamandan tasarruf etmenizi sağlayabilir.
Mevcut bir sorunu temel alan bir sorun oluşturmak için:
Mevcut sorunu açın.
Oluştur'un yanındaki düğmeyi tıklayın.
Açılır listeden yeni sorunu nasıl oluşturmak istediğinizi seçin. Açılır listedeki seçenekler, görüntülediğiniz sayfaya bağlı olarak değişiklik gösterir. Düğme yalnızca en az bir seçenek varsa görünür.
7 olası seçenek vardır.
Option
Açıklama
Şu durumlarda gösterilir:
Aynı bileşende
Bileşeni geçerli bileşen olarak ayarlayarak yeni bir sorun başlatır.
(1) Bir bileşeni yönetme, (2) Bir bileşendeki sorunları görüntüleme, (3) Bir sorunu görüntüleme
Mevcut Sorunun Benzeri
Mevcut sorunun alanları yeni soruna kopyalanarak yeni bir sorun başlatır.
Sorunu görüntüleme
Mevcut Sorun Tarafından Engellendi
Mevcut sorunu engelleme sorunu olarak yeni bir sorun başlatır.
Sorunu görüntüleme
Mevcut Sorunu Engelleme
Mevcut sorunun engellenmiş sorun olarak tanımlandığı yeni bir sorun başlatır.
Sorunu görüntüleme
Mevcut Sorunun Üst Birimi
Mevcut sorunu alt sorun olarak içeren yeni bir sorun başlatır.
Sorunu görüntüleme
Mevcut Sorunun Alt Sorunu
Mevcut sorunu üst sorun olarak kullanarak yeni bir sorun başlatır.
Sorunu görüntüleme
Aynı Hotlist'te
Mevcut sıcak liste eklenmiş yeni bir sorun başlatır.
(1) Önemli sorunlar listesini yönetme,
(2) Önemli sorunlar listesinde sorunları görüntüleme
Tüm hakları saklıdır. Java, Oracle ve/veya satış ortaklarının tescilli ticari markasıdır.
Son güncelleme tarihi: 2025-07-25 UTC.
[null,null,["Son güncelleme tarihi: 2025-07-25 UTC."],[[["\u003cp\u003eIssue creation in Google Issue Tracker requires a Google account and specific permissions (Create Issue, Admin, Comment on Issues, or Edit Issues) depending on the desired actions.\u003c/p\u003e\n"],["\u003cp\u003eTemplates, defined by Google employees, provide default field values for new issues within a component and can be selected during issue creation to streamline the process.\u003c/p\u003e\n"],["\u003cp\u003eThe process of creating an issue involves selecting a component, entering details such as title, priority, type, and description, and optionally adding attachments and configuring advanced fields.\u003c/p\u003e\n"],["\u003cp\u003eIssue Tracker provides options to create new issues based on existing ones, leveraging information like component, hotlist, or even copying field values for efficiency.\u003c/p\u003e\n"],["\u003cp\u003eUsers can explore further information regarding issues, components, and managing issues through provided links.\u003c/p\u003e\n"]]],[],null,["# Create an Issue\n\nThis page shows how to create an [issue](../concepts/issues) in Google Issue\nTracker.\n\nTo create an issue, you must be signed in to a Google Account. You also must\nhave **Create Issues** or **Admin Components**\n[permission](../concepts/access-control) for the component where the issue will\nbe created. If you have **Comment on Issues** permission, you may set the issue\ntitle and description only. If you have **Edit Issues** permission, you can set\nother fields.\n\nTemplates\n---------\n\nTemplates in Google Issue Tracker specify default values for fields in new\nissues in a [component](../concepts/components). Each component has a default\ntemplate but may have additional templates as configured by the Google employee\nwho is responsible for managing it. Public and partner users cannot create or\nmodify the templates associated with a component.\n\n### Choose a template\n\nWhen you [create an issue](../guides/create-issue-ui) in Issue Tracker, the\ndefault template for the component is automatically selected. If additional\ntemplates are available, you can select them from the **Template** drop-down\nlist on the **Create Issue** page.\n\nWhen you select a template, the fields in the page are automatically populated\nwith the default values defined.\n\nCreate an issue\n---------------\n\nTo create an issue:\n\n1. [Open Issue Tracker](../guides/access-ui) in your web browser.\n\n2. Click **Create Issue**.\n\n Issue Tracker opens the **Create Issue** page and has the **Component**\n field selected. This field shows a drop-down list of components.\n\n3. Use the drop-down list to [find the component](/issue-tracker/guides/find-a-component) where you want to create\n the issue. You can only find components where you have **Create Issues** or\n **Admin Components** permission.\n\n4. (Optional) Choose a [template](../concepts/templates) that best applies to\n the issue you are reporting. Some components only have a default template.\n\n5. Enter a [title](../references/glossary-of-fields#title) in the **Title** field. The title is displayed when you\n view the details of the issue, as well as in search results, hotlists and\n other places where you are viewing lists of issues.\n\n6. Select a [priority](../references/glossary-of-fields#priority) from the **Priority** drop-down list. The\n **Priority** field is only visible if you have **Edit Issues** permission.\n\n7. Select the issue [type](../references/glossary-of-fields#type) from the **Type** drop-down list. The **Type**\n field is only visible if you have **Edit Issues** permission.\n\n8. (Optional) Designate an [assignee](../references/glossary-of-fields#assignee) or add email addresses (including\n mailing list addresses) to the [Collaborators](../references/glossary-of-fields#collaborators) and [CC](../references/glossary-of-fields#cc) lists. These\n fields are only visible if you have **Edit Issues** permission.\n\n | Depending on your [email notification settings](/issue-tracker/guides/set-notification-preferences), you might need to add yourself to the CC list to receive notifications.\n9. (Recommended) Enter a [description](../references/glossary-of-fields#description) for the issue in the **Description**\n field. This field might already be partially populated for you if\n description text is provided by the selected template. You can also check\n the **Markdown** option to write the description as\n [markdown](https://commonmark.org) text.\n\n10. (Optional) Add attachments from your computer or from a Drive location.\n\n11. (Optional) Fill in the advanced fields for the issue.\n\n You can view these fields by toggling the **Advanced fields** panel. The\n **Advanced fields** panel is only visible if you have **Edit Issues**\n permission. In most cases, you can skip advanced fields when creating an\n issue. However, some components require you to enter values for them. If\n this is the case, the **Advanced fields** section appears automatically, and\n the required fields are marked with an asterisk (\\*).\n\n12. Click the **Create** button to submit the issue or click **Create \\& Start\n Another** to submit the issue and open a new **Create Issue** page\n pre-populated with the values used for the issue you just created.\n\n| Hover over the name of a field in the Create Issue page to view a field description.\n\nCreate an issue based on an existing one\n----------------------------------------\n\nYou can also create an issue based on an existing one. This method can save you\ntime by using the existing issue to pre-fill certain fields.\n\nTo create an issue based on an existing one:\n\n1. Open the existing issue.\n\n2. Click the button next to **Create**.\n\n3. Choose how you want to create the new issue from the drop-down list. The\n options in the drop-down list vary depending on the page that you are\n viewing. The button only becomes visible if there is at least one option\n available.\n\nThere are 7 possible options.\n\n| Option | Description | Appears when |\n|------------------------------|----------------------------------------------------------------------------------|-----------------------------------------------------------------------------------|\n| **In Same Component** | Starts a new issue with component set to the current component. | (1) Managing a component, (2) Viewing issues in a component, (3) Viewing an issue |\n| **Similar To Current Issue** | Starts a new issue with the fields of the current issue copied to the new issue. | Viewing an issue |\n| **Blocked By Current Issue** | Starts a new issue with the current issue as a blocking issue. | Viewing an issue |\n| **Blocking Current Issue** | Starts a new issue with the current issue as a blocked issue. | Viewing an issue |\n| **Parent Of Current Issue** | Starts a new issue with the current issue as a child issue. | Viewing an issue |\n| **Child Of Current Issue** | Starts a new issue with the current issue as a parent issue. | Viewing an issue |\n| **In Same Hotlist** | Starts a new issue with the current hotlist added to it. | (1) Managing a hotlist, (2) Viewing issues under a hotlist |\n\n| The **Similar To Current Issue** option does not copy the changelist, duplicate issue ID, CC or reporter fields from the original issue.\n\nWhat's next\n-----------\n\n- [Learn more about issues](../concepts/issues)\n- [Learn more about components](../concepts/components)\n- [View and edit issues](/issue-tracker/guides/edit-issue-ui)"]]