معرّف الخريطة هو معرّف فريد يمثّل إعدادات الأنماط والإعدادات في "خرائط Google" والمخزّنة في Google Cloud. يمكنك استخدام معرّفات الخرائط لتفعيل الميزات أو إدارة الخرائط أو تصميمها على مواقعك الإلكترونية وفي تطبيقاتك. يمكنك إنشاء معرّفات خرائط لكل منصة تحتاج إليها، مثل JavaScript أو Android أو iOS أو "الخرائط الثابتة"، في مشروعك على Google Cloud Console في صفحة إدارة الخرائط.
لإنشاء أي معرّفات خرائط أو إدارتها في مشروعك، يجب استخدام أساسي لديه الأذونات المناسبة على مستوى الدور، أي دور "المحرّر" أو "المالك"، في صفحة "إدارة الهوية وإمكانية الوصول" في Cloud Console الخاصة بالمشروع. للاطّلاع على التفاصيل، يُرجى الرجوع إلى مرجع الأدوار الأساسية والمحدّدة مسبقًا في "إدارة الهوية وإمكانية الوصول".
إنشاء أرقام تعريف الخرائط
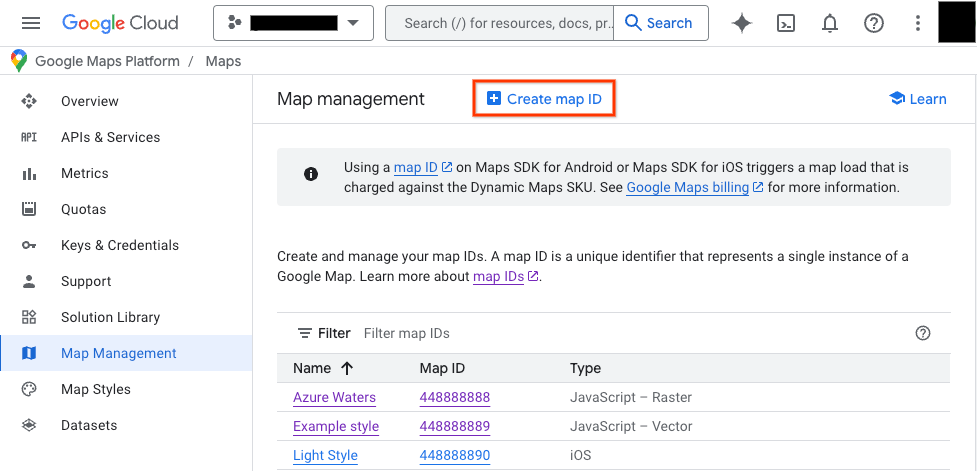
أنشئ معرّفات الخرائط في Cloud Console باتّباع الخطوات التالية:
سجِّل الدخول إلى مشروع في Cloud Console وافتحه باستخدام
الأذونات المطلوبة.
في صفحة إنشاء معرّف خريطة جديد، اتّبِع الخطوات التالية:
في الحقل الاسم، أدخِل اسمًا لرقم تعريف الخريطة.
اختياري: في حقل الوصف، صف الغرض من استخدام معرّف الخريطة.
بالنسبة إلى نوع الخريطة، اختَر النظام الأساسي الذي تخطّط لاستخدام معرّف الخريطة عليه.
إذا اخترت JavaScript، اختَر أيضًا نوع الخريطة الصورية (الإعداد التلقائي) أو المتجهة. لمزيد من المعلومات عن الخرائط المتجهة، يُرجى الاطّلاع على الخرائط المتجهة.
انقر على حفظ لعرض معرّف الخريطة الجديد.
ربط رقم تعريف خريطة بنمط خريطة
إذا كنت تستخدم تصميم الخرائط باستخدام السحابة الإلكترونية، عليك ربط تصميم خريطة برقم تعريف الخريطة. لمعرفة التفاصيل، يُرجى الاطّلاع على مقالة ربط نمط بمعرّف خريطة.
إضافة معرّف الخريطة إلى تطبيقك
Android
أضِف معرّف الخريطة من خلال عنصر <fragment> في ملف تصميم النشاط، أو باستخدام الفئة MapView، أو بشكل آلي باستخدام الفئة GoogleMapOptions.
على سبيل المثال، لنفترض أنّك أنشأت معرّف خريطة مخزّن كقيمة سلسلة باسم map_id في res/values/strings.xml:
بالنسبة إلى الخرائط التي تتم إضافتها من خلال العنصر <fragment> في ملف تصميم النشاط، يجب أن تحدّد جميع أجزاء الخريطة التي يجب أن تتضمّن النمط المخصّص رقم تعريف الخريطة في السمة map:mapId:
في "استوديو Android"، أنشئ تطبيقك وشغِّله كالمعتاد. يتم تطبيق أنماط مخصّصة تم ضبطها في الخطوة الأولى على جميع الخرائط التي تحمل رقم تعريف الخريطة المحدّد.
iOS
لإنشاء مثيل لخريطة باستخدام رقم تعريف خريطة، اتّبِع الخطوات التالية:
أنشئ GMSMapID باستخدام سلسلة معرّف الخريطة من Cloud Console.
أنشئ GMSMapView تحدّد معرّف الخريطة الذي أنشأته للتو.
إذا كنت تستخدم معرّف الخريطة الخاص بك، يمكنك ضبط معرّف الخريطة في Cloud Console ليكون له نمط جديد في أي وقت، وسيظهر هذا النمط في عرض الخريطة تلقائيًا لك وللمستخدمين في غضون ست ساعات تقريبًا.
إذا أردت الاطّلاع على التغييرات على الفور، يمكنك إغلاق التطبيق وإعادة تشغيله من خلال الخروج منه وإجباره على الإغلاق من قائمة التطبيقات التي تم استخدامها مؤخرًا ثم إعادة فتحه. ستظهر الخريطة المعدّلة بعد ذلك.
JavaScript
لإنشاء خريطة باستخدام معرّف خريطة في رمز تطبيقك، اتّبِع الخطوات التالية:
إذا كنت تخصّص خريطتك حاليًا باستخدام رمز JSON مضمّن، أزِل السمة styles من عنصر MapOptions، وإلا فتخطَّ هذه الخطوة.
أضِف رقم تعريف خريطة إلى الخريطة باستخدام السمة mapId. على سبيل المثال:
لإضافة معرّف خريطة إلى خريطة جديدة أو حالية تستخدم إحدى واجهات برمجة التطبيقات الخاصة بخدمات الويب، أضِف مَعلمة عنوان URL map_id واضبطها على معرّف الخريطة. يعرض هذا المثال كيفية إضافة معرّف خريطة إلى خريطة باستخدام Maps Static API.
إذا كان لديك توقيع رقمي في عنوان URL الخاص بـ "خرائط Google الثابتة" قبل إضافة معرّف الخريطة، عليك إنشاء
توقيع رقمي جديد وإضافته بعد إضافة معرّف الخريطة.
عند إنشاء سر جديد لتوقيع عنوان URL، تذكَّر إزالة التوقيع الرقمي السابق من عنوان URL.
تاريخ التعديل الأخير: 2025-08-31 (حسب التوقيت العالمي المتفَّق عليه)
[null,null,["تاريخ التعديل الأخير: 2025-08-31 (حسب التوقيت العالمي المتفَّق عليه)"],[[["\u003cp\u003eA map ID is a unique identifier used to represent Google Map styling and configuration settings stored in Google Cloud, allowing you to manage and style maps on websites and in applications.\u003c/p\u003e\n"],["\u003cp\u003eYou can create map IDs for JavaScript, Android, iOS, or Static maps within your Google Cloud console project on the Map Management page, and they require appropriate permissions (Editor or Owner) to manage.\u003c/p\u003e\n"],["\u003cp\u003eAssociating a map ID with a map style, particularly for cloud-based maps, allows for custom styling, and these changes can take up to six hours to be reflected on the map, or can be forced by restarting the app.\u003c/p\u003e\n"],["\u003cp\u003eTo add a map ID to your application, you can use various methods, including through \u003ccode\u003e<fragment>\u003c/code\u003e elements, the \u003ccode\u003eMapView\u003c/code\u003e class, or programmatically via the \u003ccode\u003eGoogleMapOptions\u003c/code\u003e class for Android, or by creating a \u003ccode\u003eGMSMapID\u003c/code\u003e for iOS, or by using the \u003ccode\u003emapId\u003c/code\u003e property in JavaScript.\u003c/p\u003e\n"],["\u003cp\u003eAdding a map ID to web-service APIs, like Maps Static, involves appending the \u003ccode\u003emap_id\u003c/code\u003e URL parameter, which may necessitate creating a new digital signature for the URL if one was previously present.\u003c/p\u003e\n"]]],["Map IDs are unique identifiers for Google Map styling and configurations. To create one, sign in to the Google Cloud console, navigate to the Maps Management page, and click \"Create map ID.\" Name it, optionally add a description, and select the platform (JavaScript, Android, iOS, or Static maps). Add the map ID to your app through platform-specific methods: `\u003cfragment\u003e` or `MapView` class in Android, `GMSMapView` in iOS, `mapId` property in JavaScript, and `map_id` URL parameter in Maps Static.\n"],null,["Select platform: [Android](/maps/documentation/android-sdk/map-ids/get-map-id \"View this page for the Android platform docs.\") [iOS](/maps/documentation/ios-sdk/map-ids/get-map-id \"View this page for the iOS platform docs.\") [JavaScript](/maps/documentation/javascript/map-ids/get-map-id \"View this page for the JavaScript platform docs.\") [Web Service](/maps/documentation/maps-static/map-ids/get-map-id \"View this page for the Web Service platform docs.\")\n\n\u003cbr /\u003e\n\n| **Paid feature:**\n| Features accessed by adding a [map ID](/maps/documentation/get-map-id) triggers a map\n| load charged against the Dynamic Maps SKU for Android and iOS. See\n| [Google Maps Billing](/maps/billing-and-pricing/sku-details#dynamic-maps-ess-sku) for more information.\n\nA map ID is a unique identifier that represents Google Map styling and configuration settings that are stored in Google Cloud. You use map IDs to enable features or manage or style maps on your websites and in your applications. You can create map IDs for each platform you need--JavaScript, Android, iOS, or Static maps--in your Google Cloud console project on the **Map Management** page.\n\nFor more details and features that use map IDs,\nsee [Map ID overview](/maps/documentation/ios-sdk/map-ids/mapid-over).\n\nRequired permissions\n\nTo create or manage any map IDs in your project, you\nmust use a principal with the appropriate role-level permissions, Editor or\nOwner, on the Cloud console IAM page for the project. For\ndetails, see\n[IAM basic and predefined roles reference](https://cloud.google.com/iam/docs/understanding-roles#role_types).\n\nCreate map IDs\n\nCreate map IDs in the Cloud console following\nthese steps:\n\n1. Sign in to and open a Cloud console project with the\n [required permissions](#permissions).\n\n2. In the Cloud console, go to the\n [Maps Management page](https://console.cloud.google.com/google/maps-apis/studio/maps).\n\n3. Click **Create map ID**.\n\n4. On the **Create new map ID** page, do the following:\n\n 1. For **Name**, give the map ID a name.\n 2. *Optional* : For **Description**, describe what the map ID is used for.\n 3. For **Map type** , select the platform on which you plan to use the map ID. If you choose JavaScript, also choose a **Raster** (the default) or **Vector** map type. For more information on vector maps, see [Vector Maps](/maps/documentation/javascript/vector-map).\n 4. Click **Save** to show your new map ID.\n\nAssociate a map ID to a map style\n\nIf you are using cloud-based maps styling, you associate a map style with your\nmap ID. For details, see [Associate your style to a map ID](../cloud-customization/map-styles-leg#associate-style-with-map-id).\n\nAdd the map ID to your app \n\nAndroid\n\nAdd your map ID through a `\u003cfragment\u003e` element in the\nactivity's layout file, by using the `MapView` class, or programmatically\nusing the `GoogleMapOptions` class.\n\nFor example, assume you created a map ID that is stored as a\nstring value named `map_id` in `res/values/strings.xml`: \n\n \u003c?xml version=\"1.0\" encoding=\"utf-8\"?\u003e\n \u003cresources\u003e\n \u003cstring name=\"map_id\"\u003e\u003cvar label=\"map_id\" translate=\"no\"\u003eMAP_ID\u003c/var\u003e\u003c/string\u003e\n \u003c/resources\u003e\n\nFor maps added through a `\u003cfragment\u003e` element in the activity's layout file,\nall map fragments that should have the custom style must specify the\nmap ID in the `map:mapId` attribute: \n\n \u003cfragment xmlns:map=\"http://schemas.android.com/apk/res-auto\"\n map:name=\"com.google.android.gms.maps.SupportMapFragment\"\n ...\n map:mapId=\"@string/map_id\" /\u003e\n\nYou can also use the `map:mapId` attribute of the `MapView` class to specify\na map ID: \n\n \u003ccom.google.android.gms.maps.MapView\n xmlns:map=\"http://schemas.android.com/apk/res-auto\"\n ....\n map:mapId=\"@string/map_id\" /\u003e\n\nTo specify a map ID programmatically, pass it to a\n`MapFragment` instance using the `GoogleMapOptions` class: \n\nJava \n\n MapFragment mapFragment = MapFragment.newInstance(\n new GoogleMapOptions()\n .mapId(getResources().getString(R.string.map_id)));\n\nKotlin \n\n val mapFragment = MapFragment.newInstance(\n GoogleMapOptions()\n .mapId(resources.getString(R.string.map_id))\n )\n\nIn Android Studio, build and run your app as you normally would. Custom\nstyles configured in the first step are applied to all maps with\nthe specified map ID.\n\niOS\n\nTo instantiate a map using a map ID, do the following:\n\n1. Create a `GMSMapID` with the map ID string from Cloud console.\n2. Create a `GMSMapView` specifying the map ID you just created.\n\nSwift \n\n let camera = GMSCameraPosition(latitude: 47.0169, longitude: -122.336471, zoom: 12)\n let mapID = GMSMapID(identifier: \"\u003cvar label=\"map_id\" translate=\"no\"\u003eMAP_ID\u003c/var\u003e\")\n let mapView = GMSMapView(frame: .zero, mapID: mapID, camera: camera)\n self.view = mapView\n\nObjective-C \n\n GMSCameraPosition *camera = [GMSCameraPosition cameraWithLatitude:47.0169\n longitude:-122.336471\n zoom:12];\n GMSMapID *mapID = [GMSMapID mapIDWithIdentifier:@\"\u003cvar label=\"map_id\" translate=\"no\"\u003eMAP_ID\u003c/var\u003e\"];\n GMSMapView *mapView = [GMSMapView mapWithFrame:CGRectZero mapID:mapID camera:camera];\n self.view = mapView;\n\nIf you are using your own map ID, you can set your\nmap ID in the Cloud console to have a new style\nat any time, and that style will be reflected on your map view automatically\nfor you and users within about six hours.\n\nIf you want to see the changes immediately, you can close out and restart\nyour app by exiting the app, forcing a quit of the app from the recently-used\napps list, and then reopening it. The updated map will then be visible.\n\nJavaScript\n\nTo create a map with a map ID in your application code:\n\n1. If you are already customizing your map with embedded JSON code, remove\n the\n [`styles` property](/maps/documentation/javascript/reference/map#MapOptions.styles)\n from your `MapOptions` object; otherwise, skip this step.\n\n2. Add a map ID to the map using the `mapId` property. For example:\n\n```javascript\nmap = new google.maps.Map(document.getElementById('map'), {\ncenter: {lat: -34.397, lng: 150.644},\nzoom: 8,\nmapId: '\u003cvar translate=\"no\"\u003eMAP_ID\u003c/var\u003e'\n});\n```\n\nMaps Static\n\nTo add a map ID to a new or existing map that uses one of our\nweb-service APIs, append the `map_id` URL parameter and set it to your\nmap ID. This example shows adding a map ID to\na map using Maps Static API. \n\n \u003cimg src=\"https://maps.googleapis.com/maps/api/staticmap?center=Brooklyn+Bridge,New+York,NY&zoom=13&size=600x300&maptype=roadmap&markers=color:blue%7Clabel:S%7C40.702147,-74.015794&markers=color:green%7Clabel:G%7C40.711614,-74.012318&markers=color:red%7Clabel:C%7C40.718217,-73.998284&key=YOUR_API_KEY&map_id=\u003cvar label=\"map_id\" translate=\"no\"\u003eMAP_ID\u003c/var\u003e&signature=YOUR_SIGNATURE\" /\u003e\n\nIf you have a digital signature in your Maps Static URL before adding your map ID, you will need to [create\nand add a new digital signature](/maps/documentation/maps-static/digital-signature) after adding your map ID. When generating your new URL signing secret, remember to remove your previous digital signature from the URL."]]