您可以将图片作为图块图层添加在地图上。图块层放置在特定缩放级别的地图图块之上。如果您有足够的图块,可为整个地图补充 Google 的地图数据,并且支持多个缩放级别。
简介
图块图层有时称作图块叠加层,可让您在 Google 的基本地图图块之上叠加图像。使用此功能可向应用添加数据(例如兴趣点或路况信息)和本地图像。与 kGMSTypeNone 地图类型结合使用时,图块图层可让您有效地将 Google 的基本地图数据替换为自己的数据。
如果您要为地图添加大量图像(通常覆盖大片地域),就需要使用图块层。相比之下,如果您想将单个图片固定在地图上的某个点,则适合使用地面叠加层。
图块坐标
Maps API 将各缩放级别的图像分解成一组以有序网格形式排列的方形地图图块。当地图滚动至新位置,或者切换到新的缩放级别时,Maps API 会确定需要哪些图块,并将该信息转换为需要检索的一组图块。
在 Google 实现的墨卡托投影法中,坐标为 (0,0) 的图块始终位于地图的西北角,x 值从西向东增加,y 值从北向南增加。系统使用基于该原点的 x,y 坐标为图块建立索引。例如,在缩放级别 2 时,地球分成 16 个图块,每个图块都可通过唯一的 x,y 来定位:
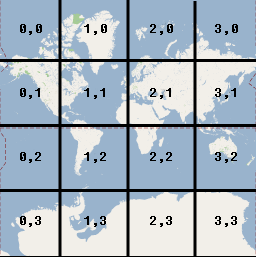
每个地图图块都是一个256x256的正方形点阵。在缩放级别 0 时,整个世界使用单个图块渲染。缩放级别每增加 1,放大为原来的 2 倍。例如,在缩放级别 1,地图将渲染为一个 2x2 图块网格;在缩放级别 2,地图将渲染为一个 4x4 网格;在缩放级别 3,地图将渲染为一个 8x8 网格。如需为图块图层创建图片,请为您想支持的每个缩放级别下的每个图块都创建一个 256x256 像素的图片。
添加图块图层
- 实例化
GMSURLTileLayer对象,或GMSTileLayer或GMSSyncTileLayer的自定义子类。 - 您可以选择修改
zIndex属性,以调整其相对于其他功能块层的位置。 - 通过设置
GMSTileLayer对象的map属性,将该对象分配给地图。
Maps SDK for iOS 提供三个可用于实现图块层的类。对于每个类,您都需要定义如何针对给定的 {x,y,zoom} 坐标集提取正确的地图图块。可用的选项包括:
- 创建
GMSSyncTileLayer子类,提供返回UIImage实例的tileForX:y:zoom实现。 - 对
GMSTileLayer进行子类化,提供异步方法requestTileForX:y:zoom的实现,该方法稍后会回调并返回图块图片。 - 使用现有类
GMSURLTileLayer从网址自动提取图块,提供GMSTileURLConstructor块。GMSURLTileLayer是一个无法进行子类化的具体类。
如果对 GMSSyncTileLayer 或 GMSTileLayer 进行子类化,提供 nil 图块结果会告知 Maps SDK for iOS 数据不可用,但将来可能会可用。或者,返回 kGMSTileLayerNoTile 以表示相应位置没有图块。
对于 GMSURLTileLayer,从 GMSTileURLConstructor 返回 nil 将表明相应位置没有图块。
使用GMSURLTileLayer通过网址提取图块
GMSURLTileLayer 不需要子类化,但您必须实现 GMSTileURLConstructor 块。以下代码展示了如何使用 GMSURLTileLayer 显示多层建筑的平面图。
Swift
let floor = 1

// Implement GMSTileURLConstructor
// Returns a Tile based on the x,y,zoom coordinates, and the requested floor
let urls: GMSTileURLConstructor = { (x, y, zoom) in
  let url = "https://www.example.com/floorplans/L\(floor)_\(zoom)_\(x)_\(y).png"
  return URL(string: url)
}

// Create the GMSTileLayer
let layer = GMSURLTileLayer(urlConstructor: urls)

// Display on the map at a specific zIndex
layer.zIndex = 100
layer.map = mapView
Objective-C
NSInteger floor = 1;

// Create the GMSTileLayer
GMSURLTileLayer *layer = [GMSURLTileLayer tileLayerWithURLConstructor:^NSURL * _Nullable(NSUInteger x, NSUInteger y, NSUInteger zoom) {
  NSString *url = [NSString stringWithFormat:@"https://www.example.com/floorplans/L%ld_%lu_%lu_%lu.png",
                   (long)floor, (unsigned long)zoom, (unsigned long)x, (unsigned long)y];
  return [NSURL URLWithString:url];
}];

// Display on the map at a specific zIndex
layer.zIndex = 100;
layer.map = mapView;
通过为GMSSyncTileLayer划分子类将图块用作UIImage
GMSSyncTileLayer 和 GMSTileLayer 是可以进行子类化的抽象类。您可以使用这些类来提供图块,就像 UIImage 一样。以下示例展示了如何通过对 GMSSyncTileLayer 进行子类化,在地图上的部分图块上渲染自定义图片。
Swift
class TestTileLayer: GMSSyncTileLayer {
  override func tileFor(x: UInt, y: UInt, zoom: UInt) -> UIImage? {
    // On every odd tile, render an image.
    if (x % 2 == 1) {
      return UIImage(named: "australia")
    } else {
      return kGMSTileLayerNoTile
    }
  }
}
Objective-C
@interface TestTileLayer : GMSSyncTileLayer
@end

@implementation TestTileLayer

- (UIImage *)tileForX:(NSUInteger)x y:(NSUInteger)y zoom:(NSUInteger)zoom {
  // On every odd tile, render an image.
  if (x % 2 == 1) {
    return [UIImage imageNamed:@"australia"];
  } else {
    return kGMSTileLayerNoTile;
  }
}

@end
要将图层添加到地图,请实例化对象并设置其地图属性。
Swift
let layer = TestTileLayer()
layer.map = mapView
Objective-C
GMSTileLayer *layer = [[TestTileLayer alloc] init];
layer.map = mapView;
用于Retina设备的高DPI图块
您可以通过将 tileSize 设置为 512,使用 GMSSyncTileLayer 或 GMSURLTileLayer 来使用高 DPI 图片。tileSize 属性表示返回的图块图片首选的显示像素数;此属性的默认值为 256,即非 Retina 设备上 Google 地图图块的尺寸。
如果您要在高 DPI 设备上显示正常 DPI 图块,可以通过将 tileSize 设置为 512 来放大图片。请注意,放大图片可能会降低图片质量,尤其是对于细线或文字。为获得最佳效果,请将 tileSize 和图片 DPI 与显示屏相匹配。在 Retina 设备上显示地图时,如果使用 tileSize 为 512 的高 DPI 图片,地图效果会达到最佳;而在非 Retina 设备上显示地图时,如果使用普通图片和默认的 tileSize 256,地图效果也会很出色。
清除过时图块
如果图层提供的图块变得“过时”,则应在图层上调用 clearTileCache 方法以强制刷新。这会使该图层上的所有图块重新加载。
Swift
layer.clearTileCache()
Objective-C
[layer clearTileCache];