
自訂及更新使用者的道路地圖體驗,不必更新應用程式的程式碼或重新載入地圖。您可以在 Google Cloud 控制台使用 Google 地圖平台雲端地圖樣式功能,選取顏色並設定地圖項目的顯示狀態。這適用於淺色和深色模式,以及下列地圖類型:
roadmapnavigationhybridterrain3D roadmap3D hybrid
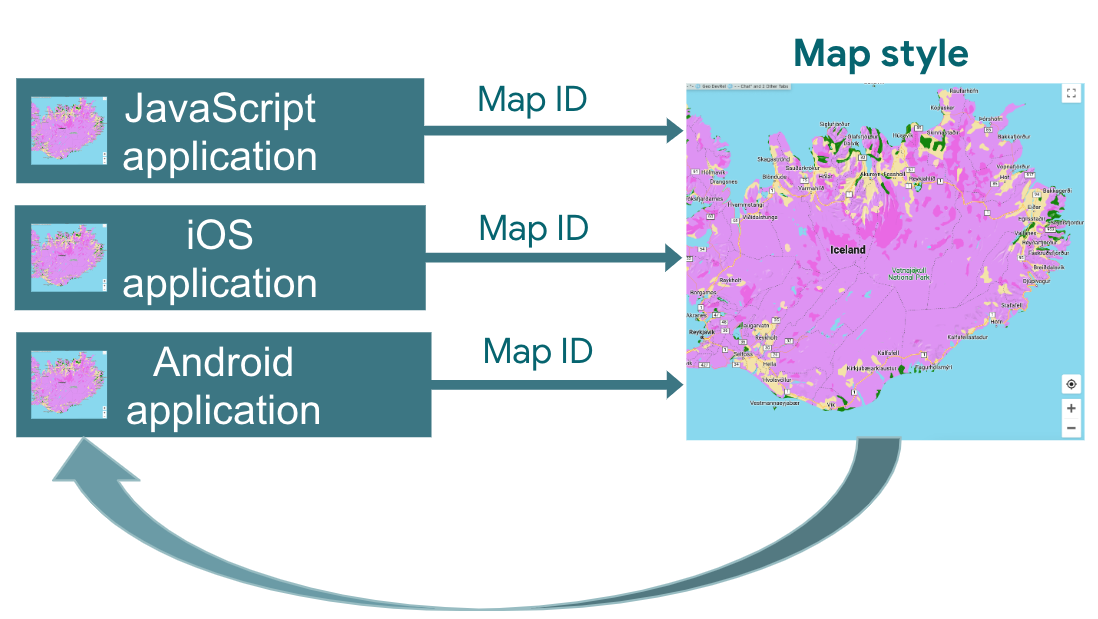
您所做的變更會套用至所有 JavaScript、iOS 和 Android 應用程式。
如要瞭解其他地圖自訂方式,請參閱「自訂地圖」。
使用雲端式地圖樣式設定的優點
使用雲端式地圖樣式設定,不僅能製作更有吸引力、資訊更豐富的地圖,更新時也不必變更程式碼:
- 更多地圖項目:可使用四大類將近 100 個不同的地圖項目進行自訂。搜尋點包括「娛樂」、「休閒」和「服務」等地圖項目,每項之下還有數個子地圖項目。舉例來說,「服務」底下有「提款機」、「銀行」、「加油站」和「洗手間」等項目。如需完整清單,請參閱「可設定樣式的地圖項目」一文。
- 更多地圖自訂設定:雲端式地圖樣式設定更加簡單直觀,方便您設定地圖樣式。Google 最近更新了一些功能,讓您可以進一步掌控基本地圖的外觀與風格,設定地圖項目先前所無法使用的標籤和幾何圖形。舉例來說,您可以自訂觀光景點、餐廳、休閒區、緊急救援服務和零售業等地圖項目套用的標籤。
- 地圖經首次使用即可更快速載入:由於地圖初次啟動時,已下載並快取過地圖樣式,您之後如果再度瀏覽和平移/縮放地圖,載入速度就會比較快。
- 在不同地圖模式和地圖類型之間順暢切換:自訂淺色和深色模式的樣式,將這些樣式套用至各種地圖類型,並在這些模式之間切換,不必重新載入圖塊。
- 地圖樣式編輯器介面更臻完美:地圖設定可用來定義地圖樣式屬性,例如建築物和地標樣式,以及搜尋點密度等級。可設定樣式的元素會集中顯示於同一個面板,這樣您在自訂樣式時,整個地圖區域就會更明顯。類別可展開或收合,使用上更加直觀,有助您找到地圖項目。您還可使用篩選器方塊,依需要的地圖項目限定清單範圍。您也可以在地圖上按一下任何位置,然後使用地圖檢查器,查看該位置可設定樣式的特徵。
雲端式地圖樣式設定提供的功能
使用雲端式地圖樣式設定時,可執行的操作如下:
- 使用無程式碼樣式編輯器:設計人員不必編寫程式碼,就能按照自己的目標和品牌宣傳需求,建立及預覽樣式。
- 不必修改程式碼就能變更樣式:設定好地圖 ID 後,不必對程式碼進行任何變更,就能草擬及測試地圖樣式的修改內容。
- 設定更多地圖項目樣式:變更更多地圖項目的顯示設定和顏色,例如道路、建築物、水域、搜尋點和大眾運輸路線。
雲端式地圖樣式設定的運作方式
地圖樣式的儲存和修改都是在 Google Maps Platform Cloud 控制台執行。應用程式會使用地圖 ID 向 Cloud 控制台要求地圖樣式,然後套用至應用程式。您可以將多個地圖 ID 與同一個地圖樣式建立關聯,這樣不同應用程式平台上顯示的地圖外觀就會保持一致。
如何使用雲端式地圖樣式設定
| 1 | 開始使用 | 前往「開始設定」,然後參閱教學課程。 |
| 2 | 建立雲端式地圖樣式 | 請參閱「建立並使用地圖樣式」一文。 |
| 3 | 將地圖樣式與地圖 ID 建立關聯 | 根據應用程式類型建立或開啟相應的地圖 ID,並為這個 ID 指派地圖樣式。您可以為其他平台的應用程式建立更多地圖 ID,並指定同樣的地圖樣式給這些 ID。詳情請參閱「連結或移除樣式中的地圖 ID」一文。 |
| 4 | 在應用程式中加入地圖 ID | 這樣地圖就會使用與 ID 相關聯的地圖樣式。詳情請參閱「在地圖中加入地圖 ID」一文。 |
| 5 | 線上調整地圖樣式 | 每當需要變更地圖樣式,都可以在雲端樣式設定中進行。詳情請參閱「更新地圖樣式」一文。 |
| 6 | 發布修改後的地圖樣式 | 準備好要更新的地圖樣式後,請點選發布,新的地圖樣式就會在應用程式中顯示。詳情請參閱「發布地圖樣式」一文。 |