
경계를 위한 데이터 기반 스타일 지정을 사용하려면 JavaScript 벡터 지도를 사용하는 지도 ID를 만들어야 합니다. 그런 다음 새 지도 스타일을 만들고 경계 지형지물 레이어를 선택한 다음 스타일을 지도 ID와 연결해야 합니다.
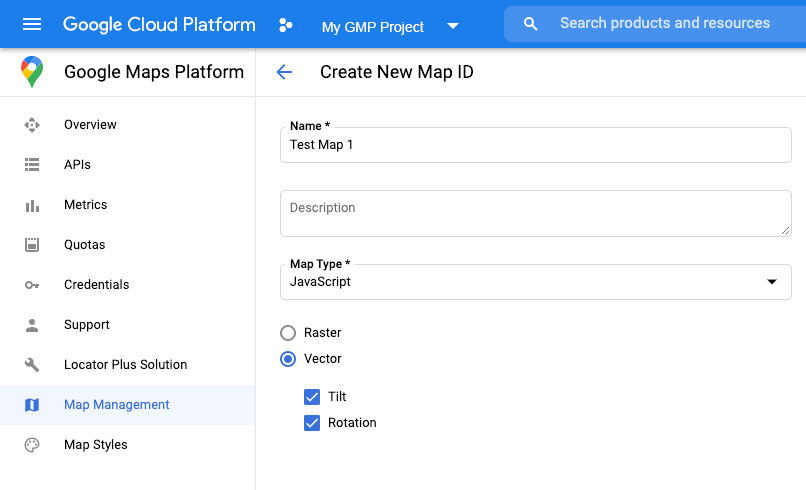
지도 ID 만들기
새 지도 ID를 만들려면 클라우드 맞춤설정의 단계를 따르세요. 지도 유형을 JavaScript로 설정하고 벡터 옵션을 선택합니다. 지도에서 기울기 및 회전을 사용 설정하려면 기울기 및 회전을 선택합니다. 기울기 또는 회전을 사용하면 앱에 부정적인 영향을 미치는 경우 사용자가 기울기 및 회전을 조정할 수 없도록 기울기와 회전을 선택 해제한 상태로 두세요.
새 지도 스타일 만들기
새 지도 스타일을 만들려면 지도 스타일 관리의 안내에 따라 스타일을 만들어 방금 만든 지도 ID와 연결하세요.
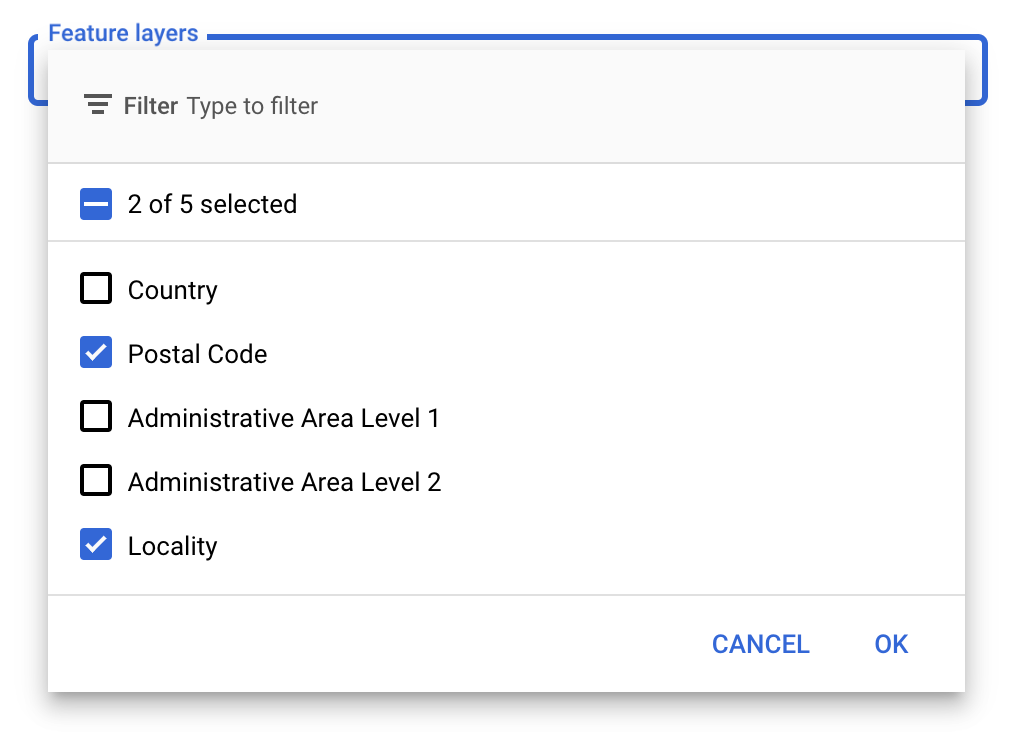
지형지물 레이어 선택
Google API 콘솔에서 표시할 지형지물 레이어를 선택할 수 있습니다. 이에 따라 지도에 표시될 경계의 종류(예: 지역, 주)가 결정됩니다.
지형지물 레이어 관리
- Google API 콘솔에서 지도 스타일 페이지로 이동합니다.
- 메시지가 표시되면 프로젝트를 선택합니다.
- 지도 스타일을 선택합니다.
- 지형지물 레이어 드롭다운을 클릭하여 레이어를 추가하거나 삭제합니다.
- 저장을 클릭해 변경사항을 저장하여 지도에서 사용할 수 있게 합니다.
지도 초기화 코드 업데이트
방금 만든 지도 ID가 필요합니다. 지도 ID는 지도 관리 페이지에서 찾을 수 있습니다.
- 다음 스니펫에 표시된 대로 애플리케이션 코드에 인라인 부트스트랩 로더를 추가하여 Maps JavaScript API를 로드합니다.
<script>
  (g=>{var h,a,k,p="The Google Maps JavaScript API",c="google",l="importLibrary",q="__ib__",m=document,b=window;b=b[c]||(b[c]={});var d=b.maps||(b.maps={}),r=new Set,e=new URLSearchParams,u=()=>h||(h=new Promise(async(f,n)=>{await (a=m.createElement("script"));e.set("libraries",[...r]+"");for(k in g)e.set(k.replace(/[A-Z]/g,t=>"_"+t[0].toLowerCase()),g[k]);e.set("callback",c+".maps."+q);a.src=`https://maps.${c}apis.com/maps/api/js?`+e;d[q]=f;a.onerror=()=>h=n(Error(p+" could not load."));a.nonce=m.querySelector("script[nonce]")?.nonce||"";m.head.append(a)}));d[l]?console.warn(p+" only loads once. Ignoring:",g):d[l]=(f,...n)=>r.add(f)&&u().then(()=>d[l](f,...n))})({
    key: "YOUR_API_KEY",
    v: "weekly",
    // Use the 'v' parameter to indicate the version to use (weekly, beta, alpha, etc.).
    // Add other bootstrap parameters as needed, using camel case.
  });
</script>
mapId속성을 사용하여 지도를 인스턴스화할 때 지도 ID를 제공합니다. 지형지물 레이어가 사용 설정된 지도 스타일을 사용하여 구성한 지도 ID를 사용해야 합니다.map = new google.maps.Map(document.getElementById('map'), { center: {lat: -34.397, lng: 150.644}, zoom: 8, mapId: 'MAP_ID' // A map ID using a style with one or more feature layers enabled. });
Maps JavaScript API 로드에 대해 자세히 알아보세요.
지도에 지형지물 레이어 추가
지도의 지형지물 레이어에 대한 참조를 가져오려면 지도를 초기화할 때 map.getFeatureLayer()를 호출하세요.
function initMap() {
  map = new google.maps.Map(document.getElementById("map"), {
    center: { lat: 20.773, lng: -156.01 },
    zoom: 12,
    mapId: 'MAP_ID',
  });

  // Add a feature layer for localities.
  localityLayer = map.getFeatureLayer('LOCALITY');
  ...
}
지도 기능 확인
경계를 위한 데이터 기반 스타일 지정을 사용하려면 Google API 콘솔에서 사용 설정되고 지도 ID와 연결된 기능이 필요합니다. 지도 ID는 일시적이며 변경될 수 있으므로 map.getMapCapabilities()를 호출하여 특정 기능(예: 데이터 기반 스타일 지정)을 호출하기 전에 사용할 수 있는지 확인할 수 있습니다. 이 확인 작업은 선택사항입니다.
다음 예에서는 지도 기능 변경사항을 구독하기 위해 리스너를 추가하는 방법을 보여줍니다.
// subscribe to changes
map.addListener('mapcapabilities_changed', () => {
  const mapCapabilities = map.getMapCapabilities();

  if (!mapCapabilities.isDataDrivenStylingAvailable) {
    // Data-driven styling is *not* available, add a fallback.
    // Existing feature layers are also unavailable.
  }
});
다음 단계
- 경계 다각형 스타일 지정
- 등치 지역도 만들기
- 마우스 이벤트 처리
- 지역의 장소 ID 가져오기
- 경계를 위한 데이터 기반 스타일 지정과 함께 Geocoding API 및 Places API 사용