
شناسه نقشه، یک شناسه منحصر به فرد است که نشاندهنده تنظیمات سبک و پیکربندی نقشه گوگل است که در Google Cloud ذخیره شدهاند. شما از شناسههای نقشه برای فعال کردن ویژگیها یا مدیریت یا سبکبندی نقشهها در وبسایتها و برنامههای خود استفاده میکنید. میتوانید شناسههای نقشه را برای هر پلتفرمی که نیاز دارید - جاوا اسکریپت، اندروید، iOS یا نقشههای استاتیک - در پروژه کنسول Google Cloud خود در صفحه مدیریت نقشه ایجاد کنید.
برای جزئیات بیشتر و ویژگیهایی که از شناسههای نقشه استفاده میکنند، به نمای کلی شناسه نقشه مراجعه کنید.
مجوزهای مورد نیاز
برای ایجاد یا مدیریت هرگونه شناسه نقشه در پروژه خود، باید از یک مدیر اصلی با مجوزهای سطح نقش مناسب، ویرایشگر یا مالک، در صفحه IAM کنسول Cloud برای پروژه استفاده کنید. برای جزئیات بیشتر، به مرجع نقشهای پایه و از پیش تعریف شده IAM مراجعه کنید.
ایجاد شناسههای نقشه
با دنبال کردن مراحل زیر، شناسههای نقشه را در کنسول Cloud ایجاد کنید:
وارد سیستم شوید و یک پروژه کنسول ابری را با مجوزهای لازم باز کنید.
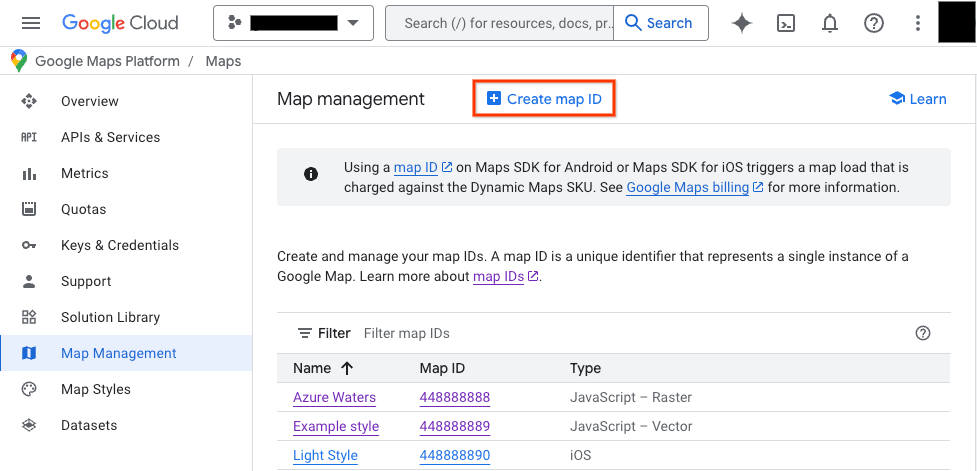
در کنسول Cloud، به صفحه مدیریت نقشهها بروید.
روی ایجاد شناسه نقشه کلیک کنید.
در صفحه ایجاد شناسه نقشه جدید ، موارد زیر را انجام دهید:
- برای Name ، به شناسه نقشه یک نام اختصاص دهید.
- اختیاری : برای توضیحات ، توضیح دهید که شناسه نقشه برای چه چیزی استفاده میشود.
- برای نوع نقشه (Map type )، پلتفرمی را که قصد دارید از شناسه نقشه در آن استفاده کنید، انتخاب کنید. اگر جاوا اسکریپت را انتخاب میکنید، نوع نقشه رستری ( Raster ) (پیشفرض) یا برداری (Vector) را نیز انتخاب کنید. برای اطلاعات بیشتر در مورد نقشههای برداری، به نقشههای برداری (Vector Maps) مراجعه کنید.
- برای نمایش شناسه نقشه جدید خود، روی ذخیره کلیک کنید.
شناسه نقشه را به سبک نقشه مرتبط کنید
اگر از سبکدهی نقشههای مبتنی بر ابر استفاده میکنید، یک سبک نقشه را با شناسه نقشه خود مرتبط میکنید. برای جزئیات بیشتر، به «مرتبط کردن سبک خود با شناسه نقشه» مراجعه کنید.
شناسه نقشه را به برنامه خود اضافه کنید
اندروید
شناسه نقشه خود را از طریق یک عنصر <fragment> در فایل طرحبندی فعالیت، با استفاده از کلاس MapView یا به صورت برنامهنویسی با استفاده از کلاس GoogleMapOptions اضافه کنید.
برای مثال، فرض کنید یک شناسه نقشه ایجاد کردهاید که به عنوان یک مقدار رشتهای با نام map_id در res/values/strings.xml ذخیره میشود:
<?xml version="1.0" encoding="utf-8"?>
<resources>
<string name="map_id">MAP_ID</string>
</resources>
برای نقشههایی که از طریق عنصر <fragment> در فایل طرحبندی فعالیت اضافه میشوند، تمام قطعات نقشه که باید سبک سفارشی داشته باشند، باید شناسه نقشه را در ویژگی map:mapId مشخص کنند:
<fragment xmlns:map="http://schemas.android.com/apk/res-auto"
    map:name="com.google.android.gms.maps.SupportMapFragment"
    …
    map:mapId="@string/map_id" />
همچنین میتوانید از ویژگی map:mapId از کلاس MapView برای تعیین شناسه نقشه استفاده کنید:
<com.google.android.gms.maps.MapView
    xmlns:map="http://schemas.android.com/apk/res-auto"
    ....
    map:mapId="@string/map_id" />
برای مشخص کردن شناسه نقشه به صورت برنامهنویسی، آن را با استفاده از کلاس GoogleMapOptions به یک نمونه MapFragment منتقل کنید:
جاوا
 MapFragment mapFragment = MapFragment.newInstance(
     new GoogleMapOptions()
         .mapId(getResources().getString(R.string.map_id)));
کاتلین
 val mapFragment = MapFragment.newInstance(
     GoogleMapOptions()
         .mapId(resources.getString(R.string.map_id))
 )
در اندروید استودیو، برنامه خود را طبق معمول بسازید و اجرا کنید. سبکهای سفارشی پیکربندی شده در مرحله اول روی همه نقشهها با شناسه نقشه مشخص شده اعمال میشوند.
آیاواس
برای نمونهسازی یک نقشه با استفاده از شناسه نقشه، موارد زیر را انجام دهید:
- یک
GMSMapIDبا رشته شناسه نقشه از کنسول Cloud ایجاد کنید. - یک
GMSMapViewایجاد کنید که شناسه نقشهای که اخیراً ایجاد کردهاید را مشخص کند.
سویفت
let camera = GMSCameraPosition(latitude: 47.0169, longitude: -122.336471, zoom: 12)
let mapID = GMSMapID(identifier: "MAP_ID")
let mapView = GMSMapView(frame: .zero, mapID: mapID, camera: camera)
self.view = mapView
هدف-سی
GMSCameraPosition *camera = [GMSCameraPosition cameraWithLatitude:47.0169
                                                        longitude:-122.336471
                                                             zoom:12];
GMSMapID *mapID = [GMSMapID mapIDWithIdentifier:@"MAP_ID"];
GMSMapView *mapView = [GMSMapView mapWithFrame:CGRectZero mapID:mapID camera:camera];
self.view = mapView;
اگر از شناسه نقشه خودتان استفاده میکنید، میتوانید شناسه نقشه خود را در کنسول Cloud طوری تنظیم کنید که در هر زمان سبک جدیدی داشته باشد و آن سبک ظرف حدود شش ساعت به طور خودکار برای شما و کاربران در نمای نقشه شما منعکس میشود.
اگر میخواهید تغییرات را فوراً مشاهده کنید، میتوانید برنامه خود را ببندید و دوباره راهاندازی کنید. برای این کار از برنامه خارج شوید، برنامه را از لیست برنامههای اخیراً استفاده شده حذف کنید و سپس دوباره آن را باز کنید. سپس نقشه بهروزرسانی شده قابل مشاهده خواهد بود.
جاوا اسکریپت
برای ایجاد نقشه با شناسه نقشه در کد برنامه خود:
اگر از قبل نقشه خود را با کد JSON تعبیهشده سفارشیسازی کردهاید، ویژگی
stylesرا از شیءMapOptionsخود حذف کنید؛ در غیر این صورت، از این مرحله صرفنظر کنید.با استفاده از ویژگی
mapIdیک شناسه نقشه به نقشه اضافه کنید. برای مثال:
map = new google.maps.Map(document.getElementById('map'), {
center: {lat: -34.397, lng: 150.644},
zoom: 8,
mapId: 'MAP_ID'
});
نقشههای استاتیک
برای افزودن شناسه نقشه به یک نقشه جدید یا موجود که از یکی از APIهای سرویس وب ما استفاده میکند، پارامتر URL مربوط به map_id را اضافه کرده و آن را روی شناسه نقشه خود تنظیم کنید. این مثال نحوه افزودن شناسه نقشه به یک نقشه با استفاده از Maps Static API را نشان میدهد.
<img src="https://maps.googleapis.com/maps/api/staticmap?center=Brooklyn+Bridge,New+York,NY&zoom=13&size=600x300&maptype=roadmap&markers=color:blue%7Clabel:S%7C40.702147,-74.015794&markers=color:green%7Clabel:G%7C40.711614,-74.012318&markers=color:red%7Clabel:C%7C40.718217,-73.998284&key=YOUR_API_KEY&map_id=MAP_ID&signature=YOUR_SIGNATURE" />