
简介
标记用于标识地图上的某个位置。默认情况下,标记使用标准图像。标记也可以显示自定义图像,在这种情况下,它们通常被称为“图标”。标记和图标是 Marker 类型的对象。您可以在标记的构造函数中设置自定义图标,也可以通过对标记调用 setIcon() 进行设置。不妨详细了解如何自定义标记图像。
从广义上来讲,标记是一种叠加层。如需了解其他叠加层类型,请参阅在地图上绘制。
标记在设计上支持互动。例如,默认情况下标记会接收 'click' 事件,因此您可以添加一个事件监听器,在监听到相关事件时弹出显示自定义信息的信息窗口。您可以将某个标记的 draggable 属性设置为 true,允许用户在地图上移动该标记。如需详细了解可拖动标记,请参阅下文。
添加标记
google.maps.Marker 构造函数采用一个 Marker options 对象字面量作为参数,该对象字面量用于指定标记的初始属性。
以下字段特别重要,通常在构建标记时进行设置:
-
position(必需):用于指定标识标记初始位置的LatLng。若要获取LatLng,一种方式是使用地理编码服务。 -
map(可选):用于指定要放置标记的Map。如果您在构建标记时未指定地图,则标记创建后不会附加到(或显示在)地图上。不过,您后续可通过调用标记的setMap()方法来添加该标记。
以下示例将一个简单的标记添加到地图上,标记所在的位置是位于澳大利亚中心区域的乌鲁鲁:
TypeScript
function initMap(): void { const myLatLng = { lat: -25.363, lng: 131.044 }; const map = new google.maps.Map( document.getElementById("map") as HTMLElement, { zoom: 4, center: myLatLng, } ); new google.maps.Marker({ position: myLatLng, map, title: "Hello World!", }); } declare global { interface Window { initMap: () => void; } } window.initMap = initMap;
JavaScript
function initMap() { const myLatLng = { lat: -25.363, lng: 131.044 }; const map = new google.maps.Map(document.getElementById("map"), { zoom: 4, center: myLatLng, }); new google.maps.Marker({ position: myLatLng, map, title: "Hello World!", }); } window.initMap = initMap;
试用示例
上述示例中,在构建标记时使用了标记选项中的 map 属性来将该标记放置在地图上。此外,您也可以使用标记的 setMap() 方法将标记直接添加到地图上,如以下示例中所示:
var myLatlng = new google.maps.LatLng(-25.363882,131.044922);
var mapOptions = {
  zoom: 4,
  center: myLatlng
}
var map = new google.maps.Map(document.getElementById("map"), mapOptions);

var marker = new google.maps.Marker({
    position: myLatlng,
    title:"Hello World!"
});

// To add the marker to the map, call setMap();
marker.setMap(map);
标记的 title 会显示为提示。
如果您不想在标记的构造函数中传递任何 Marker options,则应改为在构造函数的最后一个参数中传递一个空对象 {}。
移除标记
要从地图中移除标记,请调用 setMap() 方法并以参数形式传递 null。
marker.setMap(null);
请注意,上述方法不会删除标记,而只是从地图上移除标记。如果您想删除标记,则应先将其从地图上移除,然后再将标记本身设置为 null。
如果您希望管理一组标记,则应该创建一个数组来保存这些标记。使用此数组,您就可以依次对数组中的每个标记调用 setMap() 来移除这些标记。若要删除标记,您可以从地图中移除这些标记,然后将数组的 length 设置为 0,此操作会移除对标记的所有引用。
自定义标记图像
如要自定义标记的视觉外观,您可以指定要显示的图像文件或矢量图标,而不是使用默认的 Google 地图图钉图标。您可以通过标记标签添加文本,使用复杂的图标来定义可点击区域,并设置标记的叠放顺序。
采用图像图标的标记
在最基本的情况下,图标可以指定一个图像来代替默认的 Google 地图图钉图标。要指定此类图标,请将标记的 icon 属性设置为图像的网址。Maps JavaScript API 会自动调整图标大小。
TypeScript
// This example adds a marker to indicate the position of Bondi Beach in Sydney, // Australia. function initMap(): void { const map = new google.maps.Map( document.getElementById("map") as HTMLElement, { zoom: 4, center: { lat: -33, lng: 151 }, } ); const image = "https://developers.google.com/maps/documentation/javascript/examples/full/images/beachflag.png"; const beachMarker = new google.maps.Marker({ position: { lat: -33.89, lng: 151.274 }, map, icon: image, }); } declare global { interface Window { initMap: () => void; } } window.initMap = initMap;
JavaScript
// This example adds a marker to indicate the position of Bondi Beach in Sydney, // Australia. function initMap() { const map = new google.maps.Map(document.getElementById("map"), { zoom: 4, center: { lat: -33, lng: 151 }, }); const image = "https://developers.google.com/maps/documentation/javascript/examples/full/images/beachflag.png"; const beachMarker = new google.maps.Marker({ position: { lat: -33.89, lng: 151.274 }, map, icon: image, }); } window.initMap = initMap;
试用示例
采用矢量图标的标记
您可以使用自定义 SVG 矢量路径来定义标记的视觉外观。为此,请将包含所需路径的 Symbol 对象字面量传递给标记的 icon 属性。您可以使用 SVG 路径表示法定义自定义路径,也可以使用 google.maps.SymbolPath 中的某个预定义路径。请务必使用 anchor 属性,以便在缩放级别发生变化时正确渲染标记。不妨详细了解如何使用符号为标记(和多段线)创建矢量图标。
TypeScript
// This example uses SVG path notation to add a vector-based symbol // as the icon for a marker. The resulting icon is a marker-shaped // symbol with a blue fill and no border. function initMap(): void { const center = new google.maps.LatLng(-33.712451, 150.311823); const map = new google.maps.Map( document.getElementById("map") as HTMLElement, { zoom: 9, center: center, } ); const svgMarker = { path: "M-1.547 12l6.563-6.609-1.406-1.406-5.156 5.203-2.063-2.109-1.406 1.406zM0 0q2.906 0 4.945 2.039t2.039 4.945q0 1.453-0.727 3.328t-1.758 3.516-2.039 3.070-1.711 2.273l-0.75 0.797q-0.281-0.328-0.75-0.867t-1.688-2.156-2.133-3.141-1.664-3.445-0.75-3.375q0-2.906 2.039-4.945t4.945-2.039z", fillColor: "blue", fillOpacity: 0.6, strokeWeight: 0, rotation: 0, scale: 2, anchor: new google.maps.Point(0, 20), }; new google.maps.Marker({ position: map.getCenter(), icon: svgMarker, map: map, }); } declare global { interface Window { initMap: () => void; } } window.initMap = initMap;
JavaScript
// This example uses SVG path notation to add a vector-based symbol // as the icon for a marker. The resulting icon is a marker-shaped // symbol with a blue fill and no border. function initMap() { const center = new google.maps.LatLng(-33.712451, 150.311823); const map = new google.maps.Map(document.getElementById("map"), { zoom: 9, center: center, }); const svgMarker = { path: "M-1.547 12l6.563-6.609-1.406-1.406-5.156 5.203-2.063-2.109-1.406 1.406zM0 0q2.906 0 4.945 2.039t2.039 4.945q0 1.453-0.727 3.328t-1.758 3.516-2.039 3.070-1.711 2.273l-0.75 0.797q-0.281-0.328-0.75-0.867t-1.688-2.156-2.133-3.141-1.664-3.445-0.75-3.375q0-2.906 2.039-4.945t4.945-2.039z", fillColor: "blue", fillOpacity: 0.6, strokeWeight: 0, rotation: 0, scale: 2, anchor: new google.maps.Point(0, 20), }; new google.maps.Marker({ position: map.getCenter(), icon: svgMarker, map: map, }); } window.initMap = initMap;
试用示例
标记标签
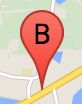
标记标签是显示在标记内的字母或数字。本部分中的标记图像显示了一个带有字母“B”的标记标签。您可以将标记标签指定为字符串,也可以指定为包含字符串和其他标签属性的 MarkerLabel 对象。
创建标记时,您可以在 MarkerOptions 对象中指定 label 属性。或者,您也可以对 Marker 对象调用 setLabel(),在现有标记上设置标签。
以下示例会在用户点击地图时显示带有标签的标记:
TypeScript
// In the following example, markers appear when the user clicks on the map. // Each marker is labeled with a single alphabetical character. const labels = "ABCDEFGHIJKLMNOPQRSTUVWXYZ"; let labelIndex = 0; function initMap(): void { const bangalore = { lat: 12.97, lng: 77.59 }; const map = new google.maps.Map( document.getElementById("map") as HTMLElement, { zoom: 12, center: bangalore, } ); // This event listener calls addMarker() when the map is clicked. google.maps.event.addListener(map, "click", (event) => { addMarker(event.latLng, map); }); // Add a marker at the center of the map. addMarker(bangalore, map); } // Adds a marker to the map. function addMarker(location: google.maps.LatLngLiteral, map: google.maps.Map) { // Add the marker at the clicked location, and add the next-available label // from the array of alphabetical characters. new google.maps.Marker({ position: location, label: labels[labelIndex++ % labels.length], map: map, }); } declare global { interface Window { initMap: () => void; } } window.initMap = initMap;
JavaScript
// In the following example, markers appear when the user clicks on the map. // Each marker is labeled with a single alphabetical character. const labels = "ABCDEFGHIJKLMNOPQRSTUVWXYZ"; let labelIndex = 0; function initMap() { const bangalore = { lat: 12.97, lng: 77.59 }; const map = new google.maps.Map(document.getElementById("map"), { zoom: 12, center: bangalore, }); // This event listener calls addMarker() when the map is clicked. google.maps.event.addListener(map, "click", (event) => { addMarker(event.latLng, map); }); // Add a marker at the center of the map. addMarker(bangalore, map); } // Adds a marker to the map. function addMarker(location, map) { // Add the marker at the clicked location, and add the next-available label // from the array of alphabetical characters. new google.maps.Marker({ position: location, label: labels[labelIndex++ % labels.length], map: map, }); } window.initMap = initMap;
试用示例
复杂的图标
您可以指定复杂形状来指示可点击的区域,还可以指定图标相对于其他叠加层的显示方式(即它们的“叠放顺序”)。以这种方式指定的图标应将其 icon 属性设置为 Icon 类型的对象。
Icon 对象定义了一个图像。这些对象还定义了图标的 size、图标的 origin(例如,当您想要的图像是一张较大雪碧图的一部分时),以及图标热点应位于的 anchor(基于原点)。
如果您是在自定义标记中使用标签,可以通过 Icon 对象中的 labelOrigin 属性确定标签位置。
TypeScript
// The following example creates complex markers to indicate beaches near // Sydney, NSW, Australia. Note that the anchor is set to (0,32) to correspond // to the base of the flagpole. function initMap(): void { const map = new google.maps.Map( document.getElementById("map") as HTMLElement, { zoom: 10, center: { lat: -33.9, lng: 151.2 }, } ); setMarkers(map); } // Data for the markers consisting of a name, a LatLng and a zIndex for the // order in which these markers should display on top of each other. const beaches: [string, number, number, number][] = [ ["Bondi Beach", -33.890542, 151.274856, 4], ["Coogee Beach", -33.923036, 151.259052, 5], ["Cronulla Beach", -34.028249, 151.157507, 3], ["Manly Beach", -33.80010128657071, 151.28747820854187, 2], ["Maroubra Beach", -33.950198, 151.259302, 1], ]; function setMarkers(map: google.maps.Map) { // Adds markers to the map. // Marker sizes are expressed as a Size of X,Y where the origin of the image // (0,0) is located in the top left of the image. // Origins, anchor positions and coordinates of the marker increase in the X // direction to the right and in the Y direction down. const image = { url: "https://developers.google.com/maps/documentation/javascript/examples/full/images/beachflag.png", // This marker is 20 pixels wide by 32 pixels high. size: new google.maps.Size(20, 32), // The origin for this image is (0, 0). origin: new google.maps.Point(0, 0), // The anchor for this image is the base of the flagpole at (0, 32). anchor: new google.maps.Point(0, 32), }; // Shapes define the clickable region of the icon. The type defines an HTML // <area> element 'poly' which traces out a polygon as a series of X,Y points. // The final coordinate closes the poly by connecting to the first coordinate. const shape = { coords: [1, 1, 1, 20, 18, 20, 18, 1], type: "poly", }; for (let i = 0; i < beaches.length; i++) { const beach = beaches[i]; new google.maps.Marker({ position: { lat: beach[1], lng: beach[2] }, map, icon: image, shape: shape, title: beach[0], zIndex: beach[3], }); } } declare global { interface Window { initMap: () => void; } } window.initMap = initMap;
JavaScript
// The following example creates complex markers to indicate beaches near // Sydney, NSW, Australia. Note that the anchor is set to (0,32) to correspond // to the base of the flagpole. function initMap() { const map = new google.maps.Map(document.getElementById("map"), { zoom: 10, center: { lat: -33.9, lng: 151.2 }, }); setMarkers(map); } // Data for the markers consisting of a name, a LatLng and a zIndex for the // order in which these markers should display on top of each other. const beaches = [ ["Bondi Beach", -33.890542, 151.274856, 4], ["Coogee Beach", -33.923036, 151.259052, 5], ["Cronulla Beach", -34.028249, 151.157507, 3], ["Manly Beach", -33.80010128657071, 151.28747820854187, 2], ["Maroubra Beach", -33.950198, 151.259302, 1], ]; function setMarkers(map) { // Adds markers to the map. // Marker sizes are expressed as a Size of X,Y where the origin of the image // (0,0) is located in the top left of the image. // Origins, anchor positions and coordinates of the marker increase in the X // direction to the right and in the Y direction down. const image = { url: "https://developers.google.com/maps/documentation/javascript/examples/full/images/beachflag.png", // This marker is 20 pixels wide by 32 pixels high. size: new google.maps.Size(20, 32), // The origin for this image is (0, 0). origin: new google.maps.Point(0, 0), // The anchor for this image is the base of the flagpole at (0, 32). anchor: new google.maps.Point(0, 32), }; // Shapes define the clickable region of the icon. The type defines an HTML // <area> element 'poly' which traces out a polygon as a series of X,Y points. // The final coordinate closes the poly by connecting to the first coordinate. const shape = { coords: [1, 1, 1, 20, 18, 20, 18, 1], type: "poly", }; for (let i = 0; i < beaches.length; i++) { const beach = beaches[i]; new google.maps.Marker({ position: { lat: beach[1], lng: beach[2] }, map, icon: image, shape: shape, title: beach[0], zIndex: beach[3], }); } } window.initMap = initMap;
试用示例
将 MarkerImage 对象转换为 Icon 类型
在 Maps JavaScript API 3.10 版之前,复杂的图标都被定义成 MarkerImage 对象。3.10 版中添加了 Icon 对象字面量,从 3.11 版开始,该字面量就取代了 MarkerImage。Icon 对象字面量支持的参数与 MarkerImage 相同,这让您能够轻松将 MarkerImage 转换为 Icon,具体操作方法如下:移除构造函数,将之前的参数封装在 {} 的参数中,然后添加每个参数的名称。例如:
var image = new google.maps.MarkerImage(
    place.icon,
    new google.maps.Size(71, 71),
    new google.maps.Point(0, 0),
    new google.maps.Point(17, 34),
    new google.maps.Size(25, 25));
可改为
var image = {
  url: place.icon,
  size: new google.maps.Size(71, 71),
  origin: new google.maps.Point(0, 0),
  anchor: new google.maps.Point(17, 34),
  scaledSize: new google.maps.Size(25, 25)
};
优化标记
您可以通过优化将多个标记渲染为单个静态元素,从而提高性能。在需要大量标记的情况下,这会非常有用。默认情况下,Maps JavaScript API 将决定是否优化标记。如果存在大量标记,Maps JavaScript API 将尝试在渲染标记时进行优化。并非所有标记都可以进行优化;在某些情况下,Maps JavaScript API 可能需要在不进行优化的情况下渲染标记。对于动画 GIF 或 PNG 或者在必须将每个标记渲染为单独的 DOM 元素的情况下,应停用优化渲染。以下示例展示了如何创建优化标记:
var marker = new google.maps.Marker({
    position: myLatlng,
    title:"Hello World!",
    optimized: true
});
使标记可供访问
若要使标记可供访问,可以添加一个点击监听器事件,并将 optimized 设置为 false。点击监听器会使标记具有按钮语义,可以使用键盘导航、屏幕阅读器等进行访问。使用 title 选项,可以显示标记的可访问文本。
在以下示例中,第一个标记会在用户按 Tab 键时获得焦点;然后,您可以使用箭头键在标记之间移动。再按一次 Tab 键,可以继续在其余地图控件之间移动。如果某个标记有信息窗口,您可以点击相应标记,或在选中该标记的状态下按 Enter 键或空格键,从而打开该信息窗口。关闭信息窗口后,焦点将返回到关联的标记。
TypeScript
// The following example creates five accessible and // focusable markers. function initMap(): void { const map = new google.maps.Map( document.getElementById("map") as HTMLElement, { zoom: 12, center: { lat: 34.84555, lng: -111.8035 }, } ); // Set LatLng and title text for the markers. The first marker (Boynton Pass) // receives the initial focus when tab is pressed. Use arrow keys to // move between markers; press tab again to cycle through the map controls. const tourStops: [google.maps.LatLngLiteral, string][] = [ [{ lat: 34.8791806, lng: -111.8265049 }, "Boynton Pass"], [{ lat: 34.8559195, lng: -111.7988186 }, "Airport Mesa"], [{ lat: 34.832149, lng: -111.7695277 }, "Chapel of the Holy Cross"], [{ lat: 34.823736, lng: -111.8001857 }, "Red Rock Crossing"], [{ lat: 34.800326, lng: -111.7665047 }, "Bell Rock"], ]; // Create an info window to share between markers. const infoWindow = new google.maps.InfoWindow(); // Create the markers. tourStops.forEach(([position, title], i) => { const marker = new google.maps.Marker({ position, map, title: `${i + 1}. ${title}`, label: `${i + 1}`, optimized: false, }); // Add a click listener for each marker, and set up the info window. marker.addListener("click", () => { infoWindow.close(); infoWindow.setContent(marker.getTitle()); infoWindow.open(marker.getMap(), marker); }); }); } declare global { interface Window { initMap: () => void; } } window.initMap = initMap;
JavaScript
// The following example creates five accessible and // focusable markers. function initMap() { const map = new google.maps.Map(document.getElementById("map"), { zoom: 12, center: { lat: 34.84555, lng: -111.8035 }, }); // Set LatLng and title text for the markers. The first marker (Boynton Pass) // receives the initial focus when tab is pressed. Use arrow keys to // move between markers; press tab again to cycle through the map controls. const tourStops = [ [{ lat: 34.8791806, lng: -111.8265049 }, "Boynton Pass"], [{ lat: 34.8559195, lng: -111.7988186 }, "Airport Mesa"], [{ lat: 34.832149, lng: -111.7695277 }, "Chapel of the Holy Cross"], [{ lat: 34.823736, lng: -111.8001857 }, "Red Rock Crossing"], [{ lat: 34.800326, lng: -111.7665047 }, "Bell Rock"], ]; // Create an info window to share between markers. const infoWindow = new google.maps.InfoWindow(); // Create the markers. tourStops.forEach(([position, title], i) => { const marker = new google.maps.Marker({ position, map, title: `${i + 1}. ${title}`, label: `${i + 1}`, optimized: false, }); // Add a click listener for each marker, and set up the info window. marker.addListener("click", () => { infoWindow.close(); infoWindow.setContent(marker.getTitle()); infoWindow.open(marker.getMap(), marker); }); }); } window.initMap = initMap;
试用示例
以动画方式呈现标记
您可以通过动画的方式呈现标记,以便它们能够在各种不同的情况下展现出动态移动的效果。若要指定某个标记的动画呈现方式,请使用该标记的 animation 属性,其类型为 google.maps.Animation。支持使用以下 Animation 值:
-
DROP,表示第一次将该标记放置在地图上时,该标记应该从地图顶部下落到其最终位置。一旦标记停止移动,动画即停止,并且animation将还原为null。这种类型的动画通常在创建Marker的过程中指定。 -
BOUNCE,表示该标记应该在原地弹跳。弹跳标记将持续弹跳,直到其animation属性被明确设置为null。
您可以对 Marker 对象调用 setAnimation(),从而为现有标记启用动画效果。
TypeScript
// The following example creates a marker in Stockholm, Sweden using a DROP // animation. Clicking on the marker will toggle the animation between a BOUNCE // animation and no animation. let marker: google.maps.Marker; function initMap(): void { const map = new google.maps.Map( document.getElementById("map") as HTMLElement, { zoom: 13, center: { lat: 59.325, lng: 18.07 }, } ); marker = new google.maps.Marker({ map, draggable: true, animation: google.maps.Animation.DROP, position: { lat: 59.327, lng: 18.067 }, }); marker.addListener("click", toggleBounce); } function toggleBounce() { if (marker.getAnimation() !== null) { marker.setAnimation(null); } else { marker.setAnimation(google.maps.Animation.BOUNCE); } } declare global { interface Window { initMap: () => void; } } window.initMap = initMap;
JavaScript
// The following example creates a marker in Stockholm, Sweden using a DROP // animation. Clicking on the marker will toggle the animation between a BOUNCE // animation and no animation. let marker; function initMap() { const map = new google.maps.Map(document.getElementById("map"), { zoom: 13, center: { lat: 59.325, lng: 18.07 }, }); marker = new google.maps.Marker({ map, draggable: true, animation: google.maps.Animation.DROP, position: { lat: 59.327, lng: 18.067 }, }); marker.addListener("click", toggleBounce); } function toggleBounce() { if (marker.getAnimation() !== null) { marker.setAnimation(null); } else { marker.setAnimation(google.maps.Animation.BOUNCE); } } window.initMap = initMap;
试用示例
如果您有很多标记,您可能不想一次性将它们全都放在地图上。您可以使用 setTimeout(),通过如下所示的模式将这些标记的动画间隔开来:
function drop() {
  for (var i =0; i < markerArray.length; i++) {
    setTimeout(function() {
      addMarkerMethod();
    }, i * 200);
  }
}
使标记可拖动
若要允许用户将某个标记拖动到地图上的其他位置,请在相应标记的选项中将 draggable 设置为 true。
var myLatlng = new google.maps.LatLng(-25.363882,131.044922);
var mapOptions = {
  zoom: 4,
  center: myLatlng
}
var map = new google.maps.Map(document.getElementById("map"), mapOptions);

// Place a draggable marker on the map
var marker = new google.maps.Marker({
    position: myLatlng,
    map: map,
    draggable:true,
    title:"Drag me!"
});
进一步自定义标记
如需了解完全自定义的标记,请参阅自定义弹出式窗口示例。
如需进一步扩展 Marker 类、标记聚类与管理以及叠加层自定义,请参阅开源库。