
用户可以使用地图上的手势控制相机的缩放、倾斜、位置和旋转。 您还可以通过编程方式配置相机。
镜头位置
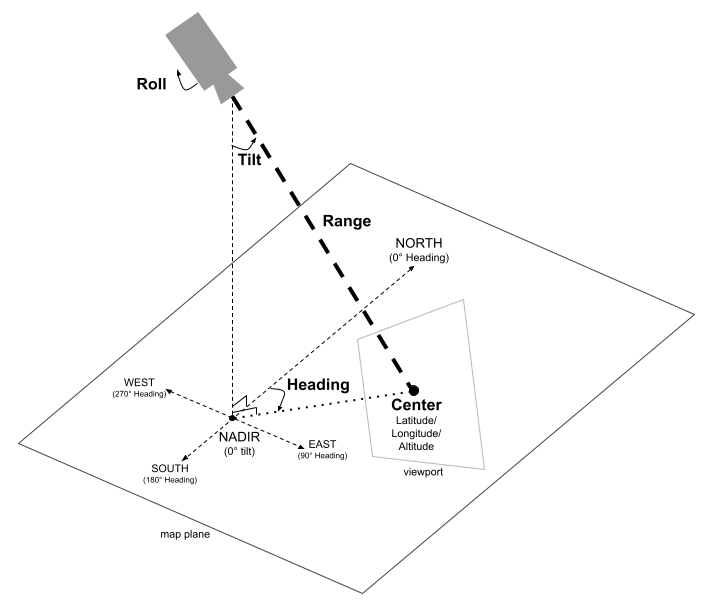
地图视图被建模成一个俯视空间中特定点的镜头。镜头的位置和方向由纬度/经度/海拔坐标(定义为“中心”,即镜头指向的位置)、方向角、倾斜度、范围和滚转角定义。
中心(纬度、经度、海拔)
中心 定义了镜头所观察的 3D 空间中的特定点。这是使用 LatLngAltitude 类指定的,该类组合了纬度、经度和海拔的值。这样就可以在三个维度中精确定位镜头的焦点。
纬度范围为 -90 度(含)到 90 度(含)。经度范围为 -180 度(含)到 180 度(含)。海拔以米为单位,表示高于海平面的高度。
朝向
方向角 指定了地图的罗盘方向,以相对于正北方的顺时针角度来表示。北方对应于 0 度,东方对应于 90 度,南方对应于 180 度,西方对应于 270 度。
倾斜度
倾斜度 指定了镜头相对于垂直轴的角度,以度为单位。倾斜度为 0 度表示镜头正对着 地球 (天底)。倾斜度为 90 度表示镜头水平指向 朝向 指定的方向。
范围
范围 定义了镜头自身位置与地图中心之间的距离(以米为单位)。范围可以从 0 米(非常近)到 6300 万米不等,从而可以从非常近的视角一直看到真正的全球视角。这有效地控制了地图的“放大”或“缩小”程度。
滚转角
滚转角 设置了镜头相对于地平线的角度,以度为单位。此参数可用于创建效果,例如飞行模拟期间的倾斜,甚至是完整的桶滚,围绕镜头的观看轴旋转镜头。
控制相机
以下代码示例演示了如何通过调用setCamera
方法以编程方式控制相机。
如需使用此代码示例,请按照
设置并
向应用添加 3D 地图中的说明,使用基本 3D 地图设置
Android Studio 项目。然后,将以下代码添加到 MainActivity.kt 文件中:
// Add imports
import com.google.android.gms.maps3d.model.latLngAltitude

...

// Add to the onMap3DViewReady method, after the googleMap3D object has been initialized
googleMap3D.setCamera(
    camera {
        center = latLngAltitude {
            latitude = 38.743502
            longitude = -109.499374
            altitude = 1467.0
        }
        heading = 350.0
        tilt = 58.1
        range = 138.2
        roll = 0.0
    }
)