
सिस्टम की ओर से तय किए गए नेटिव विज्ञापन फ़ॉर्मैट को दिखाना
नेटिव विज्ञापन लोड होने पर, आपका ऐप्लिकेशन GADAdLoaderDelegate प्रोटोकॉल मैसेज में से किसी एक का इस्तेमाल करके, नेटिव विज्ञापन ऑब्जेक्ट को पाएगा. इसके बाद, आपके ऐप्लिकेशन की यह ज़िम्मेदारी होती है कि वह विज्ञापन दिखाए. हालांकि, ऐसा ज़रूरी नहीं है कि वह विज्ञापन तुरंत दिखाए.
सिस्टम की ओर से तय किए गए विज्ञापन फ़ॉर्मैट को आसानी से दिखाने के लिए, SDK टूल कुछ काम के संसाधन उपलब्ध कराता है.
GADNativeAdView
GADNativeAd के लिए, "विज्ञापन व्यू" क्लास है:
GADNativeAdView.
यह विज्ञापन व्यू क्लास एक UIView है. पब्लिशर को इसका इस्तेमाल विज्ञापन दिखाने के लिए करना चाहिए.
उदाहरण के लिए, एक GADNativeAdView, GADNativeAd का सिर्फ़ एक इंस्टेंस दिखा सकता है. विज्ञापन की ऐसेट दिखाने के लिए इस्तेमाल किए गए हर UIView ऑब्जेक्ट को उस GADNativeAdView ऑब्जेक्ट का सबव्यू होना चाहिए.
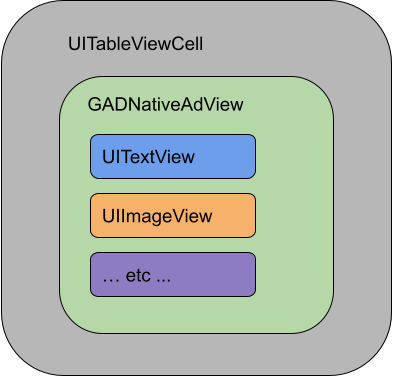
अगर आपको किसी UITableView में विज्ञापन दिखाना है, तो उदाहरण के लिए, किसी सेल के लिए व्यू हैरारकी इस तरह दिख सकती है:
GADNativeAdView क्लास, IBOutlets भी उपलब्ध कराता है. इसका इस्तेमाल, हर ऐसेट के लिए इस्तेमाल किए गए व्यू को रजिस्टर करने के लिए किया जाता है. साथ ही, यह GADNativeAd ऑब्जेक्ट को रजिस्टर करने का तरीका भी उपलब्ध कराता है. इस तरह से व्यू रजिस्टर करने पर, SDK इन जैसे टास्क को अपने-आप हैंडल कर सकता है:
- रिकॉर्डिंग पर मिले क्लिक.
- इंप्रेशन रिकॉर्ड करना (जब पहला पिक्सल स्क्रीन पर दिखता है).
- AdChoices ओवरले दिखाना.
AdChoices ओवरले
Ad Manager बैकफ़िल या Ad Exchange या AdSense के ज़रिए दिखाए जाने वाले इनडायरेक्ट नेटिव विज्ञापनों के लिए, एसडीके AdChoices ओवरले जोड़ता है. AdChoices लोगो को अपने-आप शामिल करने के लिए, नेटिव विज्ञापन व्यू के अपने पसंदीदा कोने में जगह छोड़ें. साथ ही, यह पक्का करें कि AdChoices ओवरले उस कॉन्टेंट पर मौजूद हो जहां से आइकॉन को आसानी से देखा जा सकता हो. ओवरले के दिखने और काम करने के तरीके के बारे में ज़्यादा जानने के लिए, प्रोग्राम के हिसाब से नेटिव विज्ञापन लागू करने के दिशा-निर्देश देखें.
प्रोग्राम के हिसाब से दिखाए जाने वाले नेटिव विज्ञापनों के लिए विज्ञापन एट्रिब्यूशन
प्रोग्राम के हिसाब से दिखाए जाने वाले नेटिव विज्ञापनों को दिखाते समय, आपको विज्ञापन एट्रिब्यूशन दिखाना होगा. इससे यह पता चलेगा कि व्यू एक विज्ञापन है. नीति के दिशा-निर्देशों में इसके बारे में ज़्यादा जानें.कोड का उदाहरण
इस सेक्शन में, xib फ़ाइलों से डाइनैमिक तौर पर लोड किए गए व्यू का इस्तेमाल करके, नेटिव विज्ञापन दिखाने का तरीका बताया गया है. यह तरीका तब बहुत काम आ सकता है, जब GADAdLoaders को कई फ़ॉर्मैट का अनुरोध करने के लिए कॉन्फ़िगर किया गया हो.
UIViews को लेआउट करना
सबसे पहले, उस UIViews को लेआउट करें जिसमें नेटिव विज्ञापन ऐसेट दिखेंगी.
इसे Interface Builder में किया जा सकता है. ठीक वैसे ही जैसे कोई अन्य xib फ़ाइल बनाते समय किया जाता है. नेटिव विज्ञापन का लेआउट ऐसा दिख सकता है:
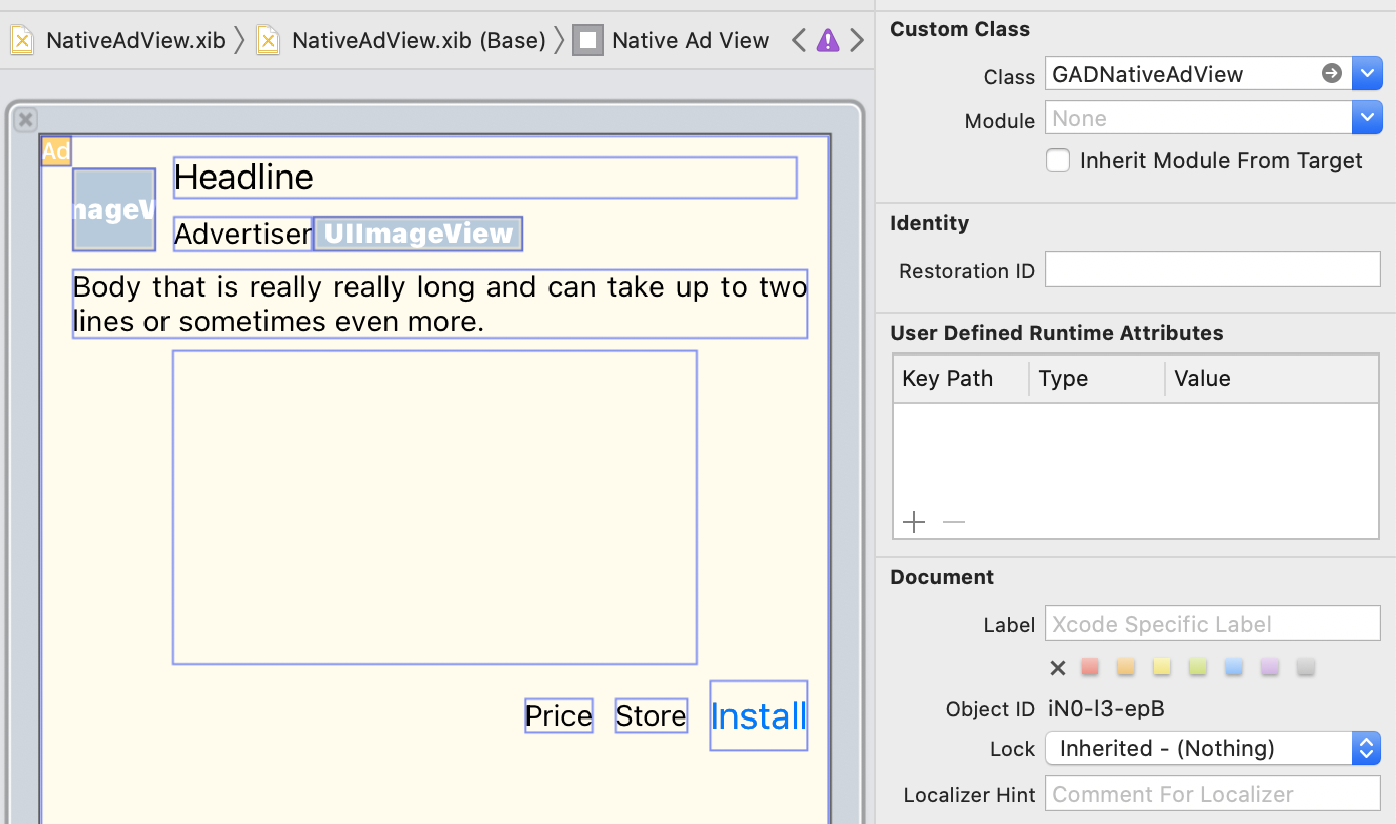
इमेज में सबसे ऊपर दाईं ओर, कस्टम क्लास की वैल्यू देखें. इसे इस पर सेट किया गया है
GADNativeAdView.
यह विज्ञापन व्यू क्लास है. इसका इस्तेमाल GADNativeAd को दिखाने के लिए किया जाता है.
आपको GADMediaView के लिए कस्टम क्लास भी सेट करनी होगी. इसका इस्तेमाल विज्ञापन के लिए वीडियो या इमेज दिखाने के लिए किया जाता है.
आउटलेट को व्यू से लिंक करना
व्यू सेट अप करने और लेआउट को सही विज्ञापन व्यू क्लास असाइन करने के बाद, विज्ञापन व्यू के ऐसेट आउटलेट को बनाए गए UIViews से लिंक करें.
यहां विज्ञापन व्यू की ऐसेट आउटलेट को विज्ञापन के लिए UIViews बनाए गए ऐसेट ग्रुप से लिंक करने का तरीका बताया गया है:
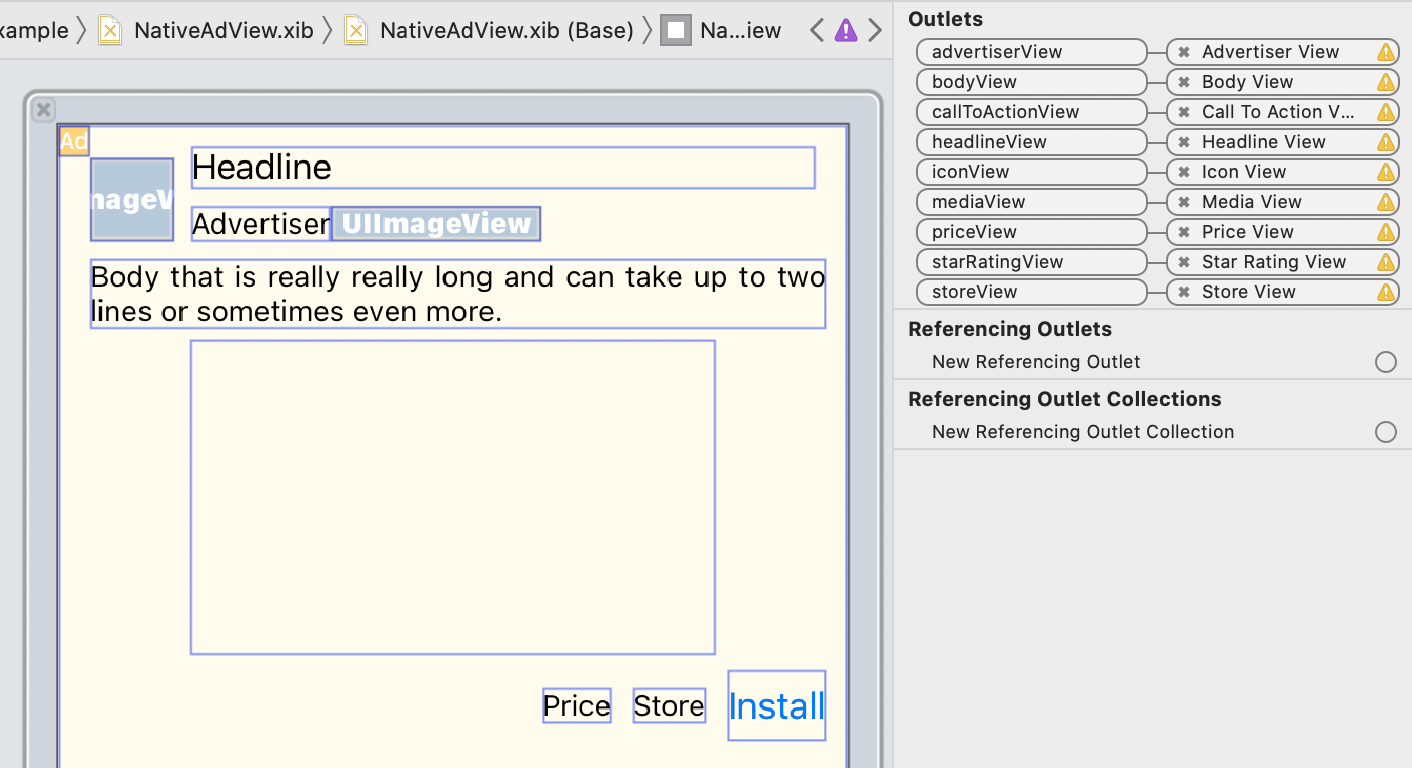
आउटलेट पैनल में, GADNativeAdView में मौजूद आउटलेट को Interface Builder में लेआउट किए गए UIViews से लिंक किया गया है. इससे SDK टूल को यह पता चलता है कि कौनसे UIView में कौनसी ऐसेट दिखानी है.
यह भी ध्यान रखना ज़रूरी है कि ये आउटलेट, विज्ञापन में क्लिक किए जा सकने वाले विचारों को दिखाते हैं.
विज्ञापन दिखाना
लेआउट पूरा होने और आउटलेट लिंक होने के बाद, अपने ऐप्लिकेशन में यह कोड जोड़ें. इससे विज्ञापन लोड होने के बाद दिखेगा:
Swift
func adLoader(_ adLoader: AdLoader, didReceive nativeAd: NativeAd) {
// ...
// Set ourselves as the native ad delegate to be notified of native ad events.
nativeAd.delegate = self
// Populate the native ad view with the native ad assets.
// The headline and mediaContent are guaranteed to be present in every native ad.
(nativeAdView.headlineView as? UILabel)?.text = nativeAd.headline
nativeAdView.mediaView?.mediaContent = nativeAd.mediaContent
// Some native ads will include a video asset, while others do not. Apps can use the
// GADVideoController's hasVideoContent property to determine if one is present, and adjust their
// UI accordingly.
let mediaContent = nativeAd.mediaContent
if mediaContent.hasVideoContent {
// By acting as the delegate to the GADVideoController, this ViewController receives messages
// about events in the video lifecycle.
mediaContent.videoController.delegate = self
videoStatusLabel.text = "Ad contains a video asset."
} else {
videoStatusLabel.text = "Ad does not contain a video."
}
// This app uses a fixed width for the GADMediaView and changes its height to match the aspect
// ratio of the media it displays.
if let mediaView = nativeAdView.mediaView, nativeAd.mediaContent.aspectRatio > 0 {
let aspectRatioConstraint = NSLayoutConstraint(
item: mediaView,
attribute: .width,
relatedBy: .equal,
toItem: mediaView,
attribute: .height,
multiplier: CGFloat(nativeAd.mediaContent.aspectRatio),
constant: 0)
mediaView.addConstraint(aspectRatioConstraint)
nativeAdView.layoutIfNeeded()
}
// These assets are not guaranteed to be present. Check that they are before
// showing or hiding them.
(nativeAdView.bodyView as? UILabel)?.text = nativeAd.body
nativeAdView.bodyView?.isHidden = nativeAd.body == nil
(nativeAdView.callToActionView as? UIButton)?.setTitle(nativeAd.callToAction, for: .normal)
nativeAdView.callToActionView?.isHidden = nativeAd.callToAction == nil
(nativeAdView.iconView as? UIImageView)?.image = nativeAd.icon?.image
nativeAdView.iconView?.isHidden = nativeAd.icon == nil
(nativeAdView.starRatingView as? UIImageView)?.image = imageOfStars(from: nativeAd.starRating)
nativeAdView.starRatingView?.isHidden = nativeAd.starRating == nil
(nativeAdView.storeView as? UILabel)?.text = nativeAd.store
nativeAdView.storeView?.isHidden = nativeAd.store == nil
(nativeAdView.priceView as? UILabel)?.text = nativeAd.price
nativeAdView.priceView?.isHidden = nativeAd.price == nil
(nativeAdView.advertiserView as? UILabel)?.text = nativeAd.advertiser
nativeAdView.advertiserView?.isHidden = nativeAd.advertiser == nil
// In order for the SDK to process touch events properly, user interaction should be disabled.
nativeAdView.callToActionView?.isUserInteractionEnabled = false
// Associate the native ad view with the native ad object. This is
// required to make the ad clickable.
// Note: this should always be done after populating the ad views.
nativeAdView.nativeAd = nativeAd
}
SwiftUI
व्यू मॉडल बनाना
एक व्यू मॉडल बनाएं, जो नेटिव विज्ञापन लोड करता है और नेटिव विज्ञापन डेटा में हुए बदलावों को पब्लिश करता है:
import GoogleMobileAds
class NativeAdViewModel: NSObject, ObservableObject, NativeAdLoaderDelegate {
@Published var nativeAd: NativeAd?
private var adLoader: AdLoader!
func refreshAd() {
adLoader = AdLoader(
adUnitID: "ca-app-pub-3940256099942544/3986624511",
// The UIViewController parameter is optional.
rootViewController: nil,
adTypes: [.native], options: nil)
adLoader.delegate = self
adLoader.load(Request())
}
func adLoader(_ adLoader: AdLoader, didReceive nativeAd: NativeAd) {
// Native ad data changes are published to its subscribers.
self.nativeAd = nativeAd
nativeAd.delegate = self
}
func adLoader(_ adLoader: AdLoader, didFailToReceiveAdWithError error: Error) {
print("\(adLoader) failed with error: \(error.localizedDescription)")
}
}
UIViewRepresentable बनाना
NativeView के लिए UIViewRepresentable बनाएं. साथ ही, ViewModel क्लास में डेटा में हुए बदलावों की सूचना पाने के लिए सदस्यता लें:
private struct NativeAdViewContainer: UIViewRepresentable {
typealias UIViewType = NativeAdView
// Observer to update the UIView when the native ad value changes.
@ObservedObject var nativeViewModel: NativeAdViewModel
func makeUIView(context: Context) -> NativeAdView {
return
Bundle.main.loadNibNamed(
"NativeAdView",
owner: nil,
options: nil)?.first as! NativeAdView
}
func updateUIView(_ nativeAdView: NativeAdView, context: Context) {
guard let nativeAd = nativeViewModel.nativeAd else { return }
// Each UI property is configurable using your native ad.
(nativeAdView.headlineView as? UILabel)?.text = nativeAd.headline
nativeAdView.mediaView?.mediaContent = nativeAd.mediaContent
(nativeAdView.bodyView as? UILabel)?.text = nativeAd.body
(nativeAdView.iconView as? UIImageView)?.image = nativeAd.icon?.image
(nativeAdView.starRatingView as? UIImageView)?.image = imageOfStars(from: nativeAd.starRating)
(nativeAdView.storeView as? UILabel)?.text = nativeAd.store
(nativeAdView.priceView as? UILabel)?.text = nativeAd.price
(nativeAdView.advertiserView as? UILabel)?.text = nativeAd.advertiser
(nativeAdView.callToActionView as? UIButton)?.setTitle(nativeAd.callToAction, for: .normal)
// For the SDK to process touch events properly, user interaction should be disabled.
nativeAdView.callToActionView?.isUserInteractionEnabled = false
// Associate the native ad view with the native ad object. This is required to make the ad
// clickable.
// Note: this should always be done after populating the ad views.
nativeAdView.nativeAd = nativeAd
}
व्यू को व्यू हैरारकी में जोड़ना
यहां दिए गए कोड में, व्यू
हायरार्की में UIViewRepresentable को जोड़ने का तरीका बताया गया है:
struct NativeContentView: View {
// Single source of truth for the native ad data.
@StateObject private var nativeViewModel = NativeAdViewModel()
var body: some View {
ScrollView {
VStack(spacing: 20) {
// Updates when the native ad data changes.
NativeAdViewContainer(nativeViewModel: nativeViewModel)
.frame(minHeight: 300) // minHeight determined from xib.
Objective-C
- (void)adLoader:(GADAdLoader *)adLoader didReceiveNativeAd:(GADNativeAd *)nativeAd {
// ...
GADNativeAdView *nativeAdView = self.nativeAdView;
// Set ourselves as the ad delegate to be notified of native ad events.
nativeAd.delegate = self;
// Populate the native ad view with the native ad assets.
// The headline and mediaContent are guaranteed to be present in every native ad.
((UILabel *)nativeAdView.headlineView).text = nativeAd.headline;
nativeAdView.mediaView.mediaContent = nativeAd.mediaContent;
// This app uses a fixed width for the GADMediaView and changes its height
// to match the aspect ratio of the media content it displays.
if (nativeAdView.mediaView != nil && nativeAd.mediaContent.aspectRatio > 0) {
NSLayoutConstraint *aspectRatioConstraint =
[NSLayoutConstraint constraintWithItem:nativeAdView.mediaView
attribute:NSLayoutAttributeWidth
relatedBy:NSLayoutRelationEqual
toItem:nativeAdView.mediaView
attribute:NSLayoutAttributeHeight
multiplier:(nativeAd.mediaContent.aspectRatio)
constant:0];
[nativeAdView.mediaView addConstraint:aspectRatioConstraint];
[nativeAdView layoutIfNeeded];
}
if (nativeAd.mediaContent.hasVideoContent) {
// By acting as the delegate to the GADVideoController, this ViewController
// receives messages about events in the video lifecycle.
nativeAd.mediaContent.videoController.delegate = self;
self.videoStatusLabel.text = @"Ad contains a video asset.";
} else {
self.videoStatusLabel.text = @"Ad does not contain a video.";
}
// These assets are not guaranteed to be present. Check that they are before
// showing or hiding them.
((UILabel *)nativeAdView.bodyView).text = nativeAd.body;
nativeAdView.bodyView.hidden = nativeAd.body ? NO : YES;
[((UIButton *)nativeAdView.callToActionView) setTitle:nativeAd.callToAction
forState:UIControlStateNormal];
nativeAdView.callToActionView.hidden = nativeAd.callToAction ? NO : YES;
((UIImageView *)nativeAdView.iconView).image = nativeAd.icon.image;
nativeAdView.iconView.hidden = nativeAd.icon ? NO : YES;
((UIImageView *)nativeAdView.starRatingView).image = [self imageForStars:nativeAd.starRating];
nativeAdView.starRatingView.hidden = nativeAd.starRating ? NO : YES;
((UILabel *)nativeAdView.storeView).text = nativeAd.store;
nativeAdView.storeView.hidden = nativeAd.store ? NO : YES;
((UILabel *)nativeAdView.priceView).text = nativeAd.price;
nativeAdView.priceView.hidden = nativeAd.price ? NO : YES;
((UILabel *)nativeAdView.advertiserView).text = nativeAd.advertiser;
nativeAdView.advertiserView.hidden = nativeAd.advertiser ? NO : YES;
// In order for the SDK to process touch events properly, user interaction
// should be disabled.
nativeAdView.callToActionView.userInteractionEnabled = NO;
// Associate the native ad view with the native ad object. This is
// required to make the ad clickable.
// Note: this should always be done after populating the ad views.
nativeAdView.nativeAd = nativeAd;
}
GitHub पर पूरा उदाहरण
Swift, SwiftUI, और Objective-C में नेटिव विज्ञापनों को इंटिग्रेट करने का पूरा उदाहरण देखने के लिए, GitHub के लिंक पर जाएं.
Swift में कस्टम रेंडरिंग का उदाहरण SwiftUI में नेटिव विज्ञापन का उदाहरण Objective-C में कस्टम रेंडरिंग का उदाहरण
GADMediaView
इमेज और वीडियो ऐसेट, GADMediaView का इस्तेमाल करने वाले लोगों को दिखाई जाती हैं.
यह एक UIView है, जिसे xib फ़ाइल में तय किया जा सकता है या डाइनैमिक तौर पर बनाया जा सकता है.
इसे GADNativeAdView की व्यू हैरारकी में रखा जाना चाहिए. ऐसा किसी अन्य ऐसेट व्यू के साथ भी किया जाता है.
सभी ऐसेट व्यू की तरह, मीडिया व्यू में भी कॉन्टेंट होना चाहिए. इसे GADMediaView पर mediaContent प्रॉपर्टी का इस्तेमाल करके सेट किया जाता है. GADNativeAd की mediaContent प्रॉपर्टी में ऐसा मीडिया कॉन्टेंट होता है जिसे GADMediaView को पास किया जा सकता है.
यहां कस्टम रेंडरिंग के उदाहरण (Swift | Objective-C) का एक स्निपेट दिया गया है. इसमें दिखाया गया है कि GADNativeAd से GADMediaContent का इस्तेमाल करके, नेटिव विज्ञापन ऐसेट को GADMediaView में कैसे भरा जाता है:
Swift
nativeAdView.mediaView?.mediaContent = nativeAd.mediaContent
Objective-C
nativeAdView.mediaView.mediaContent = nativeAd.mediaContent;
पक्का करें कि नेटिव विज्ञापन व्यू के लिए, इंटरफ़ेस बिल्डर फ़ाइल में आपने व्यू के कस्टम क्लास को GADMediaView पर सेट किया हो. साथ ही, आपने इसे mediaView आउटलेट से कनेक्ट किया हो.
इमेज कॉन्टेंट मोड बदलना
इमेज दिखाते समय, GADMediaView क्लास, UIView
contentMode
प्रॉपर्टी का पालन करती है. अगर आपको GADMediaView में किसी इमेज का साइज़ बदलने का तरीका बदलना है, तो इसके लिए GADMediaView की contentMode प्रॉपर्टी पर जाकर, उससे जुड़ा UIViewContentMode सेट करें.
उदाहरण के लिए, जब कोई इमेज दिखाई जाती है (विज्ञापन में वीडियो नहीं है), तब GADMediaView को भरने के लिए:
Swift
nativeAdView.mediaView?.contentMode = .scaleAspectFit
Objective-C
nativeAdView.mediaView.contentMode = UIViewContentModeScaleAspectFit;
GADMediaContent
GADMediaContent क्लास में, नेटिव विज्ञापन के मीडिया कॉन्टेंट से जुड़ा डेटा होता है. इसे GADMediaView क्लास का इस्तेमाल करके दिखाया जाता है. GADMediaView
mediaContent प्रॉपर्टी पर सेट होने पर:
अगर कोई वीडियो ऐसेट उपलब्ध है, तो उसे बफ़र किया जाता है और वह
GADMediaViewमें चलने लगती है.hasVideoContentको देखकर पता लगाया जा सकता है कि कोई वीडियो ऐसेट उपलब्ध है या नहीं.अगर विज्ञापन में वीडियो ऐसेट नहीं है, तो
mainImageऐसेट डाउनलोड हो जाती है और उसेGADMediaViewमें रख दिया जाता है.
अगले चरण
उपयोगकर्ता की निजता के बारे में ज़्यादा जानें.