Criar uma mala direta com o Gmail e o Planilhas Google

Nível de programação: iniciante
Duração: 10 minutos
Tipo de projeto: automação com um menu personalizado

Prefere aprender com vídeos?
O canal Google Workspace Developers inclui vídeos com dicas, sugestões e os recursos mais recentes.

Objetivos

  • Entenda o que a solução faz.
  • Entenda o que os serviços do Apps Script fazem no solução.
  • Configure o script.
  • Execute o script.

Sobre esta solução

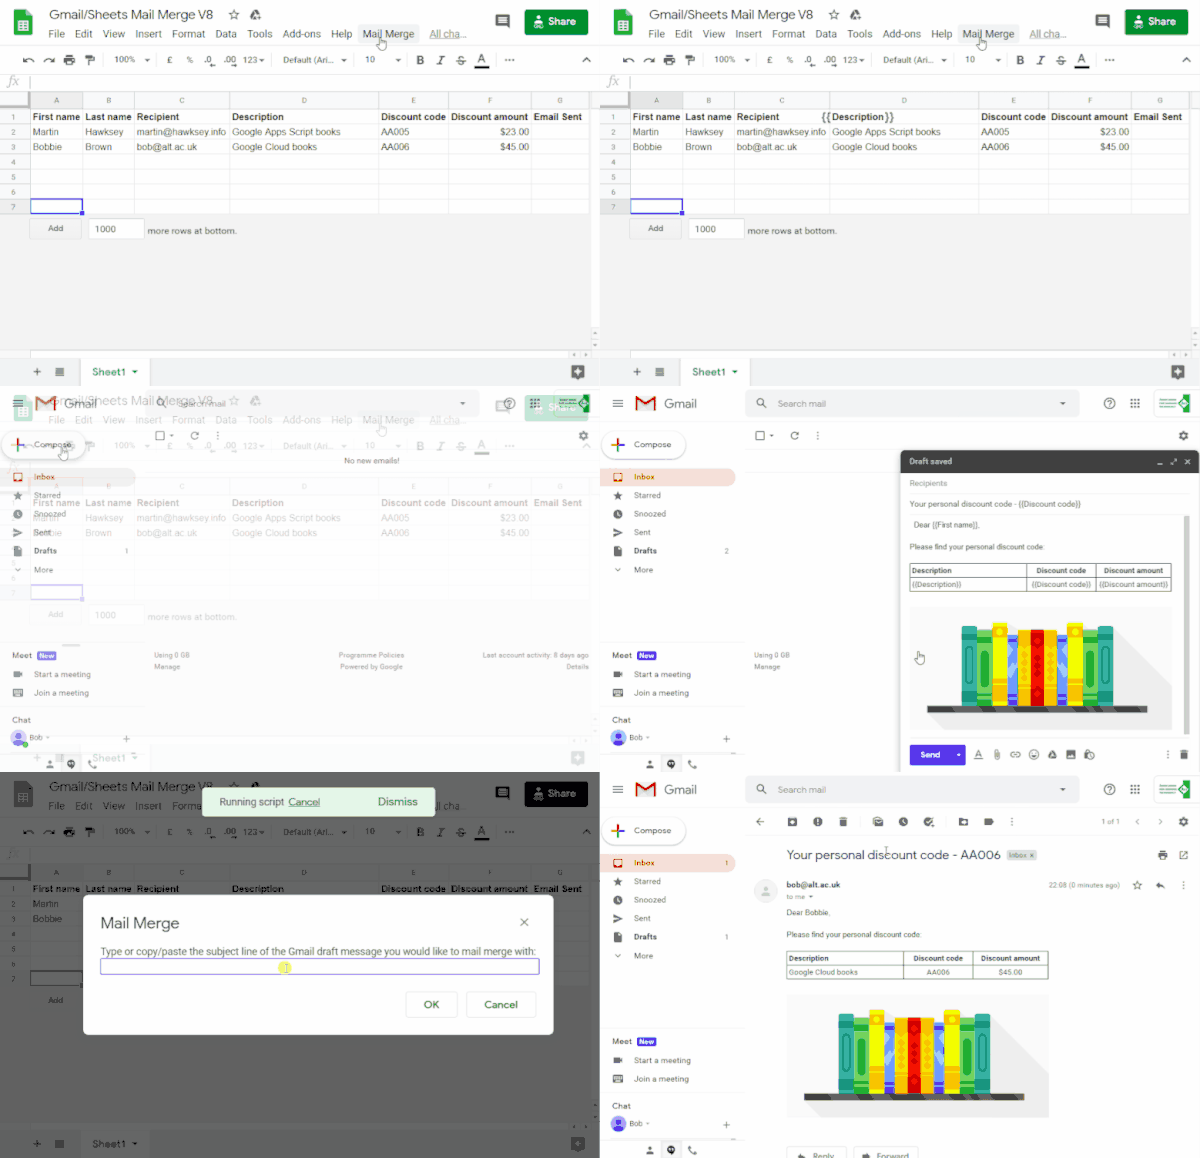
Preencher automaticamente um modelo de e-mail com dados das Planilhas Google. A e-mails são enviados da sua conta do Gmail para que você possa responder a as respostas dos destinatários.

Importante: esta amostra de mala direta está sujeita aos limites de e-mail descritos em Cotas para serviços do Google.

exemplo de mala direta

Como funciona

Você cria um modelo de rascunho do Gmail com marcadores de posição que e correspondem aos dados em uma planilha do Planilhas. O cabeçalho de cada coluna em uma planilha representa uma tag de marcador. O script envia as informações cada marcador de posição da planilha para o local tag de marcador de posição no rascunho de e-mail.

Serviços do Apps Script

Esta solução usa os seguintes serviços:

Pré-requisitos

Para usar este exemplo, você precisa dos seguintes pré-requisitos:

  • Uma Conta do Google (as contas do Google Workspace podem precisam da aprovação do administrador).
  • Um navegador da Web com acesso à Internet.

Configurar o script

Criar o projeto do Apps Script

  1. Clique no botão a seguir para copiar Exemplo de planilha mala direta do Gmail/Planilhas Google. O projeto do Apps Script para este solução está anexada à planilha.
    Fazer uma cópia
  2. Na planilha copiada, atualize a coluna Destinatários com o e-mail endereços que você quer usar na mala direta.
  3. (Opcional) Adicione, edite ou remova colunas para personalizar os dados que você quer incluir no seu modelo de e-mail.

Se você alterar o nome do Destinatário ou do E-mail Enviado, é preciso atualizar o código correspondente na projeto do Apps Script. Você pode abrir o Apps Script projeto da planilha, Clique em Extensões >. Apps Script.

Criar um modelo de e-mail

  1. Na sua conta do Gmail, crie um rascunho de e-mail. Para incluir dados da planilha em seu e-mail, use espaços reservados que correspondam aos nomes das colunas entre chaves, como {{First name}}.
    • Se você formatar o texto no e-mail, também será preciso formatar o marcador de posição os colchetes.
    • Os marcadores diferenciam maiúsculas de minúsculas e precisam corresponder exatamente aos cabeçalhos das colunas.
  2. Copie a linha de assunto do rascunho do e-mail.

Executar o script

  1. Na planilha, clique em Mesclagem de e-mails >. Enviar e-mails. Talvez seja necessário atualizar a página para esse menu personalizado. aparecer.
  2. Quando solicitado, autorize o script. Se a tela de permissão OAuth exibir o aviso Este app não foi verificado, continue selecionando Avançado > Acesse {Project Name} (não seguro).

  3. Clique em Mesclagem de e-mails > Enviar e-mails de novo.

  4. Cole a linha de assunto do modelo de e-mail e clique em OK.

Se você aplicar um filtro à planilha, o script ainda vai enviar um e-mail participantes, mas não adicionará o carimbo de data/hora.

Revisar o código

Para revisar o código do Apps Script para esta solução, clique em Veja o código-fonte abaixo:

Acessar o código-fonte

Code.gs

solutions/automations/mail-merge/Code.js
// To learn how to use this script, refer to the documentation:
// https://developers.google.com/apps-script/samples/automations/mail-merge

/*
Copyright 2022 Martin Hawksey

Licensed under the Apache License, Version 2.0 (the "License");
you may not use this file except in compliance with the License.
You may obtain a copy of the License at

    https://www.apache.org/licenses/LICENSE-2.0

Unless required by applicable law or agreed to in writing, software
distributed under the License is distributed on an "AS IS" BASIS,
WITHOUT WARRANTIES OR CONDITIONS OF ANY KIND, either express or implied.
See the License for the specific language governing permissions and
limitations under the License.
*/

/**
 * @OnlyCurrentDoc
*/

/**
 * Change these to match the column names you are using for email 
 * recipient addresses and email sent column.
*/
const RECIPIENT_COL  = "Recipient";
const EMAIL_SENT_COL = "Email Sent";

/** 
 * Creates the menu item "Mail Merge" for user to run scripts on drop-down.
 */
function onOpen() {
  const ui = SpreadsheetApp.getUi();
  ui.createMenu('Mail Merge')
      .addItem('Send Emails', 'sendEmails')
      .addToUi();
}

/**
 * Sends emails from sheet data.
 * @param {string} subjectLine (optional) for the email draft message
 * @param {Sheet} sheet to read data from
*/
function sendEmails(subjectLine, sheet=SpreadsheetApp.getActiveSheet()) {
  // option to skip browser prompt if you want to use this code in other projects
  if (!subjectLine){
    subjectLine = Browser.inputBox("Mail Merge", 
                                      "Type or copy/paste the subject line of the Gmail " +
                                      "draft message you would like to mail merge with:",
                                      Browser.Buttons.OK_CANCEL);

    if (subjectLine === "cancel" || subjectLine == ""){ 
    // If no subject line, finishes up
    return;
    }
  }

  // Gets the draft Gmail message to use as a template
  const emailTemplate = getGmailTemplateFromDrafts_(subjectLine);

  // Gets the data from the passed sheet
  const dataRange = sheet.getDataRange();
  // Fetches displayed values for each row in the Range HT Andrew Roberts 
  // https://mashe.hawksey.info/2020/04/a-bulk-email-mail-merge-with-gmail-and-google-sheets-solution-evolution-using-v8/#comment-187490
  // @see https://developers.google.com/apps-script/reference/spreadsheet/range#getdisplayvalues
  const data = dataRange.getDisplayValues();

  // Assumes row 1 contains our column headings
  const heads = data.shift(); 

  // Gets the index of the column named 'Email Status' (Assumes header names are unique)
  // @see http://ramblings.mcpher.com/Home/excelquirks/gooscript/arrayfunctions
  const emailSentColIdx = heads.indexOf(EMAIL_SENT_COL);

  // Converts 2d array into an object array
  // See https://stackoverflow.com/a/22917499/1027723
  // For a pretty version, see https://mashe.hawksey.info/?p=17869/#comment-184945
  const obj = data.map(r => (heads.reduce((o, k, i) => (o[k] = r[i] || '', o), {})));

  // Creates an array to record sent emails
  const out = [];

  // Loops through all the rows of data
  obj.forEach(function(row, rowIdx){
    // Only sends emails if email_sent cell is blank and not hidden by a filter
    if (row[EMAIL_SENT_COL] == ''){
      try {
        const msgObj = fillInTemplateFromObject_(emailTemplate.message, row);

        // See https://developers.google.com/apps-script/reference/gmail/gmail-app#sendEmail(String,String,String,Object)
        // If you need to send emails with unicode/emoji characters change GmailApp for MailApp
        // Uncomment advanced parameters as needed (see docs for limitations)
        GmailApp.sendEmail(row[RECIPIENT_COL], msgObj.subject, msgObj.text, {
          htmlBody: msgObj.html,
          // bcc: 'a.bcc@email.com',
          // cc: 'a.cc@email.com',
          // from: 'an.alias@email.com',
          // name: 'name of the sender',
          // replyTo: 'a.reply@email.com',
          // noReply: true, // if the email should be sent from a generic no-reply email address (not available to gmail.com users)
          attachments: emailTemplate.attachments,
          inlineImages: emailTemplate.inlineImages
        });
        // Edits cell to record email sent date
        out.push([new Date()]);
      } catch(e) {
        // modify cell to record error
        out.push([e.message]);
      }
    } else {
      out.push([row[EMAIL_SENT_COL]]);
    }
  });

  // Updates the sheet with new data
  sheet.getRange(2, emailSentColIdx+1, out.length).setValues(out);

  /**
   * Get a Gmail draft message by matching the subject line.
   * @param {string} subject_line to search for draft message
   * @return {object} containing the subject, plain and html message body and attachments
  */
  function getGmailTemplateFromDrafts_(subject_line){
    try {
      // get drafts
      const drafts = GmailApp.getDrafts();
      // filter the drafts that match subject line
      const draft = drafts.filter(subjectFilter_(subject_line))[0];
      // get the message object
      const msg = draft.getMessage();

      // Handles inline images and attachments so they can be included in the merge
      // Based on https://stackoverflow.com/a/65813881/1027723
      // Gets all attachments and inline image attachments
      const allInlineImages = draft.getMessage().getAttachments({includeInlineImages: true,includeAttachments:false});
      const attachments = draft.getMessage().getAttachments({includeInlineImages: false});
      const htmlBody = msg.getBody(); 

      // Creates an inline image object with the image name as key 
      // (can't rely on image index as array based on insert order)
      const img_obj = allInlineImages.reduce((obj, i) => (obj[i.getName()] = i, obj) ,{});

      //Regexp searches for all img string positions with cid
      const imgexp = RegExp('<img.*?src="cid:(.*?)".*?alt="(.*?)"[^\>]+>', 'g');
      const matches = [...htmlBody.matchAll(imgexp)];

      //Initiates the allInlineImages object
      const inlineImagesObj = {};
      // built an inlineImagesObj from inline image matches
      matches.forEach(match => inlineImagesObj[match[1]] = img_obj[match[2]]);

      return {message: {subject: subject_line, text: msg.getPlainBody(), html:htmlBody}, 
              attachments: attachments, inlineImages: inlineImagesObj };
    } catch(e) {
      throw new Error("Oops - can't find Gmail draft");
    }

    /**
     * Filter draft objects with the matching subject linemessage by matching the subject line.
     * @param {string} subject_line to search for draft message
     * @return {object} GmailDraft object
    */
    function subjectFilter_(subject_line){
      return function(element) {
        if (element.getMessage().getSubject() === subject_line) {
          return element;
        }
      }
    }
  }

  /**
   * Fill template string with data object
   * @see https://stackoverflow.com/a/378000/1027723
   * @param {string} template string containing {{}} markers which are replaced with data
   * @param {object} data object used to replace {{}} markers
   * @return {object} message replaced with data
  */
  function fillInTemplateFromObject_(template, data) {
    // We have two templates one for plain text and the html body
    // Stringifing the object means we can do a global replace
    let template_string = JSON.stringify(template);

    // Token replacement
    template_string = template_string.replace(/{{[^{}]+}}/g, key => {
      return escapeData_(data[key.replace(/[{}]+/g, "")] || "");
    });
    return  JSON.parse(template_string);
  }

  /**
   * Escape cell data to make JSON safe
   * @see https://stackoverflow.com/a/9204218/1027723
   * @param {string} str to escape JSON special characters from
   * @return {string} escaped string
  */
  function escapeData_(str) {
    return str
      .replace(/[\\]/g, '\\\\')
      .replace(/[\"]/g, '\\\"')
      .replace(/[\/]/g, '\\/')
      .replace(/[\b]/g, '\\b')
      .replace(/[\f]/g, '\\f')
      .replace(/[\n]/g, '\\n')
      .replace(/[\r]/g, '\\r')
      .replace(/[\t]/g, '\\t');
  };
}

Modificações

Você pode editar a automação de mala direta como quiser. Abaixo estão algumas mudanças opcionais que você pode fazer no código-fonte.

Adicionar parâmetros de e-mail Cco, Cc, ReplyTo ou De

O exemplo de código inclui vários parâmetros adicionais, atualmente que permitem controlar o nome da conta para a qual o e-mail é enviado responder a endereços de e-mail e endereços de e-mail Cco e Cc.

Ative os parâmetros que você quer adicionar removendo as barras // na frente de cada um.

O exemplo a seguir mostra um trecho do sendEmails que ativa a maioria dos parâmetros de e-mail:

GmailApp.sendEmail(row[RECIPIENT_COL], msgObj.subject, msgObj.text, {
         htmlBody: msgObj.html,
         bcc: 'bcc@example.com',
         cc: 'cc@example.com',
         from: 'from.alias@example.com',
         name: 'name of the sender',
         replyTo: 'reply@example.com',
        // noReply: true, // if the email should be sent from a generic no-reply email address (not available to gmail.com users)

No exemplo acima, o parâmetro noReply ainda está comentado porque o parâmetro replyTo está definido.

Incluir caracteres Unicode nos e-mails

Se quiser incluir caracteres Unicode, como emojis, em seus e-mails, você precisa atualizar o código para usar o serviço de e-mail em vez do serviço do Gmail.

No exemplo de código, atualize a seguinte linha:

GmailApp.sendEmail(row[RECIPIENT_COL], msgObj.subject, msgObj.text, {

Substitua a linha por este código:

MailApp.sendEmail(row[RECIPIENT_COL], msgObj.subject, msgObj.text, {

Colaboradores

A amostra foi criada por Martin Hawksey, líder de design e tecnologia de aprendizado na Edinburgh Futures Institute, blogueiro e Google Developer Expert.

Este exemplo é mantido pelo Google com a ajuda de especialistas do Google Developers.

Próximas etapas