Tingkat coding: Pemula
Durasi: 10 menit
Jenis project: Otomatisasi dengan menu kustom
Tujuan
- Pahami fungsi solusi.
- Pahami fungsi layanan Apps Script dalam
solusi.
- Siapkan skrip.
- Jalankan skrip.
Tentang solusi ini
Isi template email secara otomatis dengan data dari Google Spreadsheet. Email
dikirim dari akun Gmail Anda sehingga Anda dapat merespons
balasan penerima.
Penting: Contoh penggabungan email ini tunduk pada batas email yang dijelaskan
dalam Kuota untuk layanan Google.
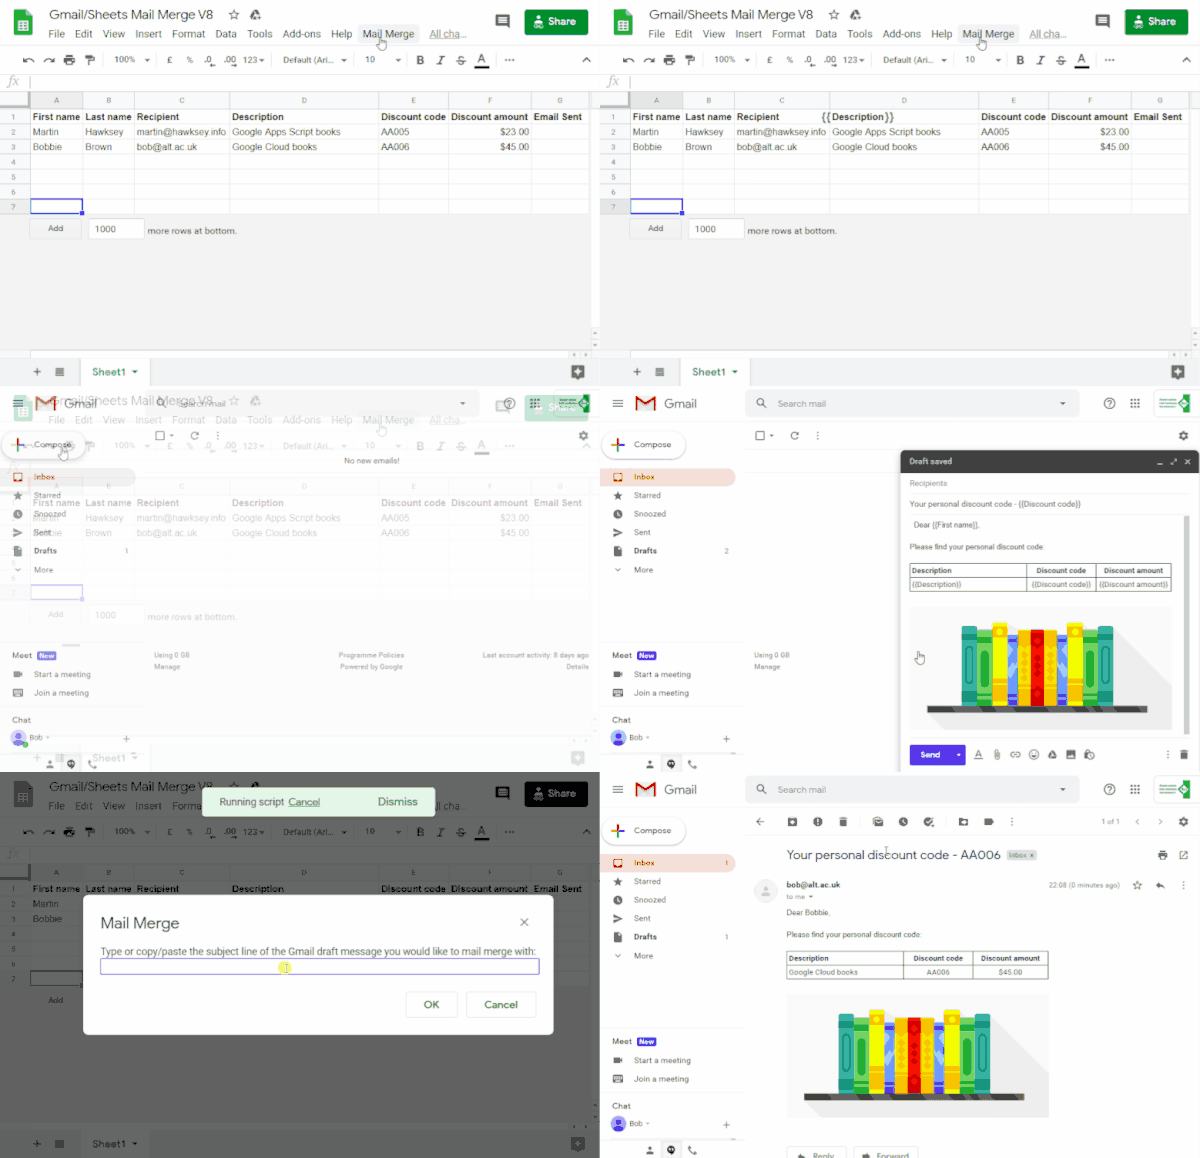
Cara kerjanya
Anda membuat template draf Gmail dengan placeholder yang
sesuai dengan data dalam spreadsheet Spreadsheet. Setiap header kolom
dalam sheet mewakili tag placeholder. Skrip mengirimkan informasi untuk
setiap placeholder dari spreadsheet ke lokasi tag placeholder
yang sesuai dalam draf email Anda.
Layanan Apps Script
Solusi ini menggunakan layanan berikut:
- Layanan Gmail–Mendapatkan, membaca,
dan mengirim draf email yang ingin Anda kirim kepada penerima.
- Layanan spreadsheet–Mengisi placeholder email
dengan informasi yang dipersonalisasi untuk
setiap penerima.
Prasyarat
Untuk menggunakan contoh ini, Anda memerlukan prasyarat berikut:
- Akun Google (akun Google Workspace mungkin
memerlukan persetujuan administrator).
- Browser web dengan akses ke internet.
Menyiapkan skrip
Membuat project Apps Script
- Klik tombol berikut untuk membuat salinan
spreadsheet contoh Penggabungan Email Gmail/Sheet.
Project Apps Script untuk solusi ini dilampirkan ke spreadsheet.
Buat salinan
- Di spreadsheet yang disalin, perbarui kolom Penerima dengan alamat email yang ingin Anda gunakan dalam penggabungan email.
- (Opsional) Tambahkan, edit, atau hapus kolom untuk menyesuaikan data yang ingin Anda sertakan dalam template email.
Jika Anda mengubah nama kolom Penerima atau Email
Terkirim, Anda harus memperbarui kode yang sesuai di
project Apps Script. Anda dapat membuka project Apps Script dari spreadsheet dengan mengklik Ekstensi >
Apps Script.
Membuat template email
- Di akun Gmail Anda, buat draf email. Untuk menyertakan data
dari
spreadsheet dalam email, gunakan placeholder yang sesuai dengan nama kolom
yang diapit oleh tanda kurung kurawal, seperti
{{First name}}
.
- Jika Anda memformat teks dalam email, Anda juga harus memformat tanda kurung
placeholder.
- Placeholder peka huruf besar/kecil dan harus sama persis dengan header kolom.
- Salin baris subjek draf email Anda.
Jalankan skrip:
- Di spreadsheet, klik Gabungkan Surat >
Kirim Email. Anda mungkin perlu memuat ulang halaman agar menu kustom ini
muncul.
Saat diminta, izinkan skrip.
Jika layar izin OAuth menampilkan peringatan, Aplikasi ini tidak diverifikasi,
lanjutkan dengan memilih Lanjutan >
Buka {Project Name} (tidak aman).
Klik Penggabungan Email > Kirim Email
lagi.
Tempelkan baris subjek template email, lalu klik OK.
Jika Anda menerapkan filter ke sheet, skrip akan tetap mengirim email kepada peserta yang difilter, tetapi tidak akan menambahkan stempel waktu.
Meninjau kode
Untuk meninjau kode Apps Script untuk solusi ini, klik
Lihat kode sumber di bawah:
Melihat kode sumber
Code.gs
// To learn how to use this script, refer to the documentation:
// https://developers.google.com/apps-script/samples/automations/mail-merge
/*
Copyright 2022 Martin Hawksey
Licensed under the Apache License, Version 2.0 (the "License");
you may not use this file except in compliance with the License.
You may obtain a copy of the License at
https://www.apache.org/licenses/LICENSE-2.0
Unless required by applicable law or agreed to in writing, software
distributed under the License is distributed on an "AS IS" BASIS,
WITHOUT WARRANTIES OR CONDITIONS OF ANY KIND, either express or implied.
See the License for the specific language governing permissions and
limitations under the License.
*/
/**
* @OnlyCurrentDoc
*/
/**
* Change these to match the column names you are using for email
* recipient addresses and email sent column.
*/
const RECIPIENT_COL = "Recipient";
const EMAIL_SENT_COL = "Email Sent";
/**
* Creates the menu item "Mail Merge" for user to run scripts on drop-down.
*/
function onOpen() {
const ui = SpreadsheetApp.getUi();
ui.createMenu('Mail Merge')
.addItem('Send Emails', 'sendEmails')
.addToUi();
}
/**
* Sends emails from sheet data.
* @param {string} subjectLine (optional) for the email draft message
* @param {Sheet} sheet to read data from
*/
function sendEmails(subjectLine, sheet=SpreadsheetApp.getActiveSheet()) {
// option to skip browser prompt if you want to use this code in other projects
if (!subjectLine){
subjectLine = Browser.inputBox("Mail Merge",
"Type or copy/paste the subject line of the Gmail " +
"draft message you would like to mail merge with:",
Browser.Buttons.OK_CANCEL);
if (subjectLine === "cancel" || subjectLine == ""){
// If no subject line, finishes up
return;
}
}
// Gets the draft Gmail message to use as a template
const emailTemplate = getGmailTemplateFromDrafts_(subjectLine);
// Gets the data from the passed sheet
const dataRange = sheet.getDataRange();
// Fetches displayed values for each row in the Range HT Andrew Roberts
// https://mashe.hawksey.info/2020/04/a-bulk-email-mail-merge-with-gmail-and-google-sheets-solution-evolution-using-v8/#comment-187490
// @see https://developers.google.com/apps-script/reference/spreadsheet/range#getdisplayvalues
const data = dataRange.getDisplayValues();
// Assumes row 1 contains our column headings
const heads = data.shift();
// Gets the index of the column named 'Email Status' (Assumes header names are unique)
// @see http://ramblings.mcpher.com/Home/excelquirks/gooscript/arrayfunctions
const emailSentColIdx = heads.indexOf(EMAIL_SENT_COL);
// Converts 2d array into an object array
// See https://stackoverflow.com/a/22917499/1027723
// For a pretty version, see https://mashe.hawksey.info/?p=17869/#comment-184945
const obj = data.map(r => (heads.reduce((o, k, i) => (o[k] = r[i] || '', o), {})));
// Creates an array to record sent emails
const out = [];
// Loops through all the rows of data
obj.forEach(function(row, rowIdx){
// Only sends emails if email_sent cell is blank and not hidden by a filter
if (row[EMAIL_SENT_COL] == ''){
try {
const msgObj = fillInTemplateFromObject_(emailTemplate.message, row);
// See https://developers.google.com/apps-script/reference/gmail/gmail-app#sendEmail(String,String,String,Object)
// If you need to send emails with unicode/emoji characters change GmailApp for MailApp
// Uncomment advanced parameters as needed (see docs for limitations)
GmailApp.sendEmail(row[RECIPIENT_COL], msgObj.subject, msgObj.text, {
htmlBody: msgObj.html,
// bcc: 'a.bcc@email.com',
// cc: 'a.cc@email.com',
// from: 'an.alias@email.com',
// name: 'name of the sender',
// replyTo: 'a.reply@email.com',
// noReply: true, // if the email should be sent from a generic no-reply email address (not available to gmail.com users)
attachments: emailTemplate.attachments,
inlineImages: emailTemplate.inlineImages
});
// Edits cell to record email sent date
out.push([new Date()]);
} catch(e) {
// modify cell to record error
out.push([e.message]);
}
} else {
out.push([row[EMAIL_SENT_COL]]);
}
});
// Updates the sheet with new data
sheet.getRange(2, emailSentColIdx+1, out.length).setValues(out);
/**
* Get a Gmail draft message by matching the subject line.
* @param {string} subject_line to search for draft message
* @return {object} containing the subject, plain and html message body and attachments
*/
function getGmailTemplateFromDrafts_(subject_line){
try {
// get drafts
const drafts = GmailApp.getDrafts();
// filter the drafts that match subject line
const draft = drafts.filter(subjectFilter_(subject_line))[0];
// get the message object
const msg = draft.getMessage();
// Handles inline images and attachments so they can be included in the merge
// Based on https://stackoverflow.com/a/65813881/1027723
// Gets all attachments and inline image attachments
const allInlineImages = draft.getMessage().getAttachments({includeInlineImages: true,includeAttachments:false});
const attachments = draft.getMessage().getAttachments({includeInlineImages: false});
const htmlBody = msg.getBody();
// Creates an inline image object with the image name as key
// (can't rely on image index as array based on insert order)
const img_obj = allInlineImages.reduce((obj, i) => (obj[i.getName()] = i, obj) ,{});
//Regexp searches for all img string positions with cid
const imgexp = RegExp('<img.*?src="cid:(.*?)".*?alt="(.*?)"[^\>]+>', 'g');
const matches = [...htmlBody.matchAll(imgexp)];
//Initiates the allInlineImages object
const inlineImagesObj = {};
// built an inlineImagesObj from inline image matches
matches.forEach(match => inlineImagesObj[match[1]] = img_obj[match[2]]);
return {message: {subject: subject_line, text: msg.getPlainBody(), html:htmlBody},
attachments: attachments, inlineImages: inlineImagesObj };
} catch(e) {
throw new Error("Oops - can't find Gmail draft");
}
/**
* Filter draft objects with the matching subject linemessage by matching the subject line.
* @param {string} subject_line to search for draft message
* @return {object} GmailDraft object
*/
function subjectFilter_(subject_line){
return function(element) {
if (element.getMessage().getSubject() === subject_line) {
return element;
}
}
}
}
/**
* Fill template string with data object
* @see https://stackoverflow.com/a/378000/1027723
* @param {string} template string containing {{}} markers which are replaced with data
* @param {object} data object used to replace {{}} markers
* @return {object} message replaced with data
*/
function fillInTemplateFromObject_(template, data) {
// We have two templates one for plain text and the html body
// Stringifing the object means we can do a global replace
let template_string = JSON.stringify(template);
// Token replacement
template_string = template_string.replace(/{{[^{}]+}}/g, key => {
return escapeData_(data[key.replace(/[{}]+/g, "")] || "");
});
return JSON.parse(template_string);
}
/**
* Escape cell data to make JSON safe
* @see https://stackoverflow.com/a/9204218/1027723
* @param {string} str to escape JSON special characters from
* @return {string} escaped string
*/
function escapeData_(str) {
return str
.replace(/[\\]/g, '\\\\')
.replace(/[\"]/g, '\\\"')
.replace(/[\/]/g, '\\/')
.replace(/[\b]/g, '\\b')
.replace(/[\f]/g, '\\f')
.replace(/[\n]/g, '\\n')
.replace(/[\r]/g, '\\r')
.replace(/[\t]/g, '\\t');
};
}
Modifikasi
Anda dapat mengedit otomatisasi penggabungan email sebanyak yang Anda inginkan sesuai kebutuhan.
Berikut adalah beberapa perubahan opsional yang dapat Anda lakukan pada kode sumber.
Menambahkan parameter email Bcc, Cc, ReplyTo, atau Dari
Kode contoh menyertakan sejumlah parameter tambahan, yang saat ini
dikomentari, yang memungkinkan Anda mengontrol nama akun tempat email dikirim, membalas alamat email, serta alamat email Bcc dan Cc.
Aktifkan parameter yang ingin ditambahkan dengan menghapus garis miring depan
//
di depan setiap parameter.
Contoh berikut menunjukkan kutipan dari fungsi sendEmails
yang mengaktifkan sebagian besar parameter email:
GmailApp.sendEmail(row[RECIPIENT_COL], msgObj.subject, msgObj.text, {
htmlBody: msgObj.html,
bcc: 'bcc@example.com',
cc: 'cc@example.com',
from: 'from.alias@example.com',
name: 'name of the sender',
replyTo: 'reply@example.com',
// noReply: true, // if the email should be sent from a generic no-reply email address (not available to gmail.com users)
Pada contoh di atas, parameter noReply
masih dikomentari
karena parameter replyTo
ditetapkan.
Menyertakan karakter unicode dalam email
Jika ingin menyertakan karakter unicode, seperti emoji, dalam email, Anda
harus memperbarui kode untuk menggunakan layanan Mail, bukan layanan Gmail.
Dalam kode contoh, perbarui baris berikut:
GmailApp.sendEmail(row[RECIPIENT_COL], msgObj.subject, msgObj.text, {
Ganti baris dengan kode berikut:
MailApp.sendEmail(row[RECIPIENT_COL], msgObj.subject, msgObj.text, {
Kontributor
Contoh ini dibuat oleh Martin Hawksey, Learning Design and Technology Lead di
Edinburgh Futures Institute, blogger, dan Google Developer Expert.
Contoh ini dikelola oleh Google dengan bantuan Pakar Developer Google.
Langkah berikutnya