تساعد واجهة Depth API كاميرا الجهاز على فهم حجم وشكل العناصر الحقيقية في المشهد. فهو يستخدم الكاميرا لإنشاء صور بعمق أو خرائط العمق، مما يضيف طبقة من الواقع المعزّز إلى تطبيقاتك. يمكنك استخدام المعلومات التي تقدّمها صورة العمق لعرض العناصر الافتراضية بدقة أمام أجسام في العالم الحقيقي أو خلفها، ما يوفّر تجربة مستخدم غامرة وواقعية.
يتم احتساب معلومات العمق من الحركة، وقد يتم دمجها مع معلومات من جهاز استشعار عمق الجهاز، مثل أداة استشعار مدة الرحلة (ToF)، في حال توفّرها. لا يحتاج الجهاز إلى أداة استشعار ToF ليتوافق مع Depth API.
المتطلبات الأساسية
احرص على فهم مفاهيم الواقع المعزّز الأساسية. وكيفية ضبط جلسة ARCore قبل المتابعة.
حظر الوصول إلى الأجهزة المتوافقة مع ميزة Depath
إذا كان تطبيقك يتطلب دعم واجهة برمجة التطبيقات Depth API، إما لأن جزءًا أساسيًا من
تعتمد تجربة الواقع المعزّز على العمق، أو لأنه لا يوجد احتياطي سلس
من التطبيق تستخدم العمق، يمكنك اختيار تقييد توزيع
في متجر Google Play
الأجهزة التي تتوافق مع واجهة Depth API من خلال إضافة
السطر التالي إلى AndroidManifest.xml، بالإضافة إلى
تم وصف AndroidManifest.xml من التغييرات في
دليل تفعيل ARCore:
<uses-feature android:name="com.google.ar.core.depth" />
تفعيل العمق
في جلسة ARCore جديدة، تحقَّق مما إذا كان جهاز المستخدم يتوافق مع ميزة Depth. لا تتيح بعض الأجهزة المتوافقة مع ARCore استخدام واجهة Depth API بسبب قيود طاقة المعالجة. لحفظ الموارد، يتم إيقاف ميزة "العمق" تلقائيًا على ARCore. عليك تفعيل وضع العمق لكي يستخدم تطبيقك واجهة برمجة التطبيقات Depth API.
Java
Config config = session.getConfig();

// Check whether the user's device supports the Depth API.
boolean isDepthSupported = session.isDepthModeSupported(Config.DepthMode.AUTOMATIC);
if (isDepthSupported) {
  config.setDepthMode(Config.DepthMode.AUTOMATIC);
}
session.configure(config);
Kotlin
val config = session.config

// Check whether the user's device supports the Depth API.
val isDepthSupported = session.isDepthModeSupported(Config.DepthMode.AUTOMATIC)
if (isDepthSupported) {
  config.depthMode = Config.DepthMode.AUTOMATIC
}
session.configure(config)
الحصول على صور في العمق
يمكنك طلب Frame.acquireDepthImage16Bits() للحصول على صورة العمق للإطار الحالي.
Java
// Retrieve the depth image for the current frame, if available.
Image depthImage = null;
try {
  depthImage = frame.acquireDepthImage16Bits();
  // Use the depth image here.
} catch (NotYetAvailableException e) {
  // This means that depth data is not available yet.
  // Depth data will not be available if there are no tracked
  // feature points. This can happen when there is no motion, or when the
  // camera loses its ability to track objects in the surrounding
  // environment.
} finally {
  if (depthImage != null) {
    depthImage.close();
  }
}
Kotlin
// Retrieve the depth image for the current frame, if available.
try {
  frame.acquireDepthImage16Bits().use { depthImage ->
    // Use the depth image here.
  }
} catch (e: NotYetAvailableException) {
  // This means that depth data is not available yet.
  // Depth data will not be available if there are no tracked
  // feature points. This can happen when there is no motion, or when the
  // camera loses its ability to track objects in the surrounding
  // environment.
}
توفّر الصورة المعروضة المخزن المؤقت للصور غير المنسّق، والذي يمكن تمريره إلى أداة تظليل الأجزاء لاستخدامها على وحدة معالجة الرسومات (GPU) لكل عنصر يتم عرضه. وهو موجّه باللغة OPENGL_NORMALIZED_DEVICE_COORDINATES ويمكن تغييره إلى TEXTURE_NORMALIZED عن طريق الاتصال بالرقم Frame.transformCoordinates2d(). وبعد الوصول إلى صورة العمق من خلال أداة تظليل العناصر، يمكن الوصول إلى قياسات العمق هذه مباشرةً للتعامل مع التظليل.
فهم قيم العمق
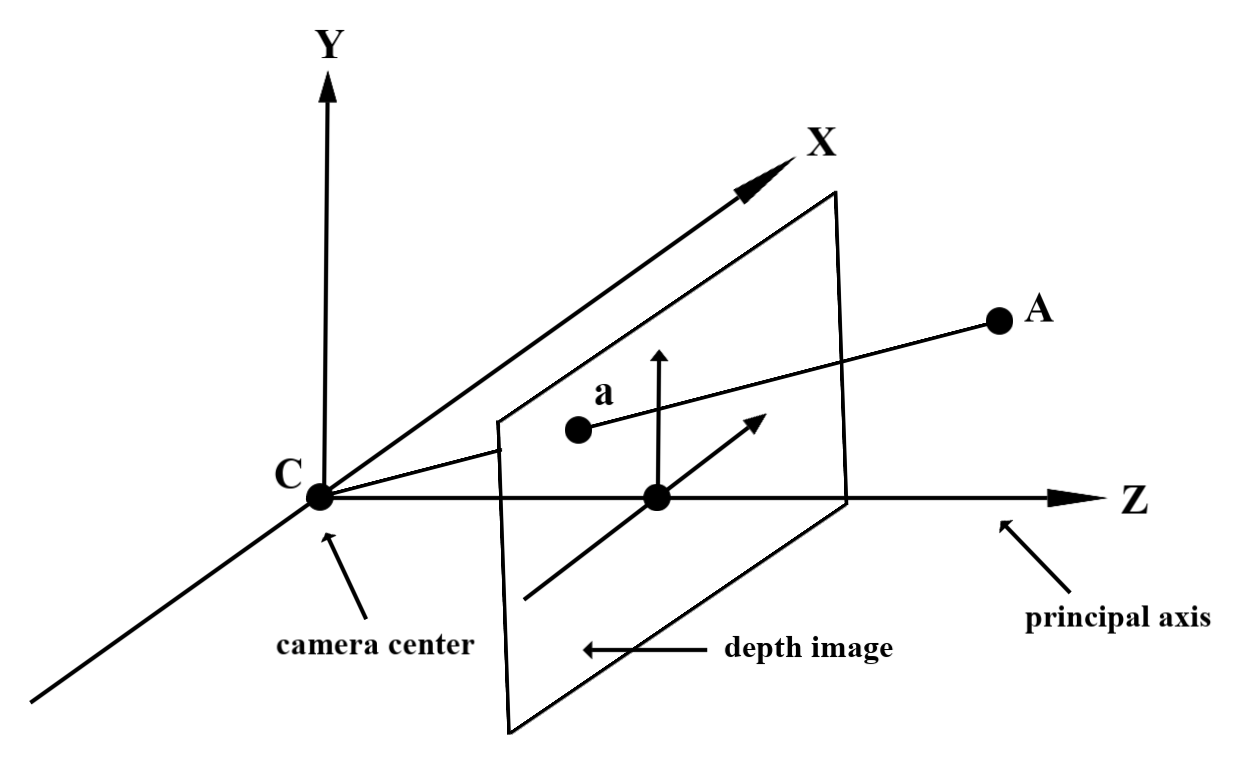
تحديد النقطة A على الهندسة الفعلية المرصودة ونقطة ثنائية الأبعاد a
تمثل النقطة نفسها في صورة العمق، وهي القيمة المحددة من خلال
تساوي واجهة برمجة التطبيقات في a طول CA المتوقع على المحور الرئيسي.
ويمكن أيضًا الإشارة إلى ذلك بالإحداثي z الذي يبلغ A بالنسبة إلى الكاميرا.
الأصل C. عند العمل باستخدام واجهة برمجة التطبيقات Depth API، من المهم معرفة أن
قيم العمق ليست طول الشعاع CA نفسه، بل هي قيمة الإسقاط
منه.
استخدام أدوات التظليل
تحليل معلومات عمق الإطار الحالي
استخدِم دالتَي المساعدة DepthGetMillimeters() وDepthGetVisibility() في أداة تظليل الأجزاء للوصول إلى معلومات العمق لتحديد موضع الشاشة الحالي. بعد ذلك، استخدِم هذه المعلومات لإخفاء أجزاء من العنصر المعروض بشكل انتقائي.
// Use DepthGetMillimeters() and DepthGetVisibility() to parse the depth image
// for a given pixel, and compare against the depth of the object to render.
float DepthGetMillimeters(in sampler2D depth_texture, in vec2 depth_uv) {
  // Depth is packed into the red and green components of its texture.
  // The texture is a normalized format, storing millimeters.
  vec3 packedDepthAndVisibility = texture2D(depth_texture, depth_uv).xyz;
  return dot(packedDepthAndVisibility.xy, vec2(255.0, 256.0 * 255.0));
}

// Return a value representing how visible or occluded a pixel is relative
// to the depth image. The range is 0.0 (not visible) to 1.0 (completely
// visible).
float DepthGetVisibility(in sampler2D depth_texture, in vec2 depth_uv,
                         in float asset_depth_mm) {
  float depth_mm = DepthGetMillimeters(depth_texture, depth_uv);

  // Instead of a hard Z-buffer test, allow the asset to fade into the
  // background along a 2 * kDepthTolerancePerMm * asset_depth_mm
  // range centered on the background depth.
  const float kDepthTolerancePerMm = 0.015f;
  float visibility_occlusion = clamp(0.5 * (depth_mm - asset_depth_mm) /
    (kDepthTolerancePerMm * asset_depth_mm) + 0.5, 0.0, 1.0);

 // Use visibility_depth_near to set the minimum depth value. If using
 // this value for occlusion, avoid setting it too close to zero. A depth value
 // of zero signifies that there is no depth data to be found.
  float visibility_depth_near = 1.0 - InverseLerp(
      depth_mm, /*min_depth_mm=*/150.0, /*max_depth_mm=*/200.0);

  // Use visibility_depth_far to set the maximum depth value. If the depth
  // value is too high (outside the range specified by visibility_depth_far),
  // the virtual object may get inaccurately occluded at further distances
  // due to too much noise.
  float visibility_depth_far = InverseLerp(
      depth_mm, /*min_depth_mm=*/7500.0, /*max_depth_mm=*/8000.0);

  const float kOcclusionAlpha = 0.0f;
  float visibility =
      max(max(visibility_occlusion, kOcclusionAlpha),
          max(visibility_depth_near, visibility_depth_far));

  return visibility;
}
إخفاء العناصر الافتراضية
يمكنك حجب العناصر الافتراضية في نص أداة تظليل الأجزاء. عدِّل قناة ألفا للكائن بناءً على عمقه. سيؤدي هذا إلى عرض كائن محجوب.
// Occlude virtual objects by updating the object’s alpha channel based on its depth.
const float kMetersToMillimeters = 1000.0;

float asset_depth_mm = v_ViewPosition.z * kMetersToMillimeters * -1.;

// Compute the texture coordinates to sample from the depth image.
vec2 depth_uvs = (u_DepthUvTransform * vec3(v_ScreenSpacePosition.xy, 1)).xy;

gl_FragColor.a *= DepthGetVisibility(u_DepthTexture, depth_uvs, asset_depth_mm);
يمكنك عرض التظليل باستخدام العرض بمرتين أو العرض لكل كائن أو تمرير الأمام. وتعتمد فعالية كل أسلوب على مدى تعقيد المشهد واعتبارات أخرى خاصة بالتطبيق.
عرض التمرير الأمامي لكل كائن
يحدد عرض التمرير الأمامي لكل كائن، ما إذا تم حجب كل وحدة بكسل من العنصر في أداة تظليل المواد. إذا لم تكن وحدات البكسل مرئية، يتم اقتصاصها، عادةً من خلال مزج ألفا، وبالتالي محاكاة التظليل على جهاز المستخدم.
العرض بمرّتين
مع العرض بتمريرتين، تعرض البطاقة الأولى كل المحتوى الافتراضي في مخزن وسيط مؤقتًا. تدمج الشريحة الثانية المشهد الافتراضي في الخلفية بناءً على الفرق بين العمق الواقعي والعمق الافتراضي للمشهد. لا يتطلب هذا الأسلوب عمل أداة تظليل إضافية خاصة بالكائن، وتنتج بشكل عام نتائج ذات مظهر موحد أكثر من طريقة التمرير الأمامي.
استخراج المسافة من صورة بعمق
لاستخدام Depth API لأغراض أخرى غير حجب الأجسام الافتراضية أو عرض بيانات العمق، يمكنك استخراج المعلومات من صورة العمق.
Java
/** Obtain the depth in millimeters for depthImage at coordinates (x, y). */
public int getMillimetersDepth(Image depthImage, int x, int y) {
  // The depth image has a single plane, which stores depth for each
  // pixel as 16-bit unsigned integers.
  Image.Plane plane = depthImage.getPlanes()[0];
  int byteIndex = x * plane.getPixelStride() + y * plane.getRowStride();
  ByteBuffer buffer = plane.getBuffer().order(ByteOrder.nativeOrder());
  return Short.toUnsignedInt(buffer.getShort(byteIndex));
}
Kotlin
/** Obtain the depth in millimeters for [depthImage] at coordinates ([x], [y]). */
fun getMillimetersDepth(depthImage: Image, x: Int, y: Int): UInt {
  // The depth image has a single plane, which stores depth for each
  // pixel as 16-bit unsigned integers.
  val plane = depthImage.planes[0]
  val byteIndex = x * plane.pixelStride + y * plane.rowStride
  val buffer = plane.buffer.order(ByteOrder.nativeOrder())
  val depthSample = buffer.getShort(byteIndex)
  return depthSample.toUInt()
}
تحويل الإحداثيات بين صور الكاميرا وصور العمق
قد تختلف نسبة العرض إلى الارتفاع للصور التي تم الحصول عليها باستخدام getCameraImage() مقارنةً بالصور في عمقها.
في هذه الحالة، تكون صورة العمق عبارة عن اقتصاص لصورة الكاميرا، ولا يكون لدى كل وحدات البكسل في صورة الكاميرا تقدير صالح للعمق.
للحصول على إحداثيات صورة عمقها في صورة وحدة المعالجة المركزية (CPU):
Java
float[] cpuCoordinates = new float[] {cpuCoordinateX, cpuCoordinateY};
float[] textureCoordinates = new float[2];
frame.transformCoordinates2d(
    Coordinates2d.IMAGE_PIXELS,
    cpuCoordinates,
    Coordinates2d.TEXTURE_NORMALIZED,
    textureCoordinates);
if (textureCoordinates[0] < 0 || textureCoordinates[1] < 0) {
  // There are no valid depth coordinates, because the coordinates in the CPU image are in the
  // cropped area of the depth image.
  return null;
}
return new Pair<>(
    (int) (textureCoordinates[0] * depthImage.getWidth()),
    (int) (textureCoordinates[1] * depthImage.getHeight()));
Kotlin
val cpuCoordinates = floatArrayOf(cpuCoordinateX.toFloat(), cpuCoordinateY.toFloat())
val textureCoordinates = FloatArray(2)
frame.transformCoordinates2d(
  Coordinates2d.IMAGE_PIXELS,
  cpuCoordinates,
  Coordinates2d.TEXTURE_NORMALIZED,
  textureCoordinates,
)
if (textureCoordinates[0] < 0 || textureCoordinates[1] < 0) {
  // There are no valid depth coordinates, because the coordinates in the CPU image are in the
  // cropped area of the depth image.
  return null
}
return (textureCoordinates[0] * depthImage.width).toInt() to
  (textureCoordinates[1] * depthImage.height).toInt()
للحصول على إحداثيات صورة وحدة المعالجة المركزية (CPU) لإحداثيات عمق الصورة:
Java
float[] textureCoordinates =
    new float[] {
      (float) depthCoordinateX / (float) depthImage.getWidth(),
      (float) depthCoordinateY / (float) depthImage.getHeight()
    };
float[] cpuCoordinates = new float[2];
frame.transformCoordinates2d(
    Coordinates2d.TEXTURE_NORMALIZED,
    textureCoordinates,
    Coordinates2d.IMAGE_PIXELS,
    cpuCoordinates);
return new Pair<>((int) cpuCoordinates[0], (int) cpuCoordinates[1]);
Kotlin
val textureCoordinates =
  floatArrayOf(
    depthCoordinatesX.toFloat() / depthImage.width.toFloat(),
    depthCoordinatesY.toFloat() / depthImage.height.toFloat(),
  )
val cpuCoordinates = FloatArray(2)
frame.transformCoordinates2d(
  Coordinates2d.TEXTURE_NORMALIZED,
  textureCoordinates,
  Coordinates2d.IMAGE_PIXELS,
  cpuCoordinates,
)
return cpuCoordinates[0].toInt() to cpuCoordinates[1].toInt()
اختبار العمق
تتيح اختبارات النتائج للمستخدمين وضع الكائنات في موقع واقعي في المشهد. في السابق، كان لا يمكن إجراء اختبارات النتائج إلا على الطائرات المرصودة، وتقتصر المواقع الجغرافية على الأسطح الكبيرة المستوية، كما هو الحال في النتائج التي تعرضها أجهزة Android الخضراء. تستفيد اختبارات النتائج المتعمقة من معلومات العمق المتجانسة والأولية لتقديم نتائج نتائج أكثر دقة، حتى على الأسطح غير المستوية والمنخفضة الزخرفة. ويظهر هذا الرمز مع أجهزة Android الحمراء.
لاستخدام اختبارات النتائج المستنِدة إلى العمق، يمكنك الاتصال بالرقم hitTest() والبحث عن DepthPoints في قائمة الإرجاع.
Java
// Create a hit test using the Depth API.
List<HitResult> hitResultList = frame.hitTest(tap);
for (HitResult hit : hitResultList) {
  Trackable trackable = hit.getTrackable();
  if (trackable instanceof Plane
      || trackable instanceof Point
      || trackable instanceof DepthPoint) {
    useHitResult(hit);
    break;
  }
}
Kotlin
// Create a hit test using the Depth API.
val hitResult =
  frame
    .hitTest(tap)
    .filter {
      val trackable = it.trackable
      trackable is Plane || trackable is Point || trackable is DepthPoint
    }
    .firstOrNull()
useHitResult(hitResult)
الخطوات التالية
- تفعيل استشعار دقة أكبر باستخدام Raw Depth API
- يمكنك الاطّلاع على معمل ARCore Depth Lab الذي يعرض طرقًا مختلفة للوصول إلى البيانات المتعمّقة.