
Webhook isteğinizi oluşturduktan sonra üretime dağıtıp bağlanın İşleminize ekleyin. Aşağıdaki adımlarda ortamınızı nasıl ayarlayacağınız gösterilmektedir üretim barındırma hizmeti için Cloud Functions for Firebase'e dağıtılacak. Ancak, HTTPS isteklerini destekleyen herhangi bir web barındırma platformunu seçebilirsiniz. yanıtlarınızı düzenli olarak gönderin.
Webhook'unuzu bir web barındırma platformuna dağıttıysanız Webhook'u İşleminize bağlama bölümüne gidin. Son aşamanın aşağıdaki işlemde yer alan adımlar, Dialogflow veya İşlemler SDK'sı.
Cloud Functions for Firebase'e dağıtma
- Node.js'yi indirip yükleyin.
Firebase CLI'yı kurun ve başlatın. Aşağıdaki komut
EACCEShata mesajı alıyorum, şunu yapmanız gerekebilir: npm izinlerini değiştirin.npm install -g firebase-toolsFirebase aracının kimliğini Google Hesabınızla doğrulayın:
firebase loginİşlem proje dizininize gidin ve Firebase'i başlatın. uygulamanız için ayarlamak istediğiniz Firebase CLI özelliklerini seçmeniz istendi. Eylemler projesi.
Functionsözelliğini ve kullanmak isteyebileceğiniz diğer özellikleri seçin. seçin, ardından işlemi onaylamak ve devam etmek için Enter tuşuna basın:cd <cloud_function_dir> firebase initFirebase aracını Eylemler projenizle ilişkilendirmek için proje listesinde gezinmek için ok tuşlarını kullanın:
Proje seçildikten sonra Firebase aracı, Functions kurulumunu başlatır size hangi dili kullanmak istediğinizi sorar. Ok tuşlarını kullanarak seçin ve devam etmek için Enter tuşuna basın.
=== Functions Setup

A functions directory will be created in your project with a Node.js
package pre-configured. Functions can be deployed with firebase deploy.

? What language would you like to use to write Cloud Functions? (Use arrow keys)
> JavaScript
TypeScript
Olası hataları yakalamak ve stili uygulamak için ESLint'i kullanmak isteyip istemediğinizi seçin
YveyaNyazmak:? Do you want to use ESLint to catch probable bugs and enforce style? (Y/n)
İsteme
Yyazarak proje bağımlılıklarını alın:? Do you want to install dependencies with npm now? (Y/n)
Kurulum tamamlandıktan sonra şuna benzer bir çıkış görürsünüz:
✔ Firebase initialization complete!
actions-on-google bağımlılığını yükleyin:
cd <cloud_function_dir>/functions
npm install actions-on-google
Sipariş karşılama bağımlılıklarını alın ve karşılama işlevini dağıtın:
npm install
firebase deploy --only functions
Dağıtım birkaç dakika sürer. İşlem tamamlandığında çıkış gösterilir. aşağıdakine benzerdir. gireceğiniz İşlev URL'si Dialogflow'u seçin.
✔  Deploy complete!

Project Console: https://console.firebase.google.com/project/exampleproject-123/overview
Function URL (cloudFunctionName): https://us-central1-exampleproject-123.cloudfunctions.net/cloudFunctionName
Webhook'u İşleminize bağlama
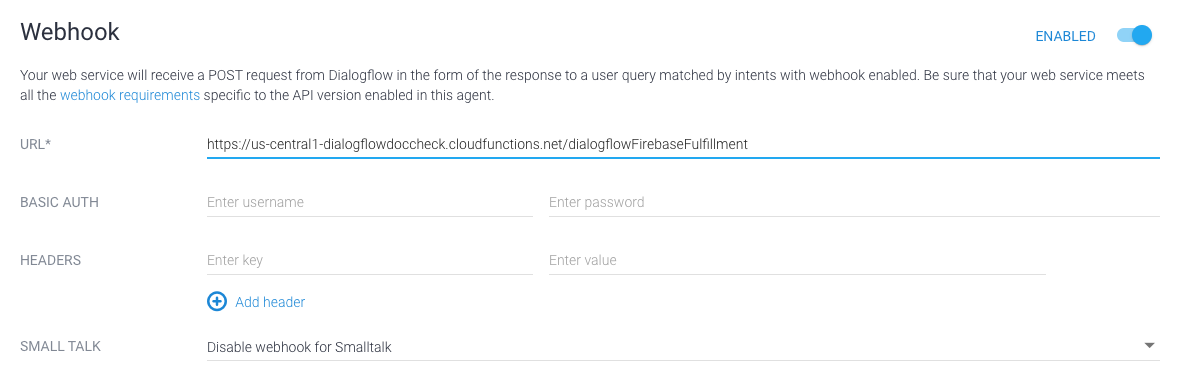
Dialogflow kullanıyorsanız: Dialogflow konsolu için Karşılama, Webhook düğmesini ETKİN olarak ayarlayın ve değiştirin URL alanındaki URL'yi işlev URL'nizle birlikte ekleyin.
Actions SDK'sını kullanıyorsanız: Bir nesne oluşturun
İşleminizdeki isteğinizi bildirmek için conversations nesnesinin içinde
paket:
{
  "actions": [
    {
      "description": "Default Welcome Intent",
      "name": "MAIN",
      "fulfillment": {
        "conversationName": "myFulfillmentFunction"
      },
      "intent": {
        "name": "actions.intent.MAIN",
        "trigger": {
          "queryPatterns": [
            "talk to myFulfillmentFunction"
          ]
        }
      }
    }
  ],
  "conversations": {
    "myFulfillmentFunction": {
      "name": "myFulfillmentFunction",
      "url": "https://us-central1-myprojectname-ab123.cloudfunctions.net/cloudFunctionName"
    }
  },
  "locale": "en"
}