Tetap teratur dengan koleksi
Simpan dan kategorikan konten berdasarkan preferensi Anda.
Halaman ini menunjukkan cara membuat masalah di Google Issue Tracker.
Untuk membuat masalah, Anda harus login ke Akun Google. Anda juga harus
memiliki izinBuat Masalah atau Admin Komponen
untuk komponen tempat masalah akan
dibuat. Jika memiliki izin Komentari Masalah, Anda hanya dapat menetapkan judul dan deskripsi masalah. Jika memiliki izin Edit Issues, Anda dapat menetapkan
kolom lain.
Template
Template di Google Issue Tracker menentukan nilai default untuk kolom dalam masalah
baru di komponen. Setiap komponen memiliki template default, tetapi mungkin memiliki template tambahan seperti yang dikonfigurasi oleh karyawan Google yang bertanggung jawab untuk mengelolanya. Pengguna publik dan partner tidak dapat membuat atau
mengubah template yang terkait dengan komponen.
Pilih template
Saat Anda membuat masalah di Issue Tracker, template default untuk komponen akan otomatis dipilih. Jika template tambahan tersedia, Anda dapat memilihnya dari daftar drop-down Template di halaman Create Issue.
Saat Anda memilih template, kolom di halaman akan otomatis diisi dengan nilai default yang ditentukan.
Pelacak Masalah akan membuka halaman Create Issue dan kolom Component
akan dipilih. Kolom ini menampilkan daftar drop-down komponen.
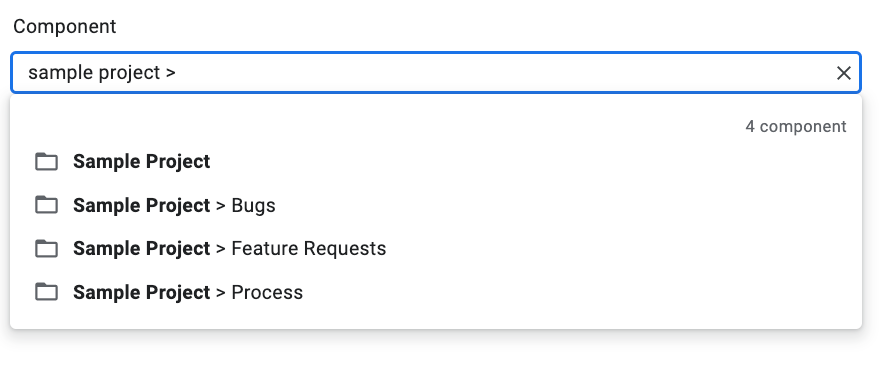
Gunakan menu drop-down untuk menemukan komponen tempat Anda ingin membuat
masalah. Anda hanya dapat menemukan komponen jika memiliki izin Buat Masalah atau
Admin Komponen.
(Opsional) Pilih template yang paling sesuai dengan
masalah yang Anda laporkan. Beberapa komponen hanya memiliki template default.
Masukkan judul di kolom Judul. Judul ditampilkan saat Anda
melihat detail masalah, serta di hasil penelusuran, hotlist, dan
tempat lain tempat Anda melihat daftar masalah.
Pilih prioritas dari menu drop-down Prioritas. Kolom
Prioritas hanya terlihat jika Anda memiliki izin Edit Masalah.
Pilih jenis masalah dari menu drop-down Type. Kolom Jenis
hanya terlihat jika Anda memiliki izin Edit Masalah.
(Opsional) Tetapkan penerima tugas atau tambahkan alamat email (termasuk alamat milis) ke daftar Kolaborator dan CC. Kolom
ini hanya terlihat jika Anda memiliki izin Edit Masalah.
(Direkomendasikan) Masukkan deskripsi untuk masalah di kolom Description. Kolom ini mungkin sudah terisi sebagian untuk Anda jika
teks deskripsi disediakan oleh template yang dipilih. Anda juga dapat mencentang
opsi Markdown untuk menulis deskripsi sebagai
teks markdown.
(Opsional) Tambahkan lampiran dari komputer atau dari lokasi Drive.
(Opsional) Isi kolom lanjutan untuk masalah tersebut.
Anda dapat melihat kolom ini dengan mengalihkan panel Kolom lanjutan. Panel
Kolom lanjutan hanya terlihat jika Anda memiliki izin
Edit Masalah. Dalam sebagian besar kasus, Anda dapat melewati kolom lanjutan saat membuat
masalah. Namun, beberapa komponen mengharuskan Anda memasukkan nilai untuk komponen tersebut. Jika
demikian, bagian Kolom lanjutan akan muncul secara otomatis, dan
kolom yang wajib diisi akan ditandai dengan tanda bintang (*).
Klik tombol Buat untuk mengirimkan masalah atau klik Buat & Mulai Masalah Lain untuk mengirimkan masalah dan membuka halaman Buat Masalah baru yang telah diisi dengan nilai yang digunakan untuk masalah yang baru saja Anda buat.
Membuat masalah berdasarkan masalah yang ada
Anda juga dapat membuat masalah berdasarkan masalah yang ada. Metode ini dapat menghemat
waktu Anda dengan menggunakan masalah yang ada untuk mengisi otomatis kolom tertentu.
Untuk membuat masalah berdasarkan masalah yang ada:
Buka masalah yang ada.
Klik tombol di samping Create.
Pilih cara Anda ingin membuat masalah baru dari menu drop-down. Opsi
dalam daftar drop-down bervariasi bergantung pada halaman yang Anda
lihat. Tombol hanya akan terlihat jika setidaknya ada satu opsi
yang tersedia.
Ada 7 kemungkinan opsi.
Opsi
Deskripsi
Muncul saat
Dalam Komponen yang Sama
Memulai masalah baru dengan
komponen yang disetel ke
komponen saat ini.
(1) Mengelola komponen,
(2) Melihat masalah dalam
komponen, (3) Melihat
masalah
Serupa dengan Masalah
Saat Ini
Memulai masalah baru dengan
kolom masalah
saat ini yang disalin ke
masalah baru.
Melihat masalah
Diblokir oleh Masalah
Saat Ini
Memulai masalah baru dengan
masalah saat ini sebagai
masalah pemblokiran.
Melihat masalah
Memblokir Masalah
Saat Ini
Memulai masalah baru dengan
masalah saat ini sebagai
masalah yang diblokir.
Melihat masalah
Induk Masalah
Saat Ini
Memulai masalah baru dengan
masalah saat ini sebagai
masalah turunan.
Melihat masalah
Turunan Masalah
Saat Ini
Memulai masalah baru dengan masalah saat ini sebagai masalah induk.
Melihat masalah
Dalam Hotlist yang Sama
Memulai masalah baru dengan
hotlist saat ini
ditambahkan ke dalamnya.
(1) Mengelola hotlist,
(2) Melihat masalah dalam
hotlist
Semua hak dilindungi undang-undang. Java adalah merek dagang terdaftar dari Oracle dan/atau afiliasinya.
Terakhir diperbarui pada 2025-07-25 UTC.
[null,null,["Terakhir diperbarui pada 2025-07-25 UTC."],[[["\u003cp\u003eIssue creation in Google Issue Tracker requires a Google account and specific permissions (Create Issue, Admin, Comment on Issues, or Edit Issues) depending on the desired actions.\u003c/p\u003e\n"],["\u003cp\u003eTemplates, defined by Google employees, provide default field values for new issues within a component and can be selected during issue creation to streamline the process.\u003c/p\u003e\n"],["\u003cp\u003eThe process of creating an issue involves selecting a component, entering details such as title, priority, type, and description, and optionally adding attachments and configuring advanced fields.\u003c/p\u003e\n"],["\u003cp\u003eIssue Tracker provides options to create new issues based on existing ones, leveraging information like component, hotlist, or even copying field values for efficiency.\u003c/p\u003e\n"],["\u003cp\u003eUsers can explore further information regarding issues, components, and managing issues through provided links.\u003c/p\u003e\n"]]],[],null,["# Create an Issue\n\nThis page shows how to create an [issue](../concepts/issues) in Google Issue\nTracker.\n\nTo create an issue, you must be signed in to a Google Account. You also must\nhave **Create Issues** or **Admin Components**\n[permission](../concepts/access-control) for the component where the issue will\nbe created. If you have **Comment on Issues** permission, you may set the issue\ntitle and description only. If you have **Edit Issues** permission, you can set\nother fields.\n\nTemplates\n---------\n\nTemplates in Google Issue Tracker specify default values for fields in new\nissues in a [component](../concepts/components). Each component has a default\ntemplate but may have additional templates as configured by the Google employee\nwho is responsible for managing it. Public and partner users cannot create or\nmodify the templates associated with a component.\n\n### Choose a template\n\nWhen you [create an issue](../guides/create-issue-ui) in Issue Tracker, the\ndefault template for the component is automatically selected. If additional\ntemplates are available, you can select them from the **Template** drop-down\nlist on the **Create Issue** page.\n\nWhen you select a template, the fields in the page are automatically populated\nwith the default values defined.\n\nCreate an issue\n---------------\n\nTo create an issue:\n\n1. [Open Issue Tracker](../guides/access-ui) in your web browser.\n\n2. Click **Create Issue**.\n\n Issue Tracker opens the **Create Issue** page and has the **Component**\n field selected. This field shows a drop-down list of components.\n\n3. Use the drop-down list to [find the component](/issue-tracker/guides/find-a-component) where you want to create\n the issue. You can only find components where you have **Create Issues** or\n **Admin Components** permission.\n\n4. (Optional) Choose a [template](../concepts/templates) that best applies to\n the issue you are reporting. Some components only have a default template.\n\n5. Enter a [title](../references/glossary-of-fields#title) in the **Title** field. The title is displayed when you\n view the details of the issue, as well as in search results, hotlists and\n other places where you are viewing lists of issues.\n\n6. Select a [priority](../references/glossary-of-fields#priority) from the **Priority** drop-down list. The\n **Priority** field is only visible if you have **Edit Issues** permission.\n\n7. Select the issue [type](../references/glossary-of-fields#type) from the **Type** drop-down list. The **Type**\n field is only visible if you have **Edit Issues** permission.\n\n8. (Optional) Designate an [assignee](../references/glossary-of-fields#assignee) or add email addresses (including\n mailing list addresses) to the [Collaborators](../references/glossary-of-fields#collaborators) and [CC](../references/glossary-of-fields#cc) lists. These\n fields are only visible if you have **Edit Issues** permission.\n\n | Depending on your [email notification settings](/issue-tracker/guides/set-notification-preferences), you might need to add yourself to the CC list to receive notifications.\n9. (Recommended) Enter a [description](../references/glossary-of-fields#description) for the issue in the **Description**\n field. This field might already be partially populated for you if\n description text is provided by the selected template. You can also check\n the **Markdown** option to write the description as\n [markdown](https://commonmark.org) text.\n\n10. (Optional) Add attachments from your computer or from a Drive location.\n\n11. (Optional) Fill in the advanced fields for the issue.\n\n You can view these fields by toggling the **Advanced fields** panel. The\n **Advanced fields** panel is only visible if you have **Edit Issues**\n permission. In most cases, you can skip advanced fields when creating an\n issue. However, some components require you to enter values for them. If\n this is the case, the **Advanced fields** section appears automatically, and\n the required fields are marked with an asterisk (\\*).\n\n12. Click the **Create** button to submit the issue or click **Create \\& Start\n Another** to submit the issue and open a new **Create Issue** page\n pre-populated with the values used for the issue you just created.\n\n| Hover over the name of a field in the Create Issue page to view a field description.\n\nCreate an issue based on an existing one\n----------------------------------------\n\nYou can also create an issue based on an existing one. This method can save you\ntime by using the existing issue to pre-fill certain fields.\n\nTo create an issue based on an existing one:\n\n1. Open the existing issue.\n\n2. Click the button next to **Create**.\n\n3. Choose how you want to create the new issue from the drop-down list. The\n options in the drop-down list vary depending on the page that you are\n viewing. The button only becomes visible if there is at least one option\n available.\n\nThere are 7 possible options.\n\n| Option | Description | Appears when |\n|------------------------------|----------------------------------------------------------------------------------|-----------------------------------------------------------------------------------|\n| **In Same Component** | Starts a new issue with component set to the current component. | (1) Managing a component, (2) Viewing issues in a component, (3) Viewing an issue |\n| **Similar To Current Issue** | Starts a new issue with the fields of the current issue copied to the new issue. | Viewing an issue |\n| **Blocked By Current Issue** | Starts a new issue with the current issue as a blocking issue. | Viewing an issue |\n| **Blocking Current Issue** | Starts a new issue with the current issue as a blocked issue. | Viewing an issue |\n| **Parent Of Current Issue** | Starts a new issue with the current issue as a child issue. | Viewing an issue |\n| **Child Of Current Issue** | Starts a new issue with the current issue as a parent issue. | Viewing an issue |\n| **In Same Hotlist** | Starts a new issue with the current hotlist added to it. | (1) Managing a hotlist, (2) Viewing issues under a hotlist |\n\n| The **Similar To Current Issue** option does not copy the changelist, duplicate issue ID, CC or reporter fields from the original issue.\n\nWhat's next\n-----------\n\n- [Learn more about issues](../concepts/issues)\n- [Learn more about components](../concepts/components)\n- [View and edit issues](/issue-tracker/guides/edit-issue-ui)"]]