
Page Summary
-
This document outlines best practices for integrating Place Autocomplete, Address Validation API, and Maps into e-commerce checkouts to improve address quality and customer experience.
-
The recommended workflow involves using Place Autocomplete for initial address capture, validating it with the Address Validation API, and providing visual confirmation on a map.
-
Address Validation API responses fall into three scenarios: "Fix" for low-quality addresses requiring user correction, "Confirm" for addresses with potential corrections needing user confirmation, and "Accept" for high-quality addresses.
-
Implementations should include address acceptance logic that allows customers to proceed with checkout even if their address doesn't fully validate, potentially flagging such orders for review.
-
Google provides resources like an open-source web component and documentation to help developers implement this workflow effectively.
Objective
This document describes methods for combining Place Autocomplete, Address Validation API1, and Maps in an ecommerce checkout for the purpose of capturing high quality addresses.
Prerequisites
Google recommends familiarity with the following:
- Place Autocomplete JavaScript developer
documentation.
- Understand from a technical point of view how Place Autocomplete works and its implementation options.
- Checkout implementation guide for Place
Autocomplete.
- Examples of Place Autocomplete implementation best practices on an ecommerce checkout.
- Address Validation API product
documentation,
with a focus on Build your validation
logic.
- Understand from a technical point of view how Address Validation API works, and review the signals that determine address quality.
What is address validation?
The Address Validation API is a service that accepts an address. It identifies address components and validates them. It also standardizes the address for mailing and finds the best known latitude/longitude coordinates for it. Optionally, for addresses in the United States and Puerto Rico, you can enable the Coding Accuracy Support System (CASS™).Why do you need address validation at checkout?
Collect accurate addresses during the ordering process:
This is an important step to promoting successful deliveries, increases on-time
fulfillment, and reduces costly address correction charges.
Guide customers to enter the address quickly and accurately:
Place Autocomplete speeds up address entry and reduces input errors, allowing
customers to move easily through the checkout. Address Validation gives feedback
on the overall address quality, makes corrections such as standardization and
spelling mistakes, and enhances metadata, such as providing a residential or
commercial indicator (available in select
regions).
Implementation Overview
This section outlines the recommended address entry workflow for ecommerce checkouts. The process is comprised of three steps:
- Use Place Autocomplete to initially capture the address.
- Use Address Validation API to confirm the entered address.
- Display the location of the entered address on a map, to give delivery confidence to customers.
Next, we'll delve into each step individually.
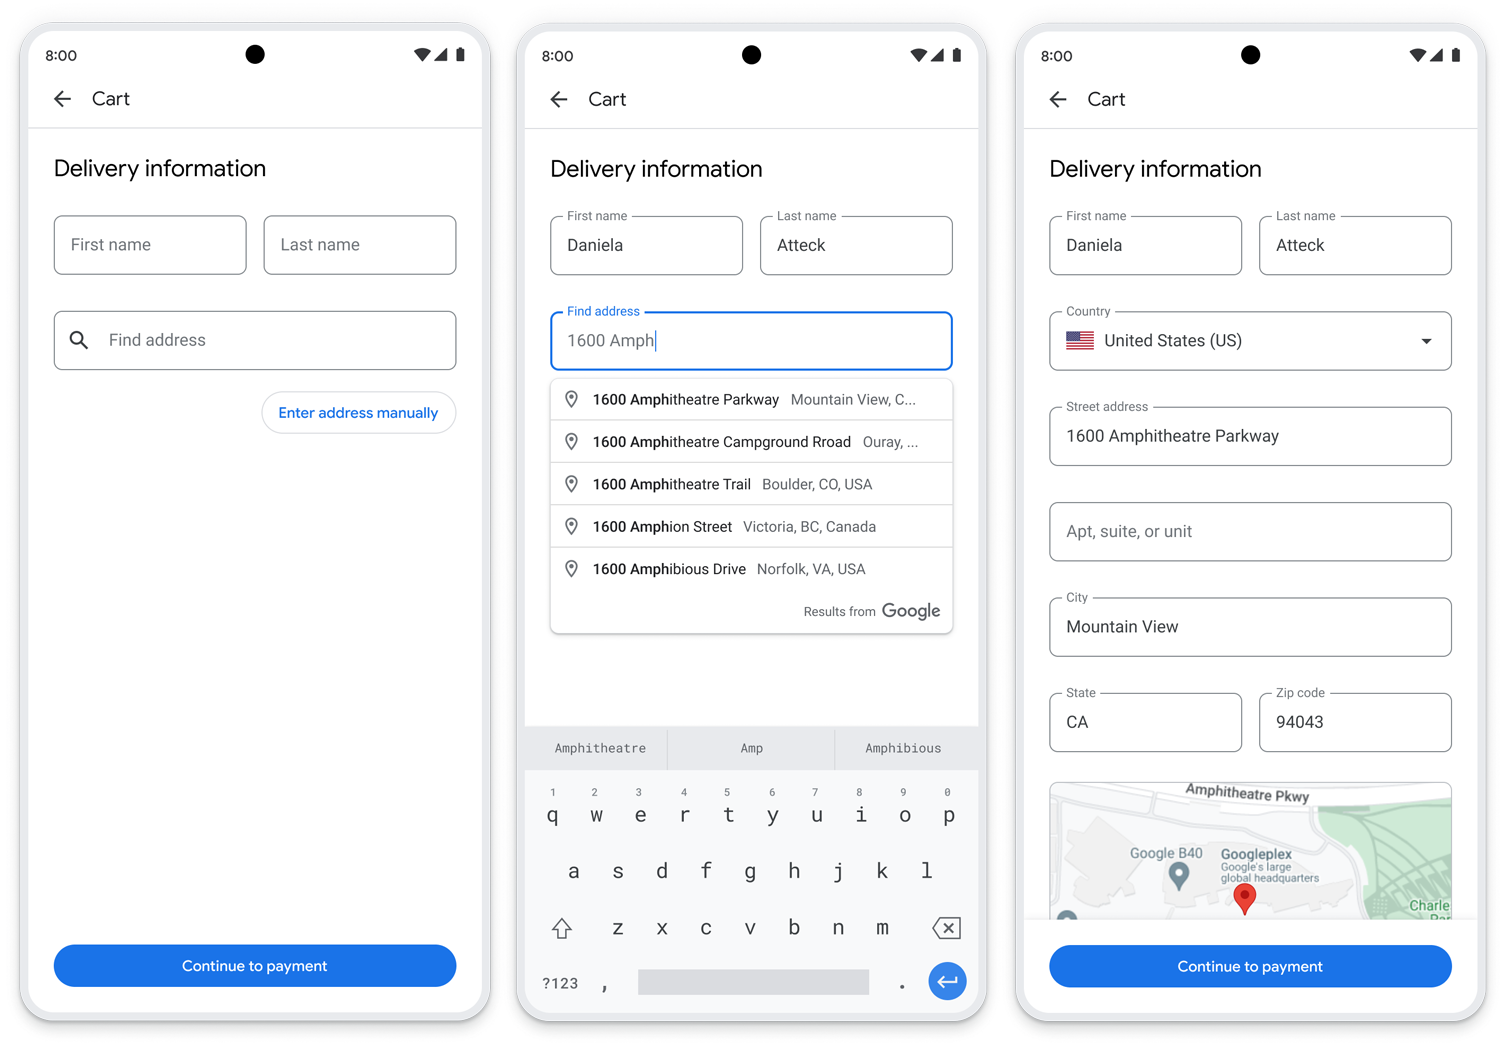
Step 1: Address entry flow - using the Place Autocomplete service
Implement Place Autocomplete using the JavaScript API on the first line of the address entry form.
Place Autocomplete provides suggestions to the customer as they enter their address details. When implemented using the JavaScript API, as users start typing, a drop-down appears under the address entry form field, showing results from the Autocomplete service that update with every keystroke. Once the user has entered enough information to find the address, they select it from the drop-down. This action automatically populates the form fields with the address data.
You can provide two form entry styles to the user with Place Autocomplete: either a display with all address fields, or a display with a single input field. This single input field prompts the user to begin searching as they type, rather than entering in address components individually. Once autocomplete populates the address, the workflow expands the form fields with the address data, allowing the customer to review and make edits, for example adding an apartment or unit number.
Here is an example of how this flow might appear, using a single input field:
Step 2: Use the Address Validation API to validate addresses
After the user enters the address, Google recommends you call the Address Validation API at checkout to confirm that the address is valid and complete. Trigger a call to the Address Validation API upon the user clicking the Next or Continue button on the address form. This button often leads to the payment page.
Google recommends calling Address Validation API for every transaction.
The following flow diagram illustrates an example end-to-end integration of the Address Validation API within a checkout:
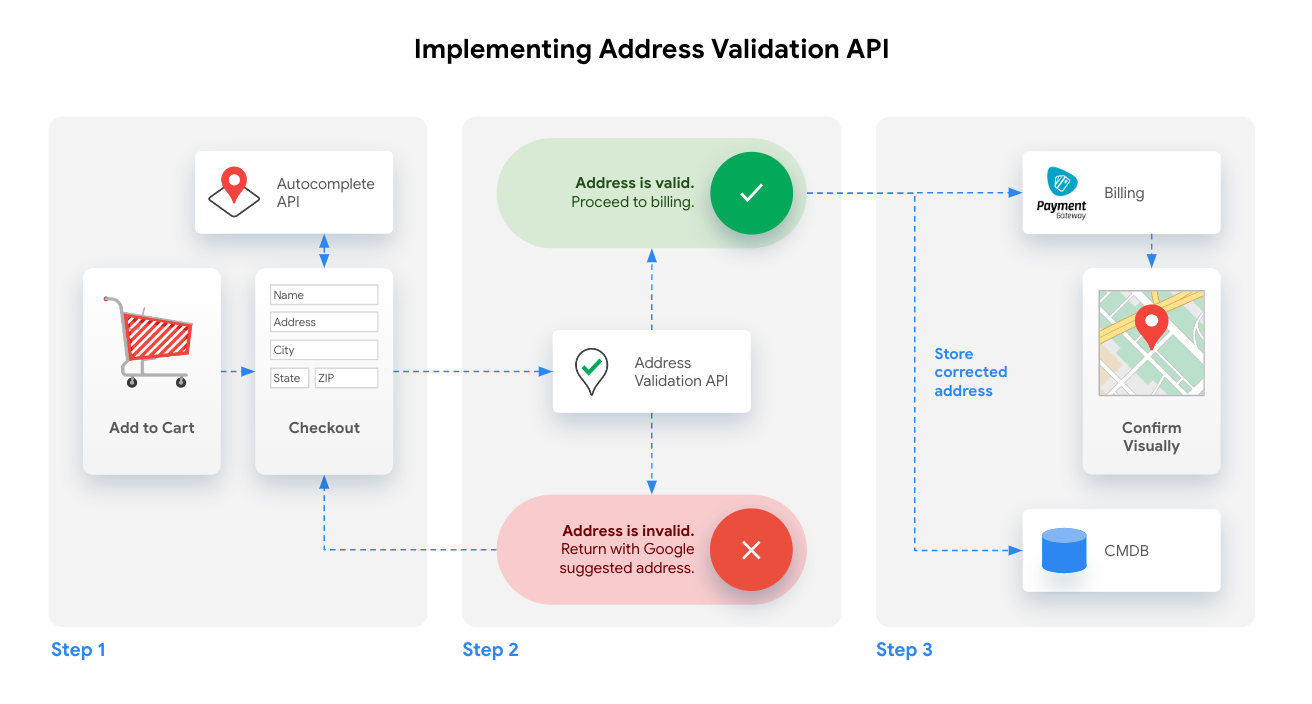
This document discusses address acceptance scenarios later.
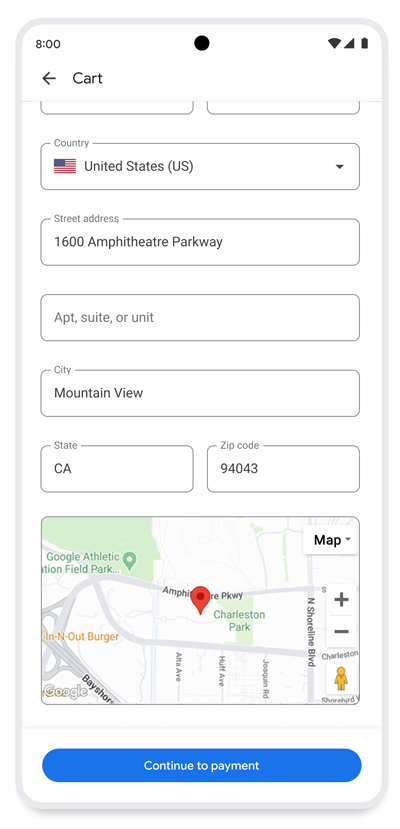
Step 3: Provide visual confirmation
After address entry, provide the user visual confirmation of the delivery location by displaying it on a map. This offers the customer additional assurance that the address is correct, and it reduces delivery or pickup failures.
The map can be shown during the checkout process, or sent within the transaction confirmation email. Both of these use cases can be accomplished with the following APIs.
| Maps JavaScript API provides an interactive map for displaying the user location. | Maps Static API allows for image embed within the web page or at a later stage in an email. |
|---|---|
 |
 |
Deep Dive - address acceptance scenarios
Address Validation API responses can be categorized into three main scenarios:
- Fix—the address is low quality. You should prompt for more information.
- Confirm—address is high quality, but has changes from the input address. You might prompt for confirmation.
- Accept—address is high quality. You can accept the address provided.
This concept is covered in the Build your validation logic section of the Address Validation API docs, and we will discuss each scenario in this section.
Fix

This section shows how to fix an address input. For information about specific signals that the Address Validation API returns to indicate a low quality address, see Fix an address in the Build your validation logic documentation.
If the response from the Address Validation API indicates an invalid address, redirect the customer to the address entry form to check their entered data. Once the address has been fixed, your service should resend to the Address Validation API to ensure the corrections made are valid.
You can also highlight specific address line errors by using the signals
returned at the addressComponents level. An example of this can be seen in the
screenshot to the right.
Confirm
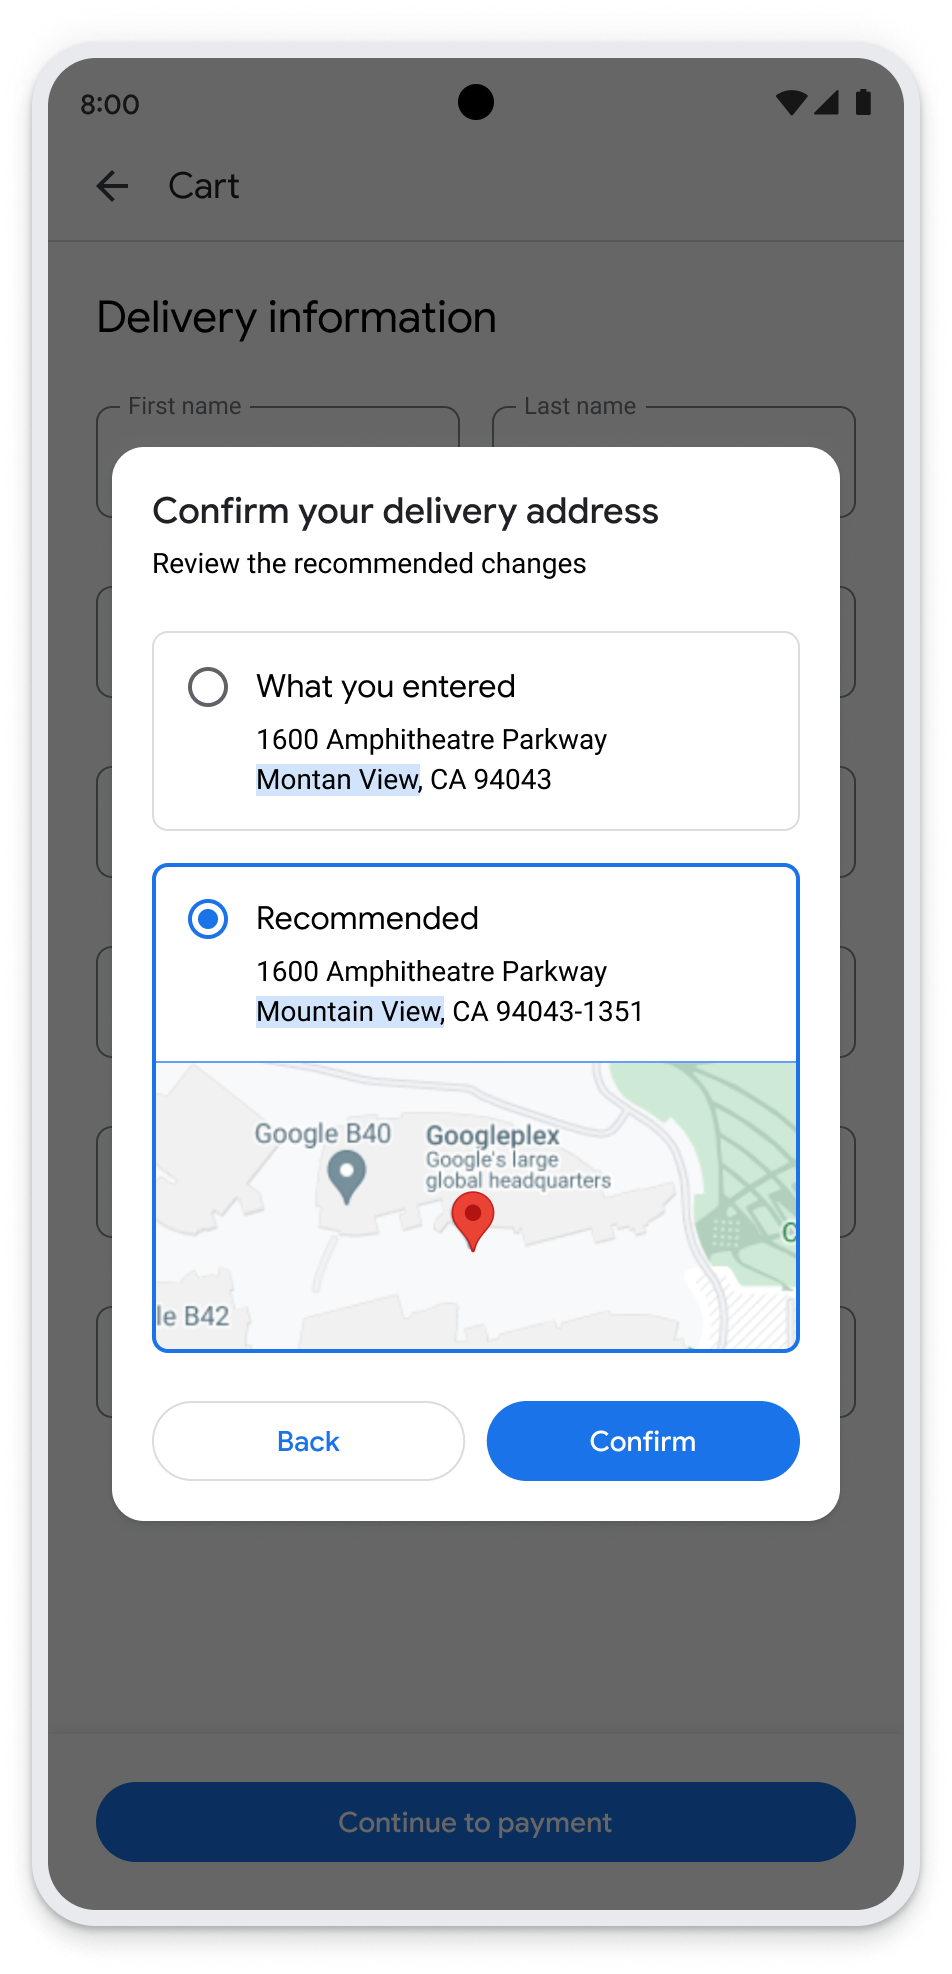
This section shows how to confirm an address. For information about specific signals that the Address Validation API returns to indicate an address should be confirmed, see Confirm an address in the Build your validation logic documentation.
Often your system will want to prompt a user to confirm an address. For example, a customer misspells the city name, which would then be corrected by the Address Validation API. You should confirm this fix with the customer. This is because the changes made by the API might fundamentally alter what was originally entered.
Use an interstitial modal to display the information to the customer, enabling three options to proceed:
- Confirm the address as returned by the API, and the checkout process continues, using the corrected address.
- Select the address as originally entered, ignoring the correction from the Address Validation API. The checkout process can continue as normal, and the order can be flagged for downstream review before shipping, if your process allows.
- The customer cancels or backs out of the modal, returning them to the address entry stage of the checkout process, where they can re-enter the address from scratch, starting the process over.
An example of this can be seen in the screenshot to the right.
Accept
This section shows how to accept an address. For information about specific signals that the Address Validation API returns to indicate an address is good quality and should be accepted, see Accept an address in the Build your validation logic documentation.
In this scenario, the checkout process should move onto the next stage, likely payment capture, with no prompts to the customer in regards to address quality. The API has confirmed that the address entered by the customer is good quality, and deliverable.
We recommend using the returned address data from the Address Validation API against the order, because this could contain minor corrections and additions, such as the following:
- Capitalization
- Formatting corrections, for example
- Street to St
- Correct ordering of address components
- ZIP+4 in the USA.
Implementation Considerations
When building your address acceptance logic, be sure your implementation doesn't block customers from checking out due to entering an invalid address. Construct logic in a way that prevents the possibility of an infinite loop if the API repeatedly indicates their entry is invalid.
Google recommends that you provide customers up to two chances to enter their address, and on the second attempt, accept their entry, even if it does not validate. On the second attempt, the goal is to let them proceed regardless of validation.
Two suggested methods to accept the second attempt:
- Force-proceed: Show the customer a modal explaining the address isn't validating, but allow the option to continue with their typed-in address.
- Silent Acceptance: Automatically accept the second attempt without a confirmation step, even if the address doesn't fully validate.
If possible, design your system to flag addresses that don't validate, so that a customer service representative can review them before the order ships. This extra measure ensures you catch any mistakes.
New building construction offers a good illustration of why this check is recommended. There may be a gap between when new building construction is finished and when that building's address is populated in the postal address databases. Customers should have the option to force-proceed through the checkout page with their typed address, even if it does not validate.
Once a checkout session has been completed, optionally use the
provideValidationFeedback
method to send Google feedback about a specific address validation attempt.
Conclusion
This document has given an overview of a checkout flow implementing Autocomplete, Address Validation, and visual confirmation on a Google Map. Use this document as a starting point to design your implementation, following the recommended address entry flows.
Next Steps
Suggested further reading:

- Place Autocomplete Documentation
- Address Validation API Documentation
- Google Maps Platform Reporting
Contributors
Henrik Valve | Solutions Engineer
Thomas Anglaret | Solutions Engineer
Sarthak Ganguly | Solutions Engineer
-
Non-exclusive Licensee of the United States Postal Service. The following trademark(s) are owned by the United States Postal Service® and used with permission: CASS™, USPS®, DPV®. ↩