如何建立地圖 ID
透過集合功能整理內容
你可以依據偏好儲存及分類內容。
地圖 ID 是不重複的識別碼,代表儲存在 Google Cloud 中的 Google 地圖樣式和設定。您可以使用地圖 ID 啟用功能,或管理及設定網站和應用程式中的地圖樣式。您可以在 Google Cloud 控制台專案的「地圖管理」頁面中,為需要的每個平台 (JavaScript、Android、iOS 或靜態地圖) 建立地圖 ID。
如要進一步瞭解地圖 ID 和使用地圖 ID 的功能,請參閱「地圖 ID 總覽」。
所需權限
如要在專案中建立或管理任何地圖 ID,您必須在專案的 Cloud Console IAM 頁面中,使用具備適當角色層級權限 (編輯者或擁有者) 的主體。詳情請參閱 IAM 基本和預先定義角色參考資料。
建立地圖 ID
在 Cloud 控制台中建立地圖 ID,步驟如下:
登入並開啟具有必要權限的 Cloud 控制台專案。
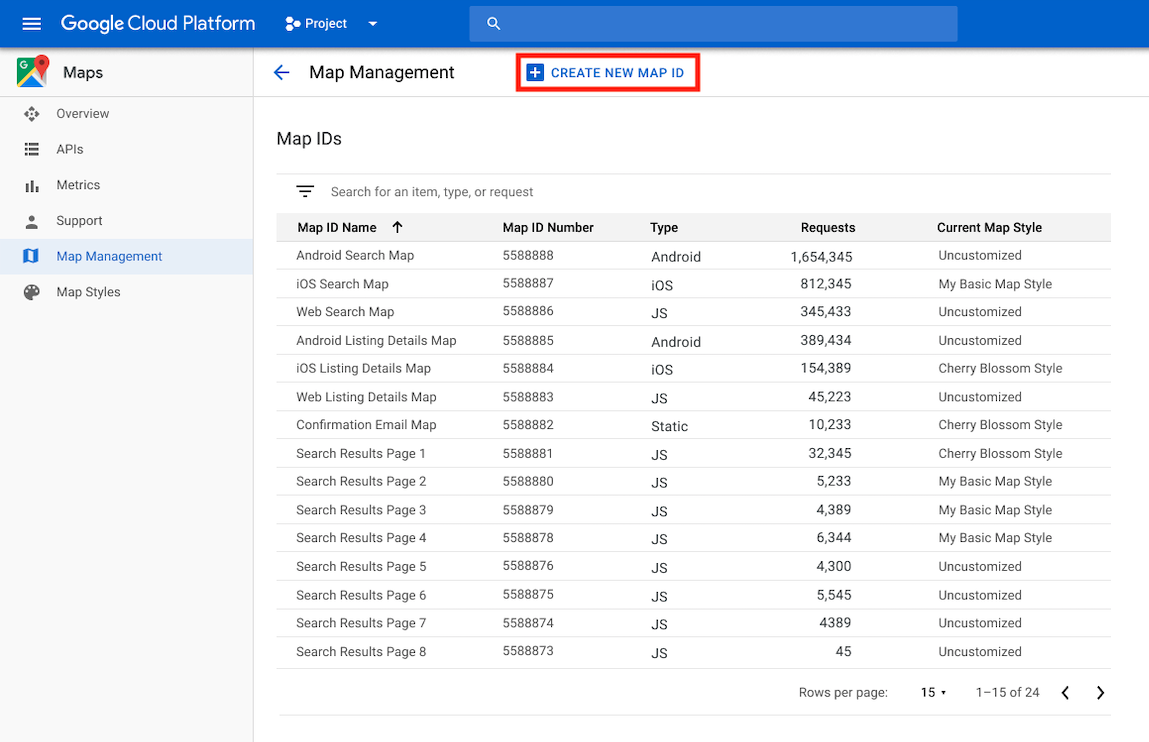
前往 Cloud Console 中的「地圖管理」頁面。
按一下「建立地圖 ID」。
在「建立新地圖 ID」頁面中,執行下列操作:
- 在「名稱」中,為地圖 ID 命名。
- 選用:在「說明」中,說明地圖 ID 的用途。
- 在「地圖類型」中,選取您打算使用地圖 ID 的平台。
如果選擇 JavaScript,請一併選擇「光柵」 (預設) 或「向量」地圖類型。如要進一步瞭解向量地圖,請參閱「向量地圖」。
- 按一下「儲存」,即可查看新的地圖 ID。
將地圖 ID 與地圖樣式建立關聯
如果您使用雲端式地圖樣式設定,請將地圖樣式與地圖 ID 建立關聯。詳情請參閱「將樣式與地圖 ID 建立關聯」。
在應用程式中加入地圖 ID
Android
您可以使用 MapView
類別 (或藉由程式輔助方式使用 GoogleMapOptions
類別),透過活動版面配置檔案中的 <fragment>
元素來新增地圖 ID。
舉例來說,假設您建立了名為 map_id
的地圖 ID,並以字串值形式儲存於 res/values/strings.xml
中:
<?xml version="1.0" encoding="utf-8"?>
<resources>
<string name="map_id">MAP_ID</string>
</resources>
如果是透過活動版面配置檔案中的 <fragment>
元素新增的地圖,所有要設定自訂樣式的地圖片段都必須在 map:mapId
屬性中指定地圖 ID:
<fragment xmlns:map="http://schemas.android.com/apk/res-auto"
map:name="com.google.android.gms.maps.SupportMapFragment"
…
map:mapId="@string/map_id" />
您也可以使用 MapView
類別的 map:mapId
屬性指定地圖 ID:
<com.google.android.gms.maps.MapView
xmlns:map="http://schemas.android.com/apk/res-auto"
....
map:mapId="@string/map_id" />
如要透過程式輔助方式指定地圖 ID,請使用 GoogleMapOptions
類別將 ID 傳送至 MapFragment
例項:
Java
MapFragment mapFragment = MapFragment.newInstance(
new GoogleMapOptions()
.mapId(getResources().getString(R.string.map_id)));
Kotlin
val mapFragment = MapFragment.newInstance(
GoogleMapOptions()
.mapId(resources.getString(R.string.map_id))
)
在 Android Studio 中,按照平常的操作方式建構及執行應用程式。在第一個步驟中設定的自訂樣式會套用至所有具備指定地圖 ID 的地圖。
iOS
如要使用地圖 ID 例項化地圖,請按照下列步驟操作:
- 使用 Cloud 控制台中的地圖 ID 字串建立
GMSMapID
。
- 建立
GMSMapView
,並指定您剛建立的地圖 ID。
Swift
let camera = GMSCameraPosition(latitude: 47.0169, longitude: -122.336471, zoom: 12)
let mapID = GMSMapID(identifier: "MAP_ID")
let mapView = GMSMapView(frame: .zero, mapID: mapID, camera: camera)
self.view = mapView
Objective-C
GMSCameraPosition *camera = [GMSCameraPosition cameraWithLatitude:47.0169
longitude:-122.336471
zoom:12];
GMSMapID *mapID = [GMSMapID mapIDWithIdentifier:@"MAP_ID"];
GMSMapView *mapView = [GMSMapView mapWithFrame:CGRectZero mapID:mapID camera:camera];
self.view = mapView;
如果您使用自己的地圖 ID,隨時可以在 Cloud 控制台中設定地圖 ID 的新樣式,大約六小時後,您和使用者就會在自己的地圖檢視畫面中看到新樣式。
如要立即查看變更,請關閉並重新啟動應用程式,方法是先退出應用程式,然後從最近使用的應用程式清單中強制結束應用程式,再重新開啟。更新後的地圖就會顯示。
JavaScript
如要在應用程式程式碼中建立含有地圖 ID 的地圖,請按照下列步驟操作:
如果您已使用內嵌 JSON 程式碼自訂地圖,請從 MapOptions
物件中移除 styles
屬性;否則請略過這個步驟。
使用 mapId
屬性在地圖中新增地圖 ID。例如:
map = new google.maps.Map(document.getElementById('map'), {
center: {lat: -34.397, lng: 150.644},
zoom: 8,
mapId: 'MAP_ID'
});
靜態地圖介面集
如要將地圖 ID 新增至使用其中一個網路服務 API 的新地圖或現有地圖,請附加 map_id
網址參數,並將其設為地圖 ID。這個範例說明如何使用 Maps Static API,在地圖中加入地圖 ID。
<img src="https://maps.googleapis.com/maps/api/staticmap?center=Brooklyn+Bridge,New+York,NY&zoom=13&size=600x300&maptype=roadmap&markers=color:blue%7Clabel:S%7C40.702147,-74.015794&markers=color:green%7Clabel:G%7C40.711614,-74.012318&markers=color:red%7Clabel:C%7C40.718217,-73.998284&key=YOUR_API_KEY&map_id=MAP_ID&signature=YOUR_SIGNATURE" />

如果在地圖 ID 之前,地圖靜態網址中已有數位簽章,您必須在加入地圖 ID 後
建立並新增新的數位簽章。產生新的網址簽署密鑰時,請記得從網址中移除先前的數位簽章。
除非另有註明,否則本頁面中的內容是採用創用 CC 姓名標示 4.0 授權,程式碼範例則為阿帕契 2.0 授權。詳情請參閱《Google Developers 網站政策》。Java 是 Oracle 和/或其關聯企業的註冊商標。
上次更新時間:2025-08-31 (世界標準時間)。
[null,null,["上次更新時間:2025-08-31 (世界標準時間)。"],[[["\u003cp\u003eA map ID is a unique identifier that represents a single Google Map instance, used to manage, style, or enable features on maps across various platforms (JavaScript, Android, iOS, Static Maps).\u003c/p\u003e\n"],["\u003cp\u003eMap IDs are created within the Google Cloud console on the Map Management page, requiring Editor or Owner permissions.\u003c/p\u003e\n"],["\u003cp\u003eTo use a map ID, you need to integrate it into your application code based on the specific platform (JavaScript, Android, iOS, or Static Maps) you're working with, following the provided instructions.\u003c/p\u003e\n"],["\u003cp\u003eCloud-based map styling allows you to associate a style with your map ID, impacting its visual appearance on the map.\u003c/p\u003e\n"],["\u003cp\u003eMap IDs can be added to the Maps Static API by appending the 'map_id' URL parameter, and a new digital signature might be required for existing URLs.\u003c/p\u003e\n"]]],[],null,["# How to create map IDs\n\nSelect platform: [Android](/maps/documentation/android-sdk/map-ids/get-map-id \"View this page for the Android platform docs.\") [iOS](/maps/documentation/ios-sdk/map-ids/get-map-id \"View this page for the iOS platform docs.\") [JavaScript](/maps/documentation/javascript/map-ids/get-map-id \"View this page for the JavaScript platform docs.\") [Web Service](/maps/documentation/maps-static/map-ids/get-map-id \"View this page for the Web Service platform docs.\")\n\n\u003cbr /\u003e\n\n| **Paid feature:**\n| Features accessed by adding a [map ID](/maps/documentation/get-map-id) triggers a map\n| load charged against the Dynamic Maps SKU for Android and iOS. See\n| [Google Maps Billing](/maps/billing-and-pricing/sku-details#dynamic-maps-ess-sku) for more information.\n\nA map ID is a unique identifier that represents Google Map styling and configuration settings that are stored in Google Cloud. You use map IDs to enable features or manage or style maps on your websites and in your applications. You can create map IDs for each platform you need--JavaScript, Android, iOS, or Static maps--in your Google Cloud console project on the **Map Management** page.\n\nFor more details and features that use map IDs,\nsee [Map ID overview](/maps/documentation/javascript/map-ids/mapid-over).\n\nRequired permissions\n--------------------\n\nTo create or manage any map IDs in your project, you\nmust use a principal with the appropriate role-level permissions, Editor or\nOwner, on the Cloud console IAM page for the project. For\ndetails, see\n[IAM basic and predefined roles reference](https://cloud.google.com/iam/docs/understanding-roles#role_types).\n\nCreate map IDs\n--------------\n\nCreate map IDs in the Cloud console following\nthese steps:\n\n1. Sign in to and open a Cloud console project with the\n [required permissions](#permissions).\n\n2. In the Cloud console, go to the\n [Maps Management page](https://console.cloud.google.com/google/maps-apis/studio/maps).\n\n3. Click **Create map ID**.\n\n4. On the **Create new map ID** page, do the following:\n\n 1. For **Name**, give the map ID a name.\n 2. *Optional* : For **Description**, describe what the map ID is used for.\n 3. For **Map type** , select the platform on which you plan to use the map ID. If you choose JavaScript, also choose a **Raster** (the default) or **Vector** map type. For more information on vector maps, see [Vector Maps](/maps/documentation/javascript/vector-map).\n 4. Click **Save** to show your new map ID.\n\nAssociate a map ID to a map style\n---------------------------------\n\nIf you are using cloud-based maps styling, you associate a map style with your\nmap ID. For details, see [Associate your style to a map ID](../cloud-customization/map-styles-leg#associate-style-with-map-id).\n\nAdd the map ID to your app\n--------------------------\n\n### Android\n\nAdd your map ID through a `\u003cfragment\u003e` element in the\nactivity's layout file, by using the `MapView` class, or programmatically\nusing the `GoogleMapOptions` class.\n\nFor example, assume you created a map ID that is stored as a\nstring value named `map_id` in `res/values/strings.xml`: \n\n \u003c?xml version=\"1.0\" encoding=\"utf-8\"?\u003e\n \u003cresources\u003e\n \u003cstring name=\"map_id\"\u003e\u003cvar label=\"map_id\" translate=\"no\"\u003eMAP_ID\u003c/var\u003e\u003c/string\u003e\n \u003c/resources\u003e\n\nFor maps added through a `\u003cfragment\u003e` element in the activity's layout file,\nall map fragments that should have the custom style must specify the\nmap ID in the `map:mapId` attribute: \n\n \u003cfragment xmlns:map=\"http://schemas.android.com/apk/res-auto\"\n map:name=\"com.google.android.gms.maps.SupportMapFragment\"\n ...\n map:mapId=\"@string/map_id\" /\u003e\n\nYou can also use the `map:mapId` attribute of the `MapView` class to specify\na map ID: \n\n \u003ccom.google.android.gms.maps.MapView\n xmlns:map=\"http://schemas.android.com/apk/res-auto\"\n ....\n map:mapId=\"@string/map_id\" /\u003e\n\nTo specify a map ID programmatically, pass it to a\n`MapFragment` instance using the `GoogleMapOptions` class: \n\n### Java\n\n MapFragment mapFragment = MapFragment.newInstance(\n new GoogleMapOptions()\n .mapId(getResources().getString(R.string.map_id)));\n\n### Kotlin\n\n val mapFragment = MapFragment.newInstance(\n GoogleMapOptions()\n .mapId(resources.getString(R.string.map_id))\n )\n\nIn Android Studio, build and run your app as you normally would. Custom\nstyles configured in the first step are applied to all maps with\nthe specified map ID.\n\n### iOS\n\nTo instantiate a map using a map ID, do the following:\n\n1. Create a `GMSMapID` with the map ID string from Cloud console.\n2. Create a `GMSMapView` specifying the map ID you just created.\n\n### Swift\n\n let camera = GMSCameraPosition(latitude: 47.0169, longitude: -122.336471, zoom: 12)\n let mapID = GMSMapID(identifier: \"\u003cvar label=\"map_id\" translate=\"no\"\u003eMAP_ID\u003c/var\u003e\")\n let mapView = GMSMapView(frame: .zero, mapID: mapID, camera: camera)\n self.view = mapView\n\n### Objective-C\n\n GMSCameraPosition *camera = [GMSCameraPosition cameraWithLatitude:47.0169\n longitude:-122.336471\n zoom:12];\n GMSMapID *mapID = [GMSMapID mapIDWithIdentifier:@\"\u003cvar label=\"map_id\" translate=\"no\"\u003eMAP_ID\u003c/var\u003e\"];\n GMSMapView *mapView = [GMSMapView mapWithFrame:CGRectZero mapID:mapID camera:camera];\n self.view = mapView;\n\nIf you are using your own map ID, you can set your\nmap ID in the Cloud console to have a new style\nat any time, and that style will be reflected on your map view automatically\nfor you and users within about six hours.\n\nIf you want to see the changes immediately, you can close out and restart\nyour app by exiting the app, forcing a quit of the app from the recently-used\napps list, and then reopening it. The updated map will then be visible.\n\n### JavaScript\n\nTo create a map with a map ID in your application code:\n\n1. If you are already customizing your map with embedded JSON code, remove\n the\n [`styles` property](/maps/documentation/javascript/reference/map#MapOptions.styles)\n from your `MapOptions` object; otherwise, skip this step.\n\n2. Add a map ID to the map using the `mapId` property. For example:\n\n```javascript\nmap = new google.maps.Map(document.getElementById('map'), {\ncenter: {lat: -34.397, lng: 150.644},\nzoom: 8,\nmapId: '\u003cvar translate=\"no\"\u003eMAP_ID\u003c/var\u003e'\n});\n```\n\n### Maps Static\n\nTo add a map ID to a new or existing map that uses one of our\nweb-service APIs, append the `map_id` URL parameter and set it to your\nmap ID. This example shows adding a map ID to\na map using Maps Static API. \n\n \u003cimg src=\"https://maps.googleapis.com/maps/api/staticmap?center=Brooklyn+Bridge,New+York,NY&zoom=13&size=600x300&maptype=roadmap&markers=color:blue%7Clabel:S%7C40.702147,-74.015794&markers=color:green%7Clabel:G%7C40.711614,-74.012318&markers=color:red%7Clabel:C%7C40.718217,-73.998284&key=YOUR_API_KEY&map_id=\u003cvar label=\"map_id\" translate=\"no\"\u003eMAP_ID\u003c/var\u003e&signature=YOUR_SIGNATURE\" /\u003e\n\nIf you have a digital signature in your Maps Static URL before adding your map ID, you will need to [create\nand add a new digital signature](/maps/documentation/maps-static/digital-signature) after adding your map ID. When generating your new URL signing secret, remember to remove your previous digital signature from the URL."]]