تنظيم صفحاتك في مجموعات
يمكنك حفظ المحتوى وتصنيفه حسب إعداداتك المفضّلة.
توضّح هذه الصفحة كيفية إنشاء مشكلة في أداة
تتبُّع المشاكل من Google.
لإنشاء مشكلة، يجب تسجيل الدخول إلى حساب Google. يجب أيضًا أن يكون لديك
إذنإنشاء المشاكل أو إدارة المكوّنات للمكوّن الذي سيتم
إنشاء المشكلة فيه. إذا كان لديك إذن التعليق على المشاكل، يمكنك ضبط عنوان المشكلة
ووصفها فقط. إذا كان لديك إذن تعديل المشاكل، يمكنك ضبط
الحقول الأخرى.
النماذج
تحدِّد النماذج في أداة "تتبُّع المشاكل" من Google القيم التلقائية للحقول في
المشاكل الجديدة في المكوّن. يحتوي كل مكوّن على ملف نموذج تلقائي، ولكن قد يحتوي على نماذج إضافية وفقًا للإعدادات التي يحدّدها موظف Google المعنيّ بإدارة المكوّن. لا يمكن للمستخدمين العلنيين والشركاء إنشاء نماذج مرتبطة بمكوّن أو تعديلها.
اختيار نموذج
عند إنشاء مشكلة في "أداة تتبُّع المشاكل"، يتم تلقائيًا اختيار ملف التنسيق
التلقائي للمكوّن. إذا كانت نماذج إضافية متاحة، يمكنك اختيارها من القائمة المنسدلة النموذج في صفحة إنشاء مشكلة.
عند اختيار نموذج، تتم تعبئة الحقول في الصفحة تلقائيًا
بالقيم التلقائية المحدّدة.
يفتح "نظام تتبُّع المشاكل" صفحة إنشاء مشكلة مع تحديد الحقل المكوّن. يعرض هذا الحقل قائمة منسدلة بالمكوّنات.
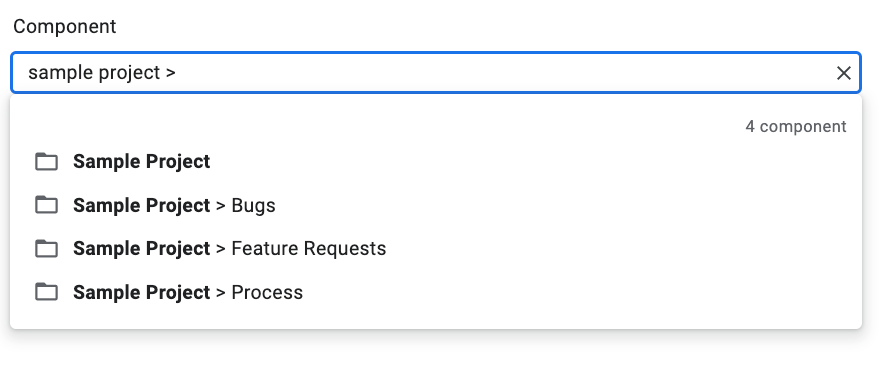
استخدِم القائمة المنسدلة للعثور على المكوّن الذي تريد فيه تسجيل
المشكلة. لا يمكنك العثور على المكوّنات إلا إذا كان لديك إذن إنشاء المشاكل أو
إدارة المكوّنات.
(اختياري) اختَر نموذجًا ينطبق على
المشكلة التي تُبلغ عنها على أفضل وجه. تتضمّن بعض المكوّنات نموذجًا تلقائيًا فقط.
أدخِل عنوانًا في حقل العنوان. يتم عرض العنوان عند
عرض تفاصيل المشكلة، بالإضافة إلى نتائج البحث وقوائم المنتجات الرائجة وغيرها من الأماكن التي تعرض قوائم بالمشاكل.
اختَر أولوية من القائمة المنسدلة الأولوية. لا يظهر حقل
الأولوية إلا إذا كان لديك إذن تعديل المشاكل.
اختَر نوع المشكلة من القائمة المنسدلة النوع. لا يظهر حقل النوع
إلا إذا كان لديك إذن تعديل المشاكل.
(اختياري) حدِّد مستلِمًا مفوَّضًا أو أضِف عناوين بريد إلكتروني (بما في ذلك
عناوين القوائم البريدية) إلى قائمتَي المتعاونون وCC. لا تظهر هذه
الحقول إلا إذا كان لديك إذن تعديل المشاكل.
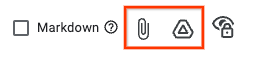
(إجراء مقترَح) أدخِل وصفًا للمشكلة في حقل الوصف. قد يكون هذا الحقل مملوءًا جزئيًا مسبقًا إذا كان النموذج المحدّد يقدّم
نص الوصف. يمكنك أيضًا وضع علامة في المربّع بجانب خيار
Markdown لكتابة الوصف بتنسيق markdown.
(اختياري) أضِف مرفقات من جهاز الكمبيوتر أو من موقع على Drive.
(اختياري) املأ الحقول المتقدّمة للمشكلة.
يمكنك عرض هذه الحقول من خلال تفعيل لوحة الحقول المتقدّمة. لا تظهر لوحة
الحقول المتقدّمة إلا إذا كان لديك إذن تعديل المشاكل. في معظم الحالات، يمكنك تخطّي الحقول المتقدّمة عند إنشاء
مشكلة. ومع ذلك، تتطلّب بعض المكوّنات منك إدخال قيم لها. في هذه الحالة، يظهر قسم الحقول المتقدّمة تلقائيًا، ويُوضع علامة نجمية (*) على الحقول المطلوبة.
انقر على الزر إنشاء لإرسال المشكلة أو انقر على إنشاء وبدء
مشكلة أخرى لإرسال المشكلة وفتح صفحة إنشاء مشكلة جديدة
تمّت تعبئتها مسبقًا بالقيم المستخدَمة في المشكلة التي أنشأتها للتو.
إنشاء مشكلة استنادًا إلى مشكلة حالية
يمكنك أيضًا إنشاء مشكلة استنادًا إلى مشكلة حالية. يمكن أن توفّر لك هذه الطريقة
الوقت من خلال استخدام المشكلة الحالية لملء حقول معيّنة مسبقًا.
لإنشاء مشكلة استنادًا إلى مشكلة حالية:
افتح المشكلة الحالية.
انقر على الزرّ بجانب إنشاء.
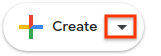
اختَر الطريقة التي تريد إنشاء المشكلة الجديدة بها من القائمة المنسدلة. تختلف options في القائمة المنسدلة حسب الصفحة التي تتم مشاهدتها. لا يظهر الزر إلا إذا كان هناك خيار واحد على الأقل
متاحًا.
هناك 7 خيارات محتملة.
Option
الوصف
حالات ظهوره
في المكوّن نفسه
بدء مشكلة جديدة مع تحديد
المكوّن على المكوّن
الحالي
(1) إدارة عنصر،
(2) عرض المشاكل في
عنصر، (3) عرض
مشكلة
مشابهة للصعوبة
الحالية
يبدأ بإنشاء مشكلة جديدة مع
نسخ حقول المشكلة
الحالية إلى
المشكلة الجديدة.
عرض مشكلة
محظور بسبب مشكلة
حالية
بدء مشكلة جديدة مع تحديد المشكلة الحالية على أنّها مشكلة عائق
عرض مشكلة
حظر المشكلة
الحالية
بدء مشكلة جديدة مع تحديد المشكلة الحالية على أنّها مشكلة محظورة
عرض مشكلة
العنصر الرئيسي لل
مشكلة الحالية
بدء مشكلة جديدة مع تحديد المشكلة الحالية كصعوبة فرعية
عرض مشكلة
الطفل من
الإصدار الحالي
بدء مشكلة جديدة مع تحديد المشكلة الحالية كصعوبة رئيسية
عرض مشكلة
في القائمة الرائجة نفسها
بدء مشكلة جديدة مع
إضافة القائمة المفضّلة الحالية
إليها
(1) إدارة قائمة المحتوى الرائج،
(2) عرض المشاكل ضمن
قائمة المحتوى الرائج
جميع الحقوق محفوظة. إنّ Java علامة تجارية مسجَّلة لشركة Oracle و/أو شركائها التابعين.
تاريخ التعديل الأخير: 2025-07-25 (حسب التوقيت العالمي المتفَّق عليه)
[null,null,["تاريخ التعديل الأخير: 2025-07-25 (حسب التوقيت العالمي المتفَّق عليه)"],[[["\u003cp\u003eIssue creation in Google Issue Tracker requires a Google account and specific permissions (Create Issue, Admin, Comment on Issues, or Edit Issues) depending on the desired actions.\u003c/p\u003e\n"],["\u003cp\u003eTemplates, defined by Google employees, provide default field values for new issues within a component and can be selected during issue creation to streamline the process.\u003c/p\u003e\n"],["\u003cp\u003eThe process of creating an issue involves selecting a component, entering details such as title, priority, type, and description, and optionally adding attachments and configuring advanced fields.\u003c/p\u003e\n"],["\u003cp\u003eIssue Tracker provides options to create new issues based on existing ones, leveraging information like component, hotlist, or even copying field values for efficiency.\u003c/p\u003e\n"],["\u003cp\u003eUsers can explore further information regarding issues, components, and managing issues through provided links.\u003c/p\u003e\n"]]],[],null,["# Create an Issue\n\nThis page shows how to create an [issue](../concepts/issues) in Google Issue\nTracker.\n\nTo create an issue, you must be signed in to a Google Account. You also must\nhave **Create Issues** or **Admin Components**\n[permission](../concepts/access-control) for the component where the issue will\nbe created. If you have **Comment on Issues** permission, you may set the issue\ntitle and description only. If you have **Edit Issues** permission, you can set\nother fields.\n\nTemplates\n---------\n\nTemplates in Google Issue Tracker specify default values for fields in new\nissues in a [component](../concepts/components). Each component has a default\ntemplate but may have additional templates as configured by the Google employee\nwho is responsible for managing it. Public and partner users cannot create or\nmodify the templates associated with a component.\n\n### Choose a template\n\nWhen you [create an issue](../guides/create-issue-ui) in Issue Tracker, the\ndefault template for the component is automatically selected. If additional\ntemplates are available, you can select them from the **Template** drop-down\nlist on the **Create Issue** page.\n\nWhen you select a template, the fields in the page are automatically populated\nwith the default values defined.\n\nCreate an issue\n---------------\n\nTo create an issue:\n\n1. [Open Issue Tracker](../guides/access-ui) in your web browser.\n\n2. Click **Create Issue**.\n\n Issue Tracker opens the **Create Issue** page and has the **Component**\n field selected. This field shows a drop-down list of components.\n\n3. Use the drop-down list to [find the component](/issue-tracker/guides/find-a-component) where you want to create\n the issue. You can only find components where you have **Create Issues** or\n **Admin Components** permission.\n\n4. (Optional) Choose a [template](../concepts/templates) that best applies to\n the issue you are reporting. Some components only have a default template.\n\n5. Enter a [title](../references/glossary-of-fields#title) in the **Title** field. The title is displayed when you\n view the details of the issue, as well as in search results, hotlists and\n other places where you are viewing lists of issues.\n\n6. Select a [priority](../references/glossary-of-fields#priority) from the **Priority** drop-down list. The\n **Priority** field is only visible if you have **Edit Issues** permission.\n\n7. Select the issue [type](../references/glossary-of-fields#type) from the **Type** drop-down list. The **Type**\n field is only visible if you have **Edit Issues** permission.\n\n8. (Optional) Designate an [assignee](../references/glossary-of-fields#assignee) or add email addresses (including\n mailing list addresses) to the [Collaborators](../references/glossary-of-fields#collaborators) and [CC](../references/glossary-of-fields#cc) lists. These\n fields are only visible if you have **Edit Issues** permission.\n\n | Depending on your [email notification settings](/issue-tracker/guides/set-notification-preferences), you might need to add yourself to the CC list to receive notifications.\n9. (Recommended) Enter a [description](../references/glossary-of-fields#description) for the issue in the **Description**\n field. This field might already be partially populated for you if\n description text is provided by the selected template. You can also check\n the **Markdown** option to write the description as\n [markdown](https://commonmark.org) text.\n\n10. (Optional) Add attachments from your computer or from a Drive location.\n\n11. (Optional) Fill in the advanced fields for the issue.\n\n You can view these fields by toggling the **Advanced fields** panel. The\n **Advanced fields** panel is only visible if you have **Edit Issues**\n permission. In most cases, you can skip advanced fields when creating an\n issue. However, some components require you to enter values for them. If\n this is the case, the **Advanced fields** section appears automatically, and\n the required fields are marked with an asterisk (\\*).\n\n12. Click the **Create** button to submit the issue or click **Create \\& Start\n Another** to submit the issue and open a new **Create Issue** page\n pre-populated with the values used for the issue you just created.\n\n| Hover over the name of a field in the Create Issue page to view a field description.\n\nCreate an issue based on an existing one\n----------------------------------------\n\nYou can also create an issue based on an existing one. This method can save you\ntime by using the existing issue to pre-fill certain fields.\n\nTo create an issue based on an existing one:\n\n1. Open the existing issue.\n\n2. Click the button next to **Create**.\n\n3. Choose how you want to create the new issue from the drop-down list. The\n options in the drop-down list vary depending on the page that you are\n viewing. The button only becomes visible if there is at least one option\n available.\n\nThere are 7 possible options.\n\n| Option | Description | Appears when |\n|------------------------------|----------------------------------------------------------------------------------|-----------------------------------------------------------------------------------|\n| **In Same Component** | Starts a new issue with component set to the current component. | (1) Managing a component, (2) Viewing issues in a component, (3) Viewing an issue |\n| **Similar To Current Issue** | Starts a new issue with the fields of the current issue copied to the new issue. | Viewing an issue |\n| **Blocked By Current Issue** | Starts a new issue with the current issue as a blocking issue. | Viewing an issue |\n| **Blocking Current Issue** | Starts a new issue with the current issue as a blocked issue. | Viewing an issue |\n| **Parent Of Current Issue** | Starts a new issue with the current issue as a child issue. | Viewing an issue |\n| **Child Of Current Issue** | Starts a new issue with the current issue as a parent issue. | Viewing an issue |\n| **In Same Hotlist** | Starts a new issue with the current hotlist added to it. | (1) Managing a hotlist, (2) Viewing issues under a hotlist |\n\n| The **Similar To Current Issue** option does not copy the changelist, duplicate issue ID, CC or reporter fields from the original issue.\n\nWhat's next\n-----------\n\n- [Learn more about issues](../concepts/issues)\n- [Learn more about components](../concepts/components)\n- [View and edit issues](/issue-tracker/guides/edit-issue-ui)"]]