
目标
了解如何将 PlaceSearchElement 与 Google 地图集成,帮助用户通过附近搜索或文本搜索查找地点,从而提升他们探索地图注点的能力。使用“地点详情”紧凑元素,提供应用中显示的地点的更多详细信息。
什么是 PlaceSearchElement?
PlaceSearchElement 是 Maps JavaScript API 中 Places UI Kit 的一部分。它是一个 HTML 元素,可直接在应用中以列表格式呈现地点搜索结果。此元素可简化显示通过附近搜索或文本搜索找到的地点的过程,从而提供顺畅的地点发现用户体验。当用户从列表中选择某个地点时,您可以在地图上显示其详细信息,通常使用信息窗口和地点详情元素。
直观呈现地点发现
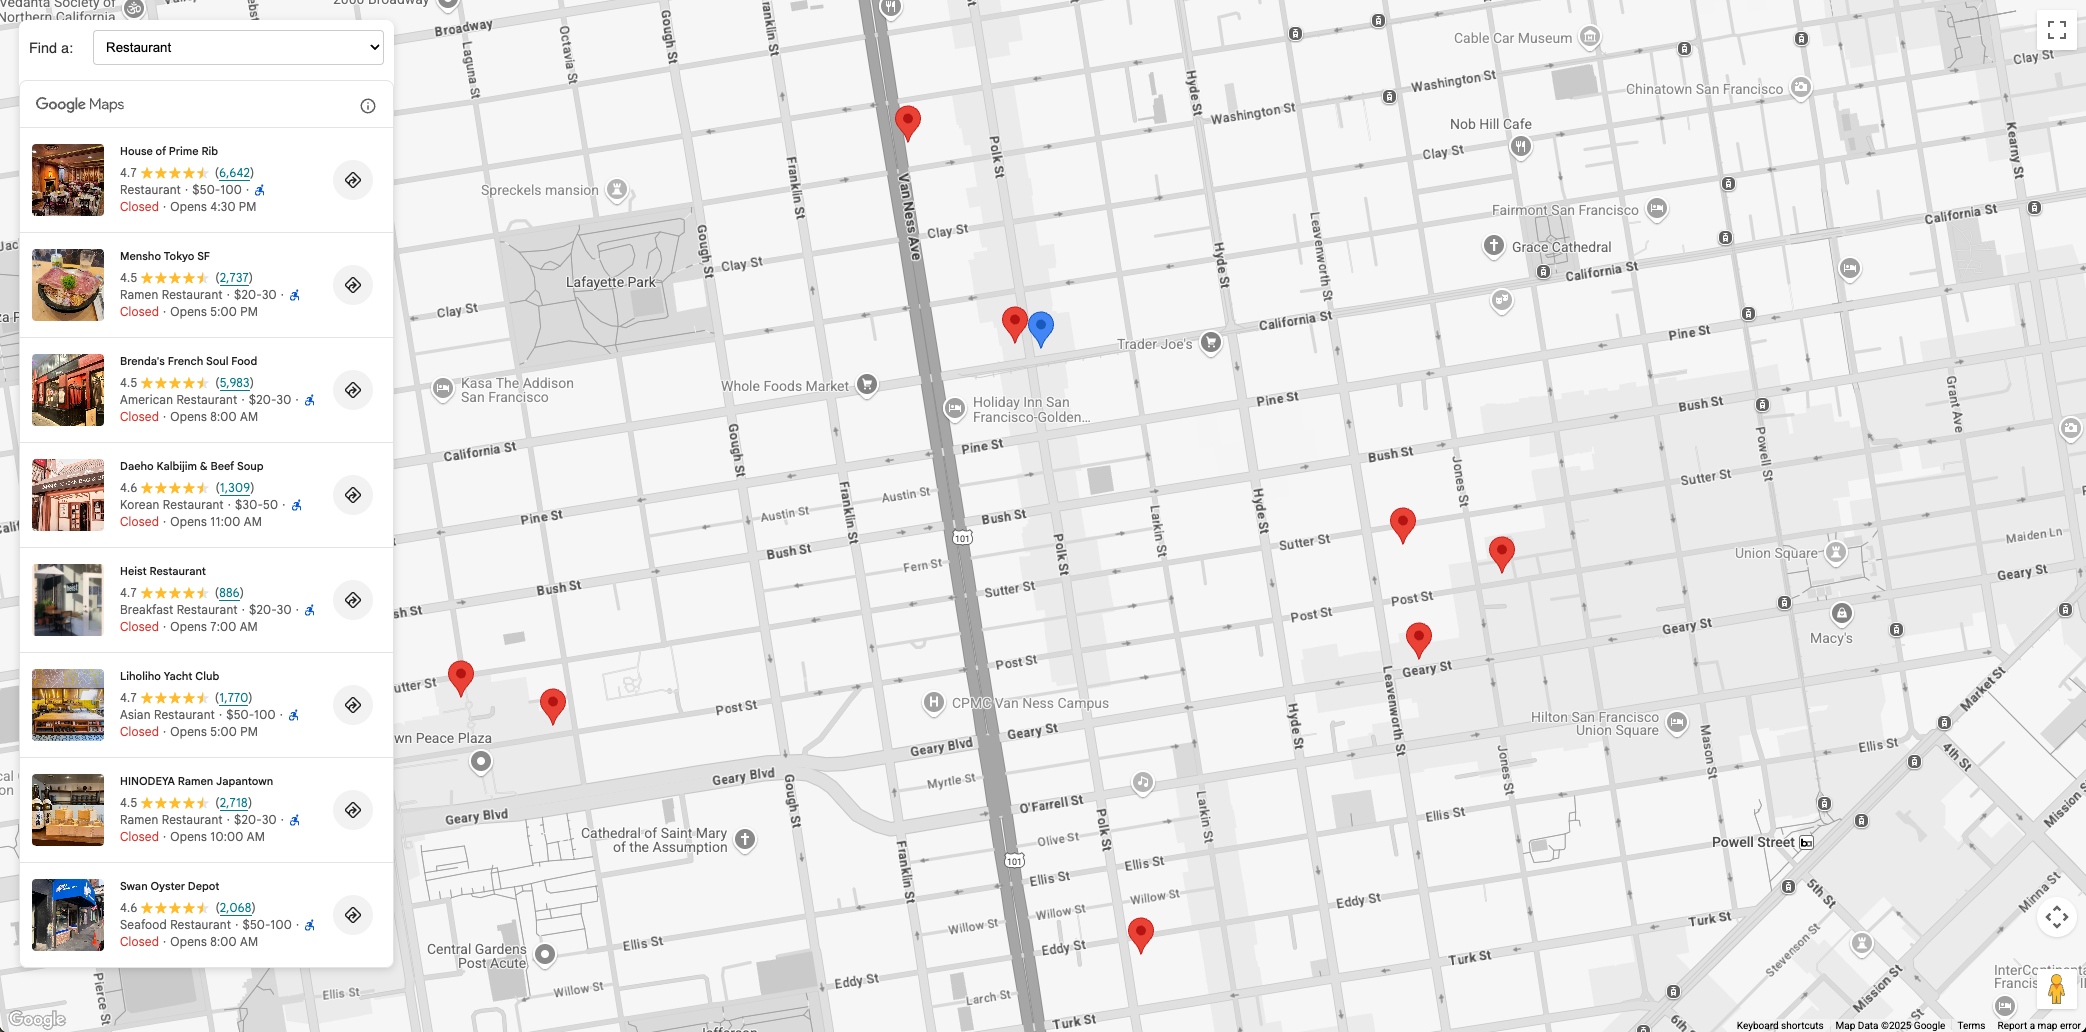
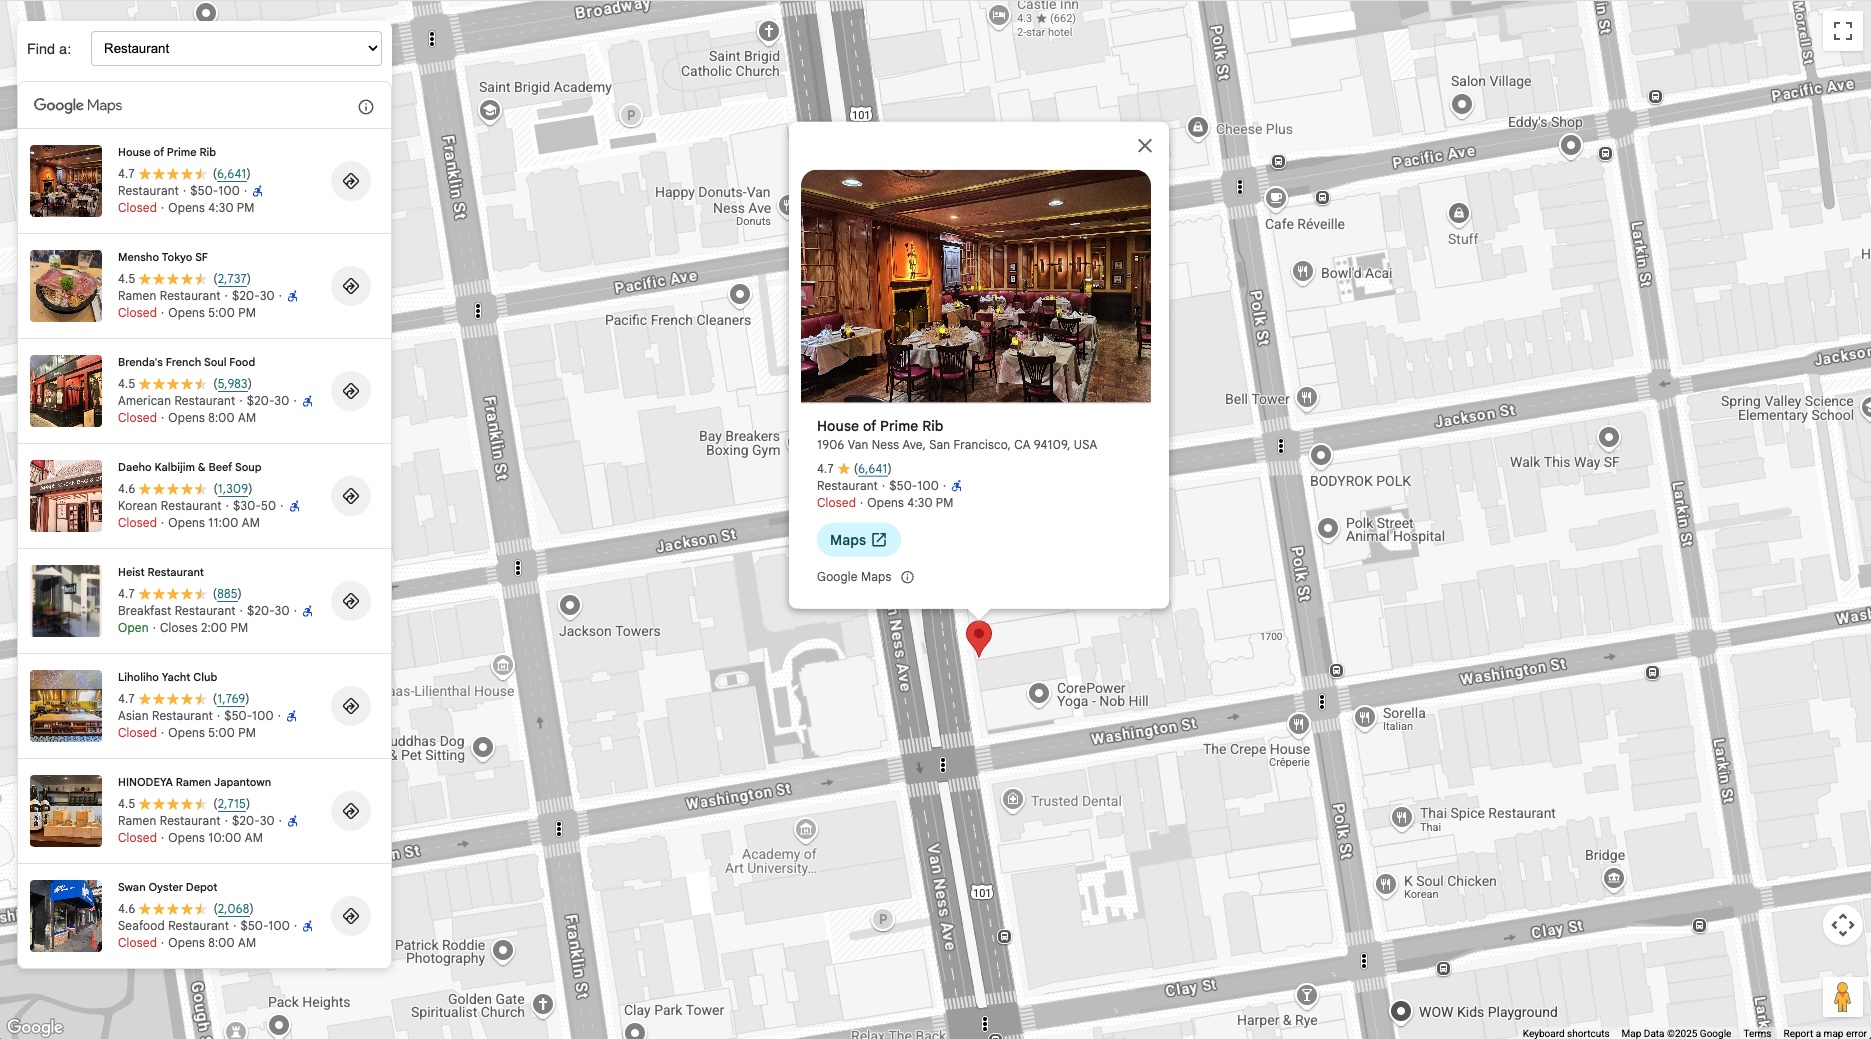
下图展示了 PlaceSearchElement 的实际应用示例。左侧显示餐厅列表 (PlaceSearchElement)。选择某家餐厅后,其详细信息会显示在地图上的信息窗口中,并且地图会以其位置为中心。
地点发现用例
集成 PlaceSearchElement 可以增强不同行业的各种应用:
- 旅游业:允许游客搜索某个区域内的景点、酒店或特定类型的美食。
- 房地产:让潜在买家或租户能够找到附近的学校、超市或公共交通选项。
- 物流和服务:协助驾驶员寻找电动车辆充电站、加油站或特定服务中心。
解决方案工作流:实现地点发现
本部分将引导您集成 PlaceSearchElement,以便在地图上发现地点,并提供与 Places UI Kit 交互的代码段。了解如何初始化地图,以及如何实现附近搜索和文本搜索。最后,使用“地点详情”元素,在用户点击地图上的图钉时显示有关地点的更多详情。
前提条件
建议您熟悉以下文档:
PlaceSearchElement- 用于通过“附近搜索”或“文本搜索”公开地点- 地点详情元素 - 用于显示单个地点的详细信息
- Maps JavaScript API - 用于在页面上显示地图,以及导入 Places UI Kit
在项目中启用 Maps JavaScript API 和 Places UI Kit。
在开始之前,请验证您是否已加载 Maps JavaScript API 并导入了所需的库。本文档还假定您具备 Web 开发(包括 HTML、CSS 和 JavaScript)方面的实践知识。
向页面添加地图
第一步是向网页添加地图。此地图将用于以可选择图钉的形式显示 PlaceSearchElement 结果。
您可以通过以下两种方式向页面添加地图:
- 使用
gmp-mapHTML Web 组件。 - 使用 JavaScript。
此页面上的代码段是使用 JavaScript 映射生成的。
地图可以以您希望用户搜索的地点(例如酒店)为中心,也可以在初始化时请求获取用户的当前位置,并以该位置为中心。在本文档中,我们将使用固定位置来锚定搜索。
如果您要直观呈现固定地点(例如酒店)附近的地点,请在地图上放置一个标记来表示该地点。例如:
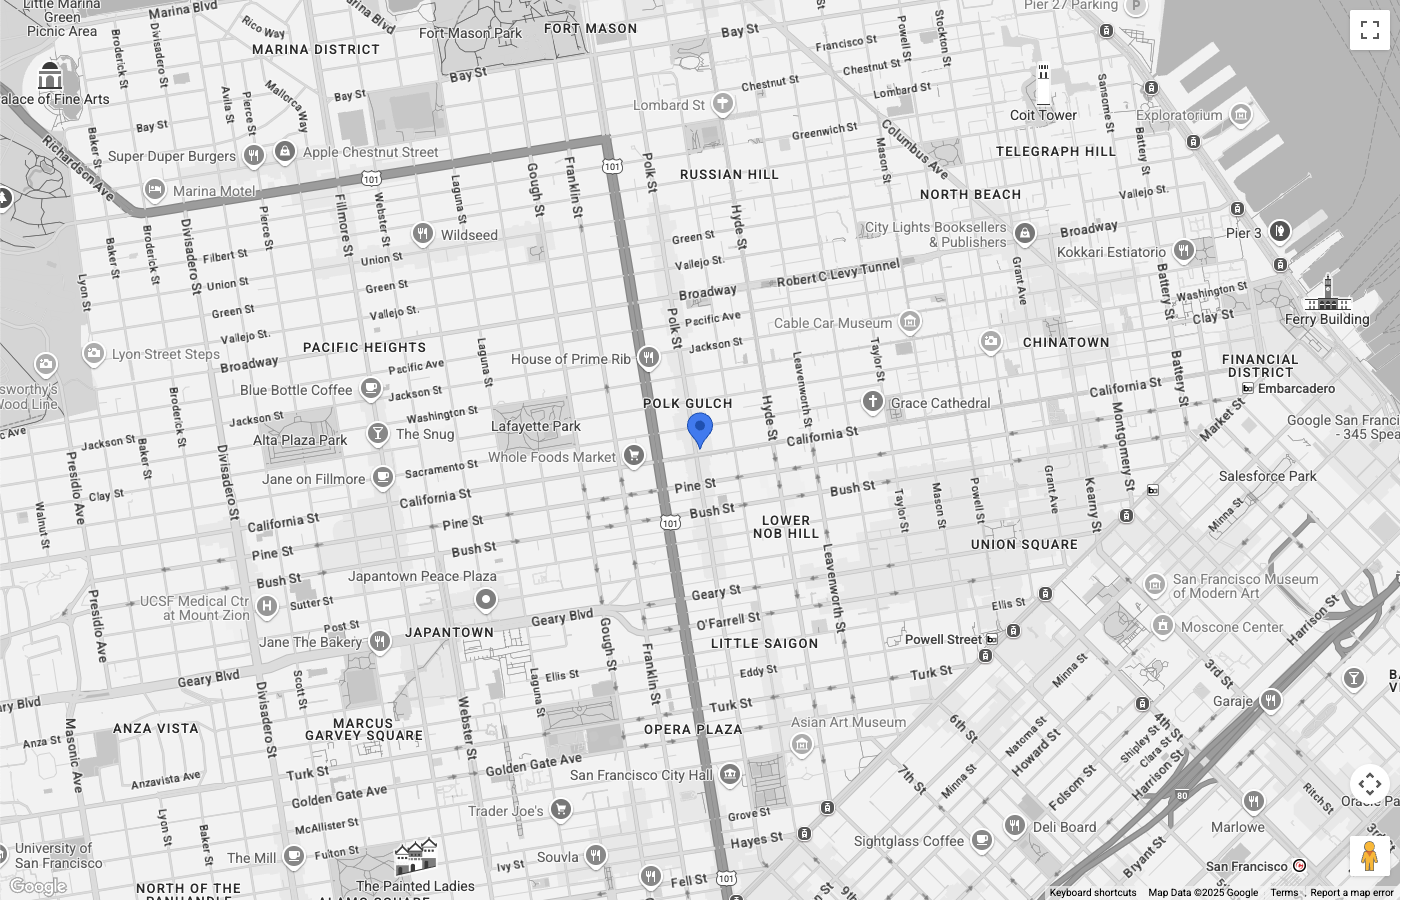
地图以旧金山为中心,并用蓝色图钉表示我们正在搜索其附近地点的地点。图钉颜色已使用 PinElement 自定义。
地图类型控件已从界面中隐藏。
设置PlaceSearchElement
现在,设置 HTML 和 CSS 以显示 PlaceSearchElement。此示例将元素悬浮在地图左侧上方,但您可以尝试不同的布局,以适应您的应用。
PlaceSearchElement 使用声明式方法。您无需完全在 JavaScript 中进行配置,而是通过在主 <gmp-place-search> 组件中嵌套请求元素(例如 <gmp-place-nearby-search-request>),直接在 HTML 中定义搜索类型。
在 HTML 代码中,初始化一个 <gmp-place-search> 元素。使用 selectable 属性可对结果启用点击事件。在其中添加一个 <gmp-place-nearby-search-request>,以指定此元素将用于附近搜索。
<gmp-place-search selectable>
  <gmp-place-nearby-search-request>
  </gmp-place-nearby-search-request>
</gmp-place-search>
为了执行初始搜索并显示结果,我们将使用 JavaScript 获取对嵌套请求元素的引用并设置其属性。初始化一个 Circle 作为 locationRestriction,并使用上一步中的标记位置作为中心点。然后,在请求元素上设置 locationRestriction 和 includedPrimaryTypes 属性以触发搜索。
此操作的代码段如下所示:
// Get references to the Place Search and its nested request element
const placeSearchElement = document.querySelector("gmp-place-search");
const placeSearchRequestElement = document.querySelector("gmp-place-nearby-search-request");

// Define the location restriction for the search
const circleRestriction = new Circle({
    center: marker.position,
    radius: 500
});

// Set the properties on the request element to perform an initial search for restaurants.
placeSearchRequestElement.locationRestriction = circleRestriction;
placeSearchRequestElement.includedPrimaryTypes = ['restaurant'];
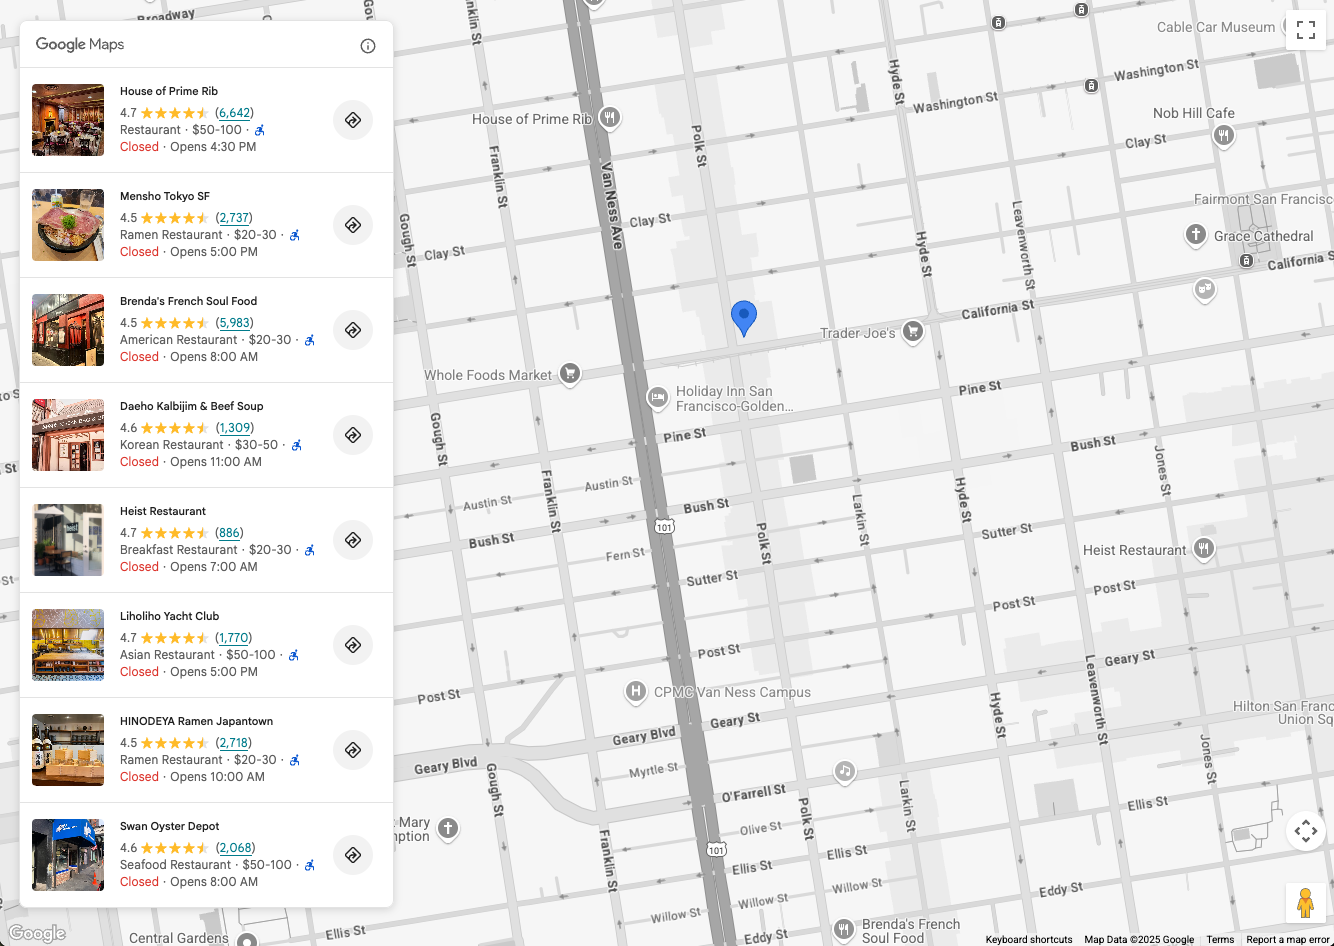
以下是应用在此阶段可能呈现的效果示例:
允许用户搜索
PlaceSearchElement 允许使用两种搜索选项:
<gmp-place-nearby-search-request>- 使用地点类型呈现地点附近搜索中的搜索结果。<gmp-place-text-search-request>- 使用自由文本输入(例如“旧金山的寿司”)呈现地点文本搜索中的搜索结果。
这些是 <gmp-place-search> 中的嵌套元素。然后,您可以使用 JavaScript 在该嵌套请求元素上设置属性,从而触发搜索。
本部分介绍了如何实现这两种方法。
附近搜索
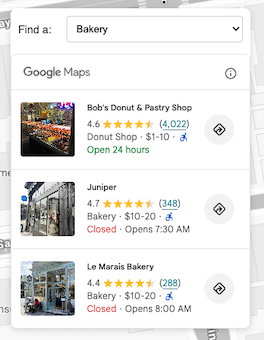
为了让用户能够执行附近搜索,您首先需要一个界面元素,以便他们选择地点类型。选择最适合您应用的选择方法,例如,填充了所选地点类型的下拉列表。
建议选择与您的应用场景相关的类型子集。例如,如果您正在开发一款应用来向游客展示酒店附近有哪些景点,则可以选择:bakery、coffee_shop、museum、restaurant 和 tourist_attraction。
您的 HTML 应包含 <gmp-place-search> 元素,其中嵌套了 <gmp-place-nearby-search-request>。
<gmp-place-search selectable>
  <gmp-place-nearby-search-request>
  </gmp-place-nearby-search-request>
</gmp-place-search>
接下来,在地点类型选择器上为 change 事件创建一个 JavaScript 监听器。此监听器将调用一个函数来更新 <gmp-place-nearby-search-request> 元素的属性,这会自动触发新的搜索并更新列表。
// Get a reference to the nested request element
const placeSearchRequestElement = document.querySelector('gmp-place-nearby-search-request');

// Function to update the place search based on the selected type
function updatePlaceList() {
    const selectedType = placeTypeSelect.value;
    if (!selectedType) {
        // If no type is selected, don't perform a search.
        // You could optionally hide the list or clear previous results here.
        placeSearchElement.style.display = 'none';
        return;
    }
    placeSearchElement.style.display = 'block';

    // Set properties on the request element to trigger a new search
    placeSearchRequestElement.locationRestriction = searchCircle;
    placeSearchRequestElement.maxResultCount = 8;
    placeSearchRequestElement.includedPrimaryTypes = [selectedType];
}
locationRestriction 使用设置步骤中的同一 searchCircle。includedPrimaryTypes 属性会设置为用户选择的值。此外,还设置了可选的 maxResultCount,以限制结果数量。
文本搜索
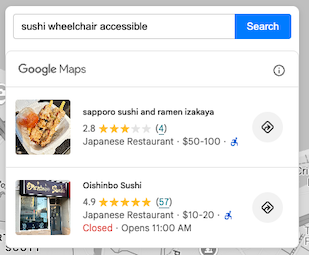
如需启用文本搜索,您必须更改 HTML 配置。您需要嵌套一个 <gmp-place-text-search-request> 元素,而不是附近搜索请求。
<gmp-place-search selectable>
  <gmp-place-text-search-request>
  </gmp-place-text-search-request>
</gmp-place-search>
在界面中添加文本输入框和搜索按钮。为按钮的 click 事件创建 JavaScript 监听器。事件处理脚本将获取用户的输入并更新 <gmp-place-text-search-request> 元素的属性,以执行搜索。
// Get a reference to the text search request element
const placeTextSearchRequestElement = document.querySelector('gmp-place-text-search-request');
const textSearchInput = document.getElementById('textSearchInput');
const textSearchButton = document.getElementById('textSearchButton');

textSearchButton.addEventListener('click', performTextSearch);

function performTextSearch() {
    const query = textSearchInput.value.trim();
    if (!query) {
        console.log("Search query is empty.");
        return;
    }
    // Set properties on the request element to trigger a new search
    placeTextSearchRequestElement.textQuery = query;
    placeTextSearchRequestElement.locationBias = map.getBounds();
    placeTextSearchRequestElement.maxResultCount = 8;
}
在这里,我们使用用户的输入设置 textQuery 属性。我们还使用当前地图边界提供 locationBias,这会告知 API 优先返回该区域内的结果,但不会严格限制结果。可选的 maxResultCount 用于限制返回的结果数。
显示地点图钉和详情
现在,应用可以执行地点搜索并填充元素。在下一步中,我们将通过以下方式增强其功能:
- 在地图上为
PlaceSearchElement中填充的每个地点显示图钉。 - 允许用户点击图钉或
PlaceSearchElement中的地点,以显示有关该特定地点的更多详细信息。
无论应用使用的是附近搜索还是文本搜索,此步骤的原理都是相同的。
首先,向 JavaScript 代码中添加一个全局变量,用于存储地点标记。 这样,您就可以在搜索结果发生变化时移除这些标记,并处理点击事件。
let markers = {};
创建一个函数,用于向地图添加标记。每当加载新的搜索结果时,系统都会调用此函数。它将:
- 从地图中移除所有现有的地点标记。
- 循环遍历
PlaceSearchElement中的结果,并为每个结果添加一个标记。 - 调整地图的边界,以便所有新标记都可见。
如需监听搜索结果何时可用,请向 <gmp-place-search> 元素添加 gmp-load 事件监听器。此事件会在搜索完成且结果呈现后触发。
我们将在搜索函数(例如 updatePlaceList)中添加监听器,并使用 { once: true } 选项确保它仅针对当前搜索的结果触发。
// In your search function, after setting the request properties:
placeSearchElement.addEventListener('gmp-load', addMarkers, { once: true });
addMarkers 函数如下所示:
async function addMarkers() {
    const { LatLngBounds } = await google.maps.importLibrary("core");
    const bounds = new LatLngBounds();

    if (placeSearchElement.places.length > 0) {
        // Remove existing markers
        for (const m in markers) {
            markers[m].map = null;
        }
        markers = {};

        // Loop through each place from the search results
        // and add a marker for each one.
        for (const place of placeSearchElement.places) {
            const marker = new google.maps.marker.AdvancedMarkerElement({
                map: map,
                position: place.location,
            });

            markers[place.id] = marker;
            bounds.extend(place.location);
            marker.collisionBehavior = google.maps.CollisionBehavior.REQUIRED_AND_HIDES_OPTIONAL;

            // Add a click listener for each marker.
            marker.addListener('gmp-click', (event) => {
                // The main logic for showing details will go here.
            });
        }
        // Position the map to display all markers.
        map.setCenter(bounds.getCenter());
        map.fitBounds(bounds);
    }
}
完成此步骤后,应用将如下所示,能够为 PlaceSearchElement 返回的每个地点显示标记:
现在,地图上已经有了标记,最后一步是处理标记和元素点击事件,以显示包含地点详情的信息窗口,这些详情由地点详情元素提供。在本示例中,我们将使用地点详情紧凑元素。
将地点详情紧凑元素 HTML 添加到代码中,例如:
<gmp-place-details-compact orientation="vertical" style="display: none;">
    <gmp-place-all-content></gmp-place-all-content>
    <gmp-place-attribution light-scheme-color="gray" dark-scheme-color="white"></gmp-place-attribution>
</gmp-place-details-compact>
style 设置为 display: none;在需要之前,它不会显示。
gmp-place-all-content 会传递给该函数,以呈现所有元素内容。如需选择要呈现的内容,请参阅地点详情紧凑元素文档。
在 JavaScript 中创建一个全局变量,用于保存对地点详情紧凑元素的引用,并在初始化代码中填充该变量,例如:
let placeDetailsElement;
...
placeDetailsElement = document.querySelector('gmp-place-details-compact');
在 addMarkers 函数中,为每个标记添加 gmp-click 事件监听器,并通过传递当前标记的地点 ID,将地点详情紧凑元素配置为显示地点详情。
完成此操作后,系统会打开一个信息窗口,以显示锚定在标记上的地点详情紧凑元素。
最后,地图会定位到所选地点的视口,使其可见。
async function addMarkers() {
          ...
            marker.addListener('gmp-click', (event) => {
                //Set up Place Details Compact Widget
                placeDetailsElement.style.display = "block";
                // Remove any existing place request element
                const existingPlaceRequest = placeDetailsElement.querySelector('gmp-place-details-place-request');
                if (existingPlaceRequest) {
                    existingPlaceRequest.remove();
                }
                // Create and configure the new place request element
                const placeRequestElement = new google.maps.places.PlaceDetailsPlaceRequestElement({ place: place.id });
                // Prepend the new place request element to the main widget
                placeDetailsElement.prepend(placeRequestElement);
                if (infoWindow.isOpen) {
                    infoWindow.close();
                }
                infoWindow.setOptions({
                    content: placeDetailsElement
                });
                infoWindow.open({
                    anchor: marker,
                    map: map
                });
                // Position the map to show the selected place
                placeDetailsElement.addEventListener('gmp-load', () => {
                    map.fitBounds(place.viewport, { top: 500, left: 400 });
                });
            });
          ...
        });
    }
}
如需让用户能够点击地点列表元素中的地点以显示地点详情紧凑元素,请在调用 configureFromSearchNearbyRequest 后将以下代码添加到 JavaScript 代码中。
placeSearchElement.addEventListener("gmp-select", ({ place }) => {
    if (markers[place.id]) {
        markers[place.id].click();
    }
});
完成此步骤后,应用将能够使用附近搜索或文本搜索来填充地点列表元素。此操作的结果将在地图上显示图钉,点击图钉或地点列表元素中的地点将显示一个信息窗口,其中包含地点详情(由地点详情紧凑元素提供)。
该应用将如下所示:
总结
PlaceSearchElement 与地点详情紧凑元素相结合,可让您以简化的方式向 Google Maps Platform 应用添加丰富的地点探索功能。
立即试用 Places UI Kit,让用户能够通过附近搜索和文本搜索来查找和探索地点,并显示丰富的地点详情,从而增强他们与地点发现用例的互动。
贡献者
Henrik Valve | DevX 工程师