
כדי להשתמש במדריך הזה, צריך להגדיר כמה הגדרות מקדימות שמוגדרות בשלבים הקודמים. אם עוד לא עשיתם את זה, כדאי להתחיל עם ההקדמה.
במדריך הזה נעשה שימוש גם בטוקנים לרענון. זהו תהליך עבודה שבו משתמש עם הרשאת גישה מספקת לחשבון Google Ads יכול להעניק לאפליקציה הרשאה לבצע קריאות API אופליין לחשבון, בהגדרה חד-פעמית, ללא התערבות נוספת של המשתמש. אפשר להשתמש באסימוני רענון כדי ליצור תהליכי עבודה במצב אופליין, כמו משימות cron או צינורות נתונים, וגם תהליכי עבודה אינטראקטיביים, כמו אפליקציות אינטרנט או אפליקציות לנייד.
אחזור טוקן רענון
ב-Google Ads API נעשה שימוש ב-OAuth 2.0 כמנגנון ההרשאה. כברירת מחדל, אימות OAuth 2.0 מנפיק אסימון גישה שתוקפו פג אחרי זמן מוגבל. כדי לחדש את אסימון הגישה באופן אוטומטי, צריך להנפיק במקום זאת אסימון רענון.
CLI של gcloud
מריצים את הכלי gcloud CLI כדי ליצור את אסימון הרענון:
gcloud auth application-default \
    login --scopes=https://www.googleapis.com/auth/adwords,https://www.googleapis.com/auth/cloud-platform \
    --client-id-file=<path_to_credentials.json>
קובץ
credentials.jsonהוא מ השלב הקודם.הפקודה
gcloudפותחת חלון כניסה לחשבון Google בחלון דפדפן חדש, ומעבירה אתכם דרך שלבי האימות של OAuth 2.0. חשוב לוודא שאתם נכנסים לחשבון באמצעות כתובת האימייל שציינתם בשלב שבו זיהיתם את מספר הלקוח שלכם להתחברות. אם האפליקציה לא מאומתת, יכול להיות שיוצג מסך אזהרה. במקרים כאלה, אפשר ללחוץ על הקישור הצגת אפשרויות מתקדמות ואז על האפשרות מעבר אל PROJECT_NAME (לא מאומת).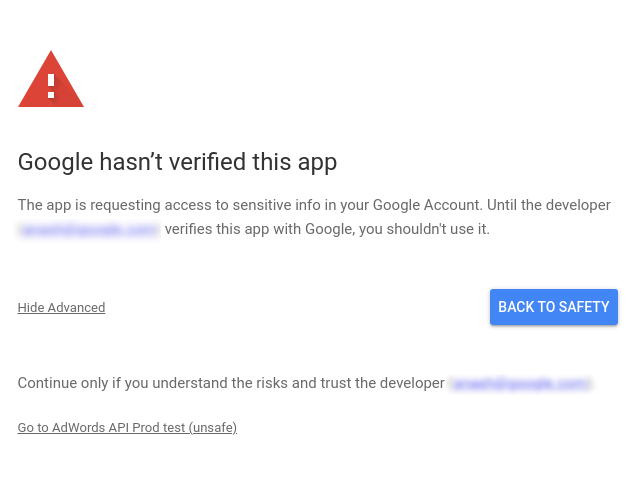
אחרי שמאמתים את היקפי ההרשאות, לוחצים על הלחצן המשך כדי להעניק את ההרשאה. הדפדפן עובר אל
https://cloud.google.com/sdk/auth_success, מה שמצביע על כך שהאימות הצליח. בדף מוצגת ההודעה הבאה:Authorization code granted. Close this tab.
הפקודה
gcloudמדפיסה את ההודעה הבאה:Credentials saved to file: [/****/.config/gcloud/application_default_credentials.json]
עכשיו פותחים את קובץ
application_default_credentials.json. התוכן שלו צריך להיות דומה לזה:{ "account": "", "client_id": "******.apps.googleusercontent.com", "client_secret": "******", "refresh_token": "******", "type": "authorized_user", "universe_domain": "googleapis.com" }
אחרים
אם אתם מעדיפים להשתמש ב-curl או בלקוח HTTP משלכם, תוכלו לעיין במדריך בנושא
OAuth 2.0 לאפליקציות לנייד ולמחשב כדי לראות דוגמה.
ביצוע קריאה ל-API
בוחרים את הלקוח הרצוי כדי לקבל הוראות לגבי ביצוע קריאה ל-API:
Java
הארטיפקטים של ספריות הלקוח מתפרסמים במאגר Maven Central. מוסיפים את ספריית הלקוח כתלות לפרויקט באופן הבא:
התלות ב-Maven היא:
<dependency>
  <groupId>com.google.api-ads</groupId>
  <artifactId>google-ads</artifactId>
  <version>40.0.0</version>
</dependency>
התלות ב-Gradle היא:
implementation 'com.google.api-ads:google-ads:40.0.0'
יוצרים קובץ ~/ads.properties עם התוכן הבא:
api.googleads.clientId=INSERT_CLIENT_ID_HERE
api.googleads.clientSecret=INSERT_CLIENT_SECRET_HERE
api.googleads.refreshToken=INSERT_REFRESH_TOKEN_HERE
api.googleads.developerToken=INSERT_DEVELOPER_TOKEN_HERE
api.googleads.loginCustomerId=INSERT_LOGIN_CUSTOMER_ID_HERE
יוצרים אובייקט GoogleAdsClient באופן הבא:
GoogleAdsClient googleAdsClient = null;
try {
  googleAdsClient = GoogleAdsClient.newBuilder().fromPropertiesFile().build();
} catch (FileNotFoundException fnfe) {
  System.err.printf(
      "Failed to load GoogleAdsClient configuration from file. Exception: %s%n",
      fnfe);
  System.exit(1);
} catch (IOException ioe) {
  System.err.printf("Failed to create GoogleAdsClient. Exception: %s%n", ioe);
  System.exit(1);
}
לאחר מכן, מריצים דוח קמפיינים באמצעות השיטה GoogleAdsService.SearchStream כדי לאחזר את הקמפיינים בחשבון. המדריך הזה לא כולל פרטים על דיווח.
private void runExample(GoogleAdsClient googleAdsClient, long customerId) {
try (GoogleAdsServiceClient googleAdsServiceClient =
googleAdsClient.getLatestVersion().createGoogleAdsServiceClient()) {
String query = "SELECT campaign.id, campaign.name FROM campaign ORDER BY campaign.id";
// Constructs the SearchGoogleAdsStreamRequest.
SearchGoogleAdsStreamRequest request =
SearchGoogleAdsStreamRequest.newBuilder()
.setCustomerId(Long.toString(customerId))
.setQuery(query)
.build();
// Creates and issues a search Google Ads stream request that will retrieve all campaigns.
ServerStream<SearchGoogleAdsStreamResponse> stream =
googleAdsServiceClient.searchStreamCallable().call(request);
// Iterates through and prints all of the results in the stream response.
for (SearchGoogleAdsStreamResponse response : stream) {
for (GoogleAdsRow googleAdsRow : response.getResultsList()) {
System.out.printf(
"Campaign with ID %d and name '%s' was found.%n",
googleAdsRow.getCampaign().getId(), googleAdsRow.getCampaign().getName());
}
}
}
}
C#
חבילות של ספריות לקוח מתפרסמות במאגר Nuget.org. מתחילים בהוספת הפניה ל-NuGet לחבילה Google.Ads.GoogleAds.
dotnet add package Google.Ads.GoogleAds --version 18.1.0יוצרים אובייקט GoogleAdsConfig עם ההגדרות הרלוונטיות, ומשתמשים בו כדי ליצור אובייקט GoogleAdsClient.
GoogleAdsConfig config = new GoogleAdsConfig()
{
    DeveloperToken = "******",
    OAuth2Mode = "APPLICATION",
    OAuth2ClientId = "******.apps.googleusercontent.com",
    OAuth2ClientSecret = "******",
    OAuth2RefreshToken = "******",
    LoginCustomerId = ******
};
GoogleAdsClient client = new GoogleAdsClient(config);
לאחר מכן, מריצים דוח קמפיינים באמצעות השיטה GoogleAdsService.SearchStream כדי לאחזר את הקמפיינים בחשבון. המדריך הזה לא כולל פרטים על דיווח.
public void Run(GoogleAdsClient client, long customerId)
{
// Get the GoogleAdsService.
GoogleAdsServiceClient googleAdsService = client.GetService(
Services.V21.GoogleAdsService);
// Create a query that will retrieve all campaigns.
string query = @"SELECT
campaign.id,
campaign.name,
campaign.network_settings.target_content_network
FROM campaign
ORDER BY campaign.id";
try
{
// Issue a search request.
googleAdsService.SearchStream(customerId.ToString(), query,
delegate (SearchGoogleAdsStreamResponse resp)
{
foreach (GoogleAdsRow googleAdsRow in resp.Results)
{
Console.WriteLine("Campaign with ID {0} and name '{1}' was found.",
googleAdsRow.Campaign.Id, googleAdsRow.Campaign.Name);
}
}
);
}
catch (GoogleAdsException e)
{
Console.WriteLine("Failure:");
Console.WriteLine($"Message: {e.Message}");
Console.WriteLine($"Failure: {e.Failure}");
Console.WriteLine($"Request ID: {e.RequestId}");
throw;
}
}
PHP
חבילות של ספריות לקוח מתפרסמות במאגר Packagist. עוברים לספריית הבסיס של הפרויקט ומריצים את הפקודה הבאה כדי להתקין את הספרייה ואת כל יחסי התלות שלה בספרייה vendor/ של ספריית הבסיס של הפרויקט.
composer require googleads/google-ads-php:31.0.0יוצרים עותק של הקובץ google_ads_php.ini ממאגר GitHub ומשנים אותו כך שיכלול את פרטי הכניסה שלכם.
[GOOGLE_ADS]
developerToken = "INSERT_DEVELOPER_TOKEN_HERE"
loginCustomerId = "INSERT_LOGIN_CUSTOMER_ID_HERE"

[OAUTH2]
clientId = "INSERT_OAUTH2_CLIENT_ID_HERE"
clientSecret = "INSERT_OAUTH2_CLIENT_SECRET_HERE"
refreshToken = "INSERT_OAUTH2_REFRESH_TOKEN_HERE"
יוצרים מופע של אובייקט GoogleAdsClient.
$oAuth2Credential = (new OAuth2TokenBuilder())
    ->fromFile('/path/to/google_ads_php.ini')
    ->build();

$googleAdsClient = (new GoogleAdsClientBuilder())
    ->fromFile('/path/to/google_ads_php.ini')
    ->withOAuth2Credential($oAuth2Credential)
    ->build();
לאחר מכן, מריצים דוח קמפיינים באמצעות השיטה GoogleAdsService.SearchStream כדי לאחזר את הקמפיינים בחשבון. המדריך הזה לא כולל פרטים על דיווח.
public static function runExample(GoogleAdsClient $googleAdsClient, int $customerId)
{
$googleAdsServiceClient = $googleAdsClient->getGoogleAdsServiceClient();
// Creates a query that retrieves all campaigns.
$query = 'SELECT campaign.id, campaign.name FROM campaign ORDER BY campaign.id';
// Issues a search stream request.
/** @var GoogleAdsServerStreamDecorator $stream */
$stream = $googleAdsServiceClient->searchStream(
SearchGoogleAdsStreamRequest::build($customerId, $query)
);
// Iterates over all rows in all messages and prints the requested field values for
// the campaign in each row.
foreach ($stream->iterateAllElements() as $googleAdsRow) {
/** @var GoogleAdsRow $googleAdsRow */
printf(
"Campaign with ID %d and name '%s' was found.%s",
$googleAdsRow->getCampaign()->getId(),
$googleAdsRow->getCampaign()->getName(),
PHP_EOL
);
}
}
Python
ספריית הלקוח מופצת ב-PyPI ואפשר להתקין אותה באמצעות הפקודה pip באופן הבא:
python -m pip install google-ads==21.3.0יוצרים עותק של הקובץ google-ads.yaml ממאגר GitHub ומשנים אותו כך שיכלול את פרטי הכניסה שלכם.
client_id: INSERT_OAUTH2_CLIENT_ID_HERE
client_secret: INSERT_OAUTH2_CLIENT_SECRET_HERE
refresh_token: INSERT_REFRESH_TOKEN_HERE
developer_token: INSERT_DEVELOPER_TOKEN_HERE
login_customer_id: INSERT_LOGIN_CUSTOMER_ID_HERE
יוצרים מופע GoogleAdsClient על ידי קריאה לשיטה GoogleAdsClient.load_from_storage. מעבירים את הנתיב אל google-ads.yaml כמחרוזת לשיטה כשמפעילים אותה:
from google.ads.googleads.client import GoogleAdsClient
client = GoogleAdsClient.load_from_storage("path/to/google-ads.yaml")
מוסיפים ל-logger של הספרייה handler שמציין איפה להדפיס את היומנים.
הפקודה הבאה תגרום ל-logger של הספרייה להדפיס את הפלט במסוף (stdout).
import logging
import sys

logger = logging.getLogger('google.ads.googleads.client')
logger.addHandler(logging.StreamHandler(sys.stdout))
לאחר מכן, מריצים דוח קמפיינים באמצעות השיטה GoogleAdsService.SearchStream כדי לאחזר את הקמפיינים בחשבון. המדריך הזה לא כולל פרטים על דיווח.
def main(client: GoogleAdsClient, customer_id: str) -> None:
ga_service: GoogleAdsServiceClient = client.get_service("GoogleAdsService")
query: str = """
SELECT
campaign.id,
campaign.name
FROM campaign
ORDER BY campaign.id"""
# Issues a search request using streaming.
stream: Iterator[SearchGoogleAdsStreamResponse] = ga_service.search_stream(
customer_id=customer_id, query=query
)
for batch in stream:
rows: List[GoogleAdsRow] = batch.results
for row in rows:
print(
f"Campaign with ID {row.campaign.id} and name "
f'"{row.campaign.name}" was found.'
)
Ruby
קבצי ה-Ruby gems של ספריית הלקוח מתפרסמים באתר האירוח של Rubygems gem. הדרך המומלצת להתקין היא באמצעות bundler. מוסיפים שורה לקובץ Gemfile:
gem 'google-ads-googleads', '~> 35.2.0'
מריצים את הפקודה:
bundle installיוצרים עותק של הקובץ google_ads_config.rb ממאגר GitHub ומשנים אותו כך שיכלול את פרטי הכניסה שלכם.
ruby
Google::Ads::GoogleAds::Config.new do |c|
  c.client_id = 'INSERT_CLIENT_ID_HERE'
  c.client_secret = 'INSERT_CLIENT_SECRET_HERE'
  c.refresh_token = 'INSERT_REFRESH_TOKEN_HERE'
  c.developer_token = 'INSERT_DEVELOPER_TOKEN_HERE'
  c.login_customer_id = 'INSERT_LOGIN_CUSTOMER_ID_HERE'
end
יוצרים מופע GoogleAdsClient על ידי העברת הנתיב למיקום שבו שומרים את הקובץ הזה.
client = Google::Ads::GoogleAds::GoogleAdsClient.new('path/to/google_ads_config.rb')
לאחר מכן, מריצים דוח קמפיינים באמצעות השיטה GoogleAdsService.SearchStream כדי לאחזר את הקמפיינים בחשבון. המדריך הזה לא כולל פרטים על דיווח.
def get_campaigns(customer_id)
# GoogleAdsClient will read a config file from
# ENV['HOME']/google_ads_config.rb when called without parameters
client = Google::Ads::GoogleAds::GoogleAdsClient.new
responses = client.service.google_ads.search_stream(
customer_id: customer_id,
query: 'SELECT campaign.id, campaign.name FROM campaign ORDER BY campaign.id',
)
responses.each do |response|
response.results.each do |row|
puts "Campaign with ID #{row.campaign.id} and name '#{row.campaign.name}' was found."
end
end
end
Perl
הספרייה מופצת ב-CPAN. מתחילים בשיבוט
מאגר google-ads-perl בספרייה הרצויה.
git clone https://github.com/googleads/google-ads-perl.gitעוברים לספרייה google-ads-perl ומריצים את הפקודה הבאה בשורת הפקודה כדי להתקין את כל יחסי התלות שנדרשים לשימוש בספרייה.
cd google-ads-perlcpan install Module::Buildperl Build.PLperl Build installdeps
יוצרים עותק של הקובץ googleads.properties ממאגר GitHub ומשנים אותו כך שיכלול את פרטי הכניסה שלכם.
clientId=INSERT_OAUTH2_CLIENT_ID_HERE
clientSecret=INSERT_OAUTH2_CLIENT_SECRET_HERE
refreshToken=INSERT_OAUTH2_REFRESH_TOKEN_HERE
developerToken=INSERT_DEVELOPER_TOKEN_HERE
loginCustomerId=INSERT_LOGIN_CUSTOMER_ID_HERE
יוצרים מופע של Client על ידי העברת הנתיב למיקום שבו שומרים את הקובץ הזה.
my $properties_file = "/path/to/googleads.properties";

my $api_client = Google::Ads::GoogleAds::Client->new({
  properties_file => $properties_file
});
לאחר מכן, מריצים דוח קמפיינים באמצעות השיטה GoogleAdsService.SearchStream כדי לאחזר את הקמפיינים בחשבון. המדריך הזה לא כולל פרטים על דיווח.
sub get_campaigns {
my ($api_client, $customer_id) = @_;
# Create a search Google Ads stream request that will retrieve all campaigns.
my $search_stream_request =
Google::Ads::GoogleAds::V21::Services::GoogleAdsService::SearchGoogleAdsStreamRequest
->new({
customerId => $customer_id,
query =>
"SELECT campaign.id, campaign.name FROM campaign ORDER BY campaign.id"
});
# Get the GoogleAdsService.
my $google_ads_service = $api_client->GoogleAdsService();
my $search_stream_handler =
Google::Ads::GoogleAds::Utils::SearchStreamHandler->new({
service => $google_ads_service,
request => $search_stream_request
});
# Issue a search request and process the stream response to print the requested
# field values for the campaign in each row.
$search_stream_handler->process_contents(
sub {
my $google_ads_row = shift;
printf "Campaign with ID %d and name '%s' was found.\n",
$google_ads_row->{campaign}{id}, $google_ads_row->{campaign}{name};
});
return 1;
}
REST
מתחילים באמצעות לקוח HTTP כדי לאחזר אסימון גישה מסוג OAuth 2.0. במדריך הזה נעשה שימוש בפקודה curl.
curl \
  --data "grant_type=refresh_token" \
  --data "client_id=CLIENT_ID" \
  --data "client_secret=CLIENT_SECRET" \
  --data "refresh_token=REFRESH_TOKEN" \
  https://www.googleapis.com/oauth2/v3/token
לאחר מכן, מריצים דוח קמפיינים באמצעות השיטה GoogleAdsService.SearchStream כדי לאחזר את הקמפיינים בחשבון. המדריך הזה לא כולל פרטים על דיווח.
curl -i -X POST https://googleads.googleapis.com/v21/customers/CUSTOMER_ID/googleAds:searchStream \
   -H "Content-Type: application/json" \
   -H "Authorization: Bearer ACCESS_TOKEN" \
   -H "developer-token: DEVELOPER_TOKEN" \
   -H "login-customer-id: LOGIN_CUSTOMER_ID" \
   --data-binary "@query.json"
התוכן של query.json הוא:
{
  "query": "SELECT campaign.id, campaign.name, campaign.network_settings.target_content_network FROM campaign ORDER BY campaign.id"
}