
Bu hızlı başlangıç kılavuzu, Google Ads API'ye ilk API çağrınızı yapmanıza yardımcı olur.
Temel kavramlar
- Geliştirici jetonu: Geliştirici jetonu, uygulamanızı Google Ads API sunucularında tanımlayan 22 karakter uzunluğunda alfanümerik bir dizedir. API çağrıları yapmak için gereklidir.
- API erişim düzeyi: Geliştirici jetonunuzun API erişim düzeyi, günlük olarak yapabileceğiniz API çağrısı sayısını ve API çağrısı yapabileceğiniz ortamları kontrol eder.
- Google Ads yönetici hesabı: Google Ads yönetici hesabı, diğer Google Ads hesaplarını yönetmek için kullanılır. Google Ads müşteri hesaplarını veya diğer Google Ads yönetici hesaplarını yönetmek için Google Ads yönetici hesabı kullanılabilir. Geliştirici jetonu almak için Google Ads yönetici hesabınızın olması gerekir.
- Google Ads müşteri hesabı: API çağrıları yaptığınız Google Ads hesabı.
- Müşteri müşteri kimliği: Bir Google Ads müşteri hesabını tanımlayan 10 haneli sayı. Bu kimliği Google Ads kullanıcı arayüzünden kopyaladıysanız tireleri kaldırdığınızdan emin olun.
- OAuth 2.0: OAuth 2.0, tüm Google API'leri tarafından kullanılan, yetkilendirme için endüstri standardı bir protokoldür. API çağrıları yapmak için OAuth 2.0 kimlik bilgileri oluşturmak üzere hizmet hesabınız ve anahtarınız olmalıdır.
- Google Cloud projesi: Google Cloud projesi, API'leri ve OAuth 2.0 API kimlik bilgilerini yönetme dahil olmak üzere tüm Google hizmetlerini oluşturma, etkinleştirme ve kullanma işlemlerinin temelini oluşturur. Bu anahtarı Google Cloud Console'dan oluşturabilirsiniz.
- Hizmet hesabı: Tek bir kullanıcıya değil, uygulamanıza ait olan özel bir Google Hesabı türüdür. Uygulamanızın Google Ads API'de kimliğini doğrulamak için kullanılır. Hizmet hesabı almak için bir Google Cloud projeniz olması gerekir.
- Hizmet hesabı anahtarı: Hizmet hesabınızın özel anahtarını içeren bir JSON uygulama kimlik bilgisi dosyasıdır. Google Ads API API çağrısı yaparken hizmet hesabının kimliğini doğrulamak için OAuth 2.0 kimlik bilgilerini oluşturmak üzere kullanılır. Hizmet hesabı anahtarı almak için hizmet hesabına ihtiyacınız vardır.
Ön koşullar
Google Ads API çağrısı yapmak için aşağıdaki adımları tamamlamanız gerekir.
Geliştirici jetonunuzu edinme
Geçmişte geliştirici jetonu için kaydolduysanız Google Ads yönetici hesabınızda oturum açtıktan sonra API Merkezi'ni ziyaret ederek jetonunuzu bulabilirsiniz.
Geliştirici jetonunuz yoksa API Merkezi'nden bir jeton için kaydolabilirsiniz.
Geliştirici jetonuna kaydolma
- Web tarayıcınızda API Merkezi'ne gidin. İstenirse Google Ads yönetici hesabınızda oturum açın. Henüz bir hesabınız yoksa Google Ads yönetici hesabı oluşturun.
- API erişim formunu doldurun ve Hükümler ve Koşullar'ı kabul edin.
- Bilgilerinizin doğru olduğundan ve şirketinizin web sitesi URL'sinin çalıştığından emin olun. Web sitesi yayında değilse Google, başvurunuzu işleme alamayabilir ve başvurunuzu reddedebilir.
- Sağladığınız API iletişim e-posta adresinin düzenli olarak izlenen bir gelen kutusuna yönlendirdiğinden emin olun. Google'ın API uygunluk ekibi, inceleme sürecinde netleştirmek için bu e-posta adresiyle iletişime geçebilir. Size ulaşılamazsa Google, başvurunuza devam etmeyebilir.
- API iletişim e-posta adresinizi API Merkezi'nden düzenleyebilirsiniz. Google'ın size önemli hizmet duyuruları gönderebilmesi için bu bilgileri başvuru sürecinden sonra bile güncel tutun.
Başvuru sürecini tamamladıktan sonra geliştirici jetonu, API merkezinizde Onay Bekliyor durumuyla görünür. Geliştirici jetonunuz artık Test Account Access (Test Hesabı Erişimi) düzeyinde.
Google API Konsolu projenizi yapılandırma
Google API Konsolu projesi, Google API'lerini ve OAuth 2.0 API kimlik bilgilerini yönetmek için kullanılır. Mevcut Google API Konsolu projelerinizi Google API Konsolu'nu ziyaret ederek bulabilir veya yeni bir proje oluşturabilirsiniz.
Öncelikle projenizde Google Ads API'yi etkinleştirin:
Google Ads API'yi etkinleştirme
Ardından, API çağrıları yapmak için bir hizmet hesabına ve hizmet hesabı anahtarına ihtiyacınız vardır. Başka bir Google API'si kullanıyorsanız ve OAuth 2.0 hizmet hesabı ile anahtarı oluşturduysanız bu adımı atlayabilir ve mevcut kimlik bilgilerini yeniden kullanabilirsiniz.
Hizmet hesabı ve anahtarı oluşturma
- Google Cloud Console'da Menü > IAM & Admin > Service Accounts'a (Hizmet Hesapları) gidin.
- Hizmet hesabınızı seçin.
- Anahtarlar > Anahtar ekle > Yeni anahtar oluştur'u tıklayın.
- JSON'ı seçip Oluştur'u tıklayın.
Yeni herkese açık/özel anahtar çiftiniz oluşturulur ve makinenize yeni bir dosya olarak indirilir. İndirilen JSON dosyasını çalışma dizininize
credentials.jsonolarak kaydedin. Bu dosya, bu anahtarın tek kopyasıdır. - Kapat'ı tıklayın.
Google Ads müşteri hesabınızı yapılandırma
Öncelikle API çağrıları yaptığınız Google Ads hesabını belirleyin. API çağrısı yapabileceğiniz hesap türü, geliştirici jetonunuzun API erişim düzeyine bağlıdır. API erişim düzeyinizi öğrenmek için API Merkezinizi kontrol edin.
Gezgin, Temel ve Standart erişim düzeyleri
Google Ads üretim hesabınıza çağrı yapabilirsiniz. Ancak gerekirse Test Hesabı Erişimi sekmesindeki talimatları uygulayarak bir Google Ads test hesabı oluşturabilirsiniz.
Test hesabı erişim düzeyi
Geliştirici jetonunuz, Google Ads üretim hesabına API çağrıları yapmak için kullanılamaz. Yalnızca Google Ads test hesaplarına karşı API çağrıları yapabilirsiniz.
Google Ads test hesabı oluşturma
Aşağıdaki talimatlar, bir Google Ads test yönetici hesabı ve bu hesabın altında bir Google Ads test Google Ads reklamvereni hesabı oluşturur.
Google Ads test yönetici hesabı oluşturmak için mavi düğmeyi tıklayın. İstenirse Google Ads üretim yöneticisi hesabınıza bağlı olmayan bir Google Hesabı ile oturum açın. Hesabınız yoksa yeni bir Google Hesabı oluşturmak için bu sayfadaki Hesap oluştur düğmesini kullanın.
- Google Ads test yönetici hesabınızdayken bir Google Ads test müşteri hesabı oluşturun: Hesaplar > > Yeni hesap oluştur'u tıklayın ve formu doldurun. Google Ads test yönetici hesabınızdan oluşturduğunuz tüm Google Ads hesapları otomatik olarak Google Ads test hesapları olur.
- İsteğe bağlı olarak, Google Ads sayfasından Google Ads test müşterisi hesabında birkaç kampanya oluşturun.
Bir Google Ads müşterisine API çağrısı yapmak için hizmet hesabınıza Google Ads müşteri hesabına erişim ve uygun izinler vermeniz gerekir. Bu işlemi gerçekleştirmek için müşteri hesabına yönetici erişiminiz olmalıdır.
Hizmet hesabına Google Ads hesabınıza erişim izni verme
- Google Ads hesabınızda yönetici olarak oturum açarak başlayın.
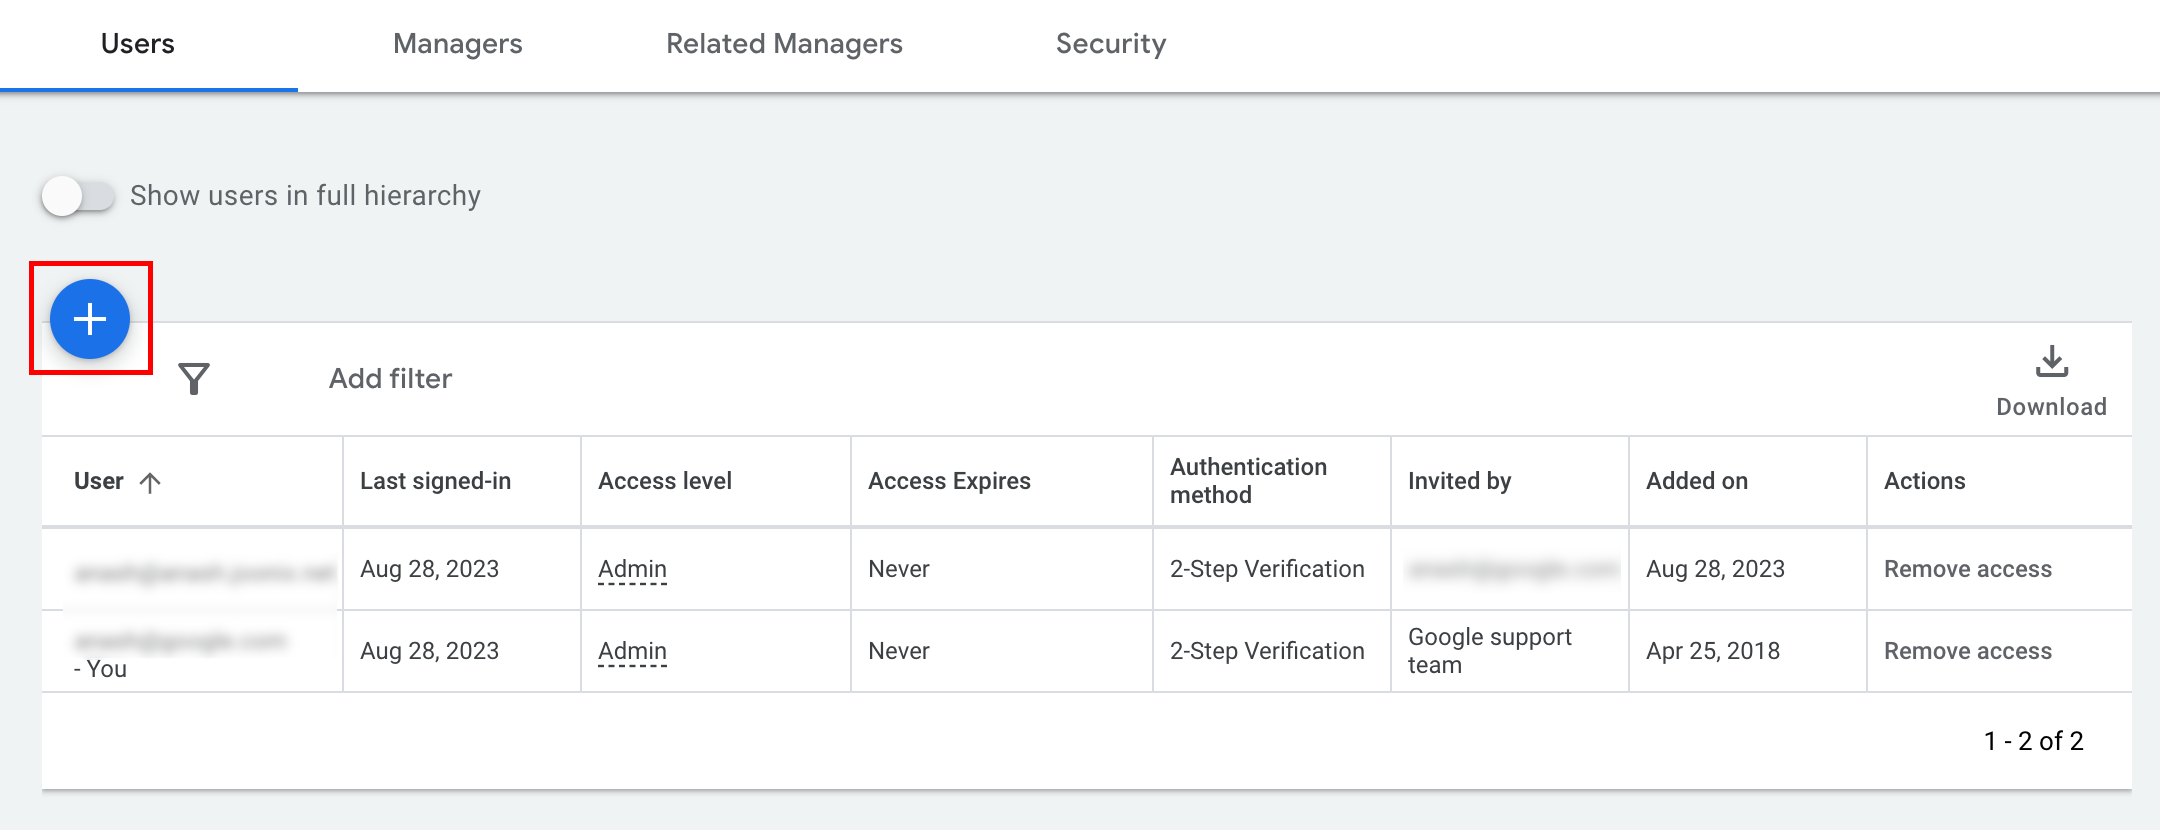
- Yönetici > Erişim ve güvenlik'e gidin.
- Kullanıcılar sekmesindeki
düğmesini tıklayın.
- Hizmet hesabı e-posta adresini E-posta giriş kutusuna yazın.
Uygun hesap erişim düzeyini seçin ve Hesap ekle düğmesini tıklayın. Hizmet hesaplarında e-posta erişim düzeyinin desteklenmediğini unutmayın.
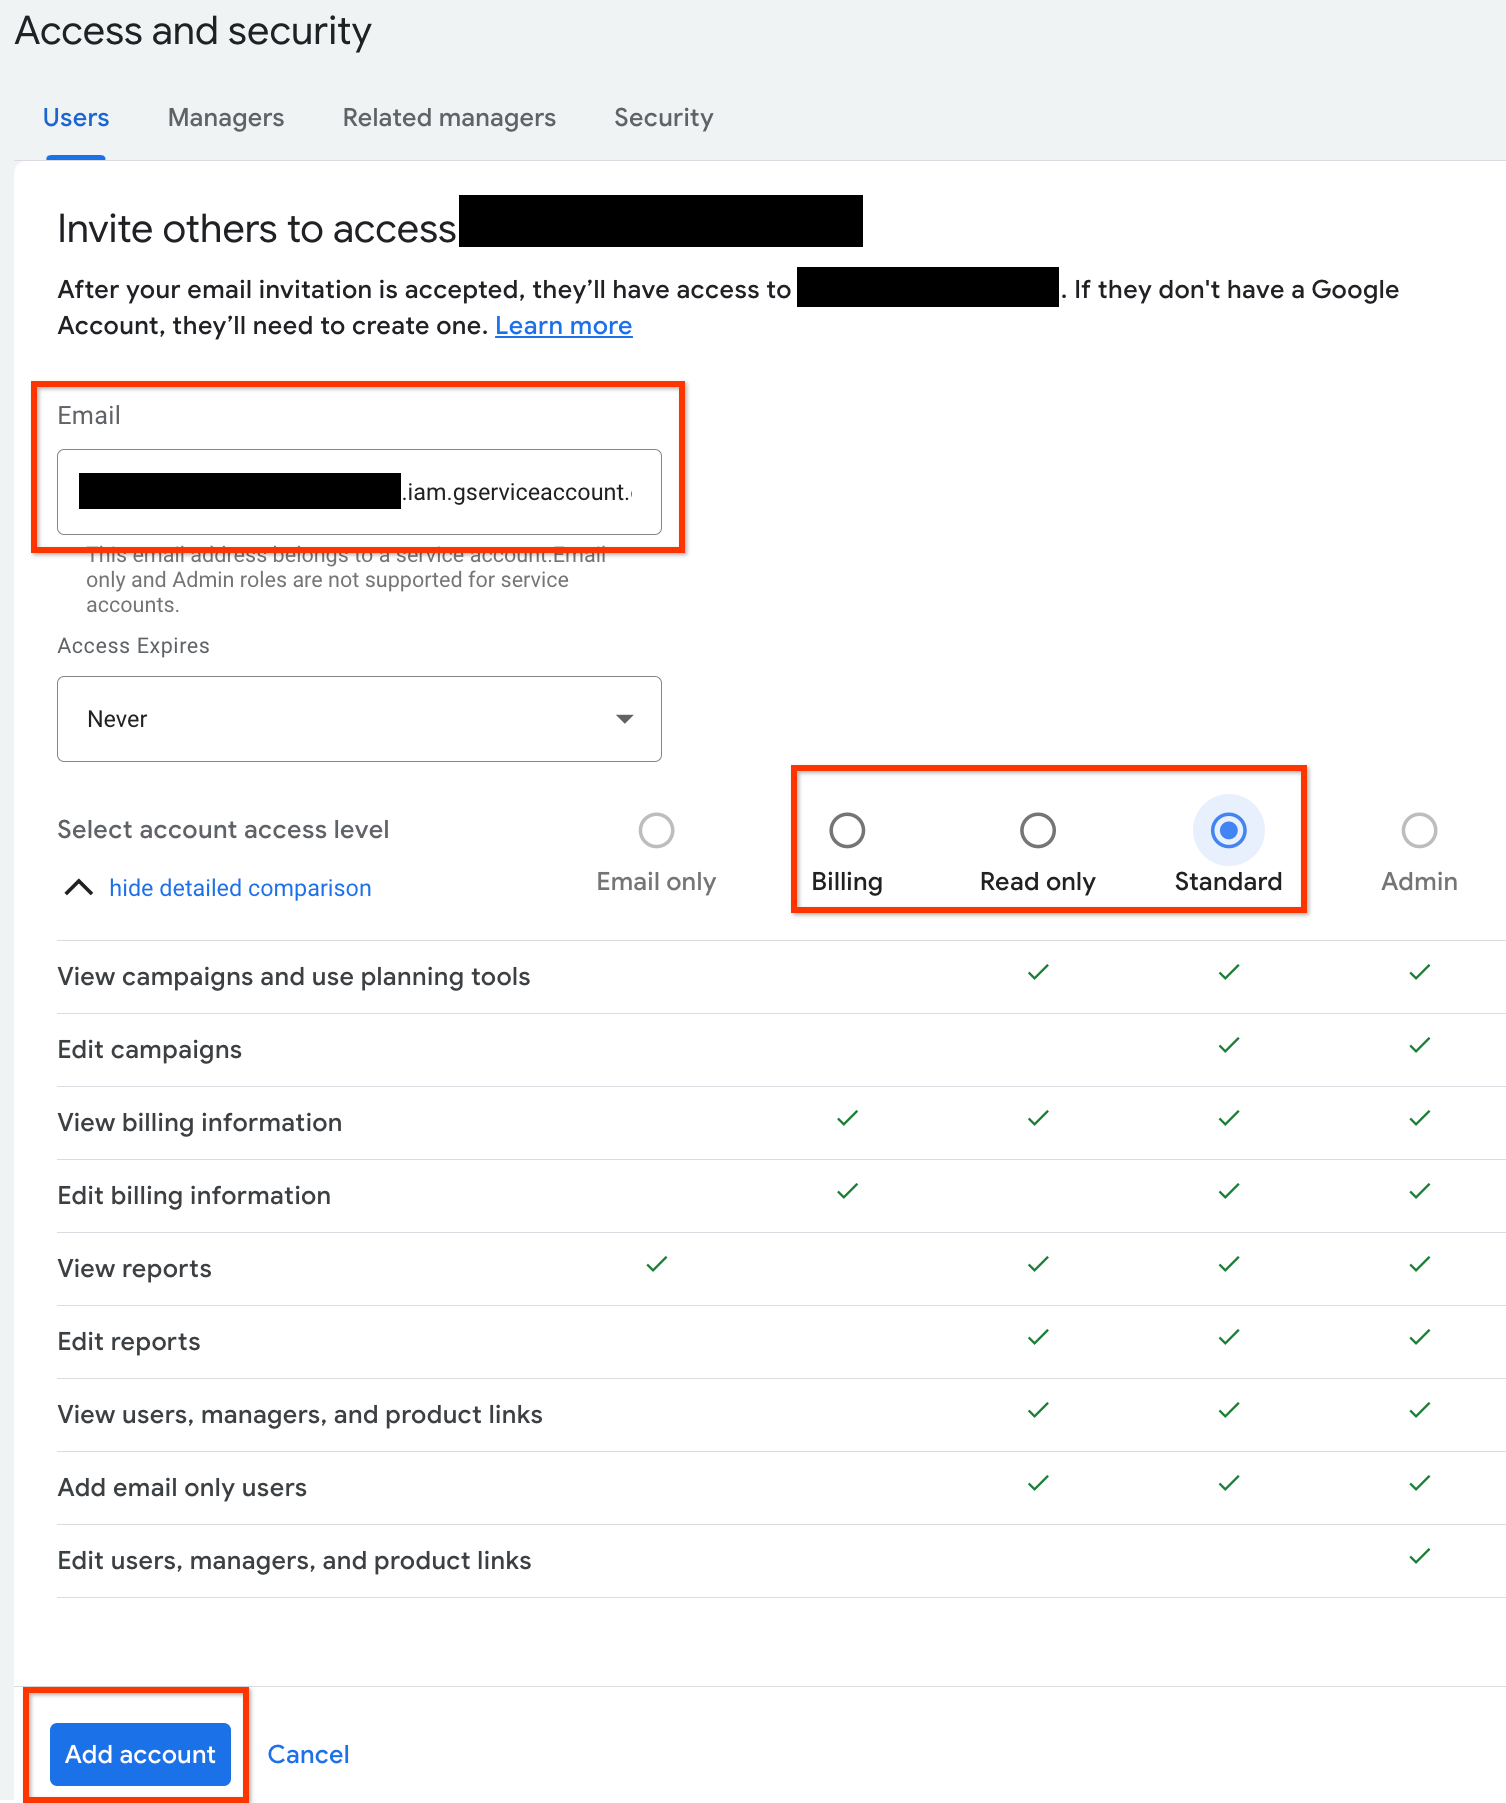
- Hizmet hesabına erişim verilir.
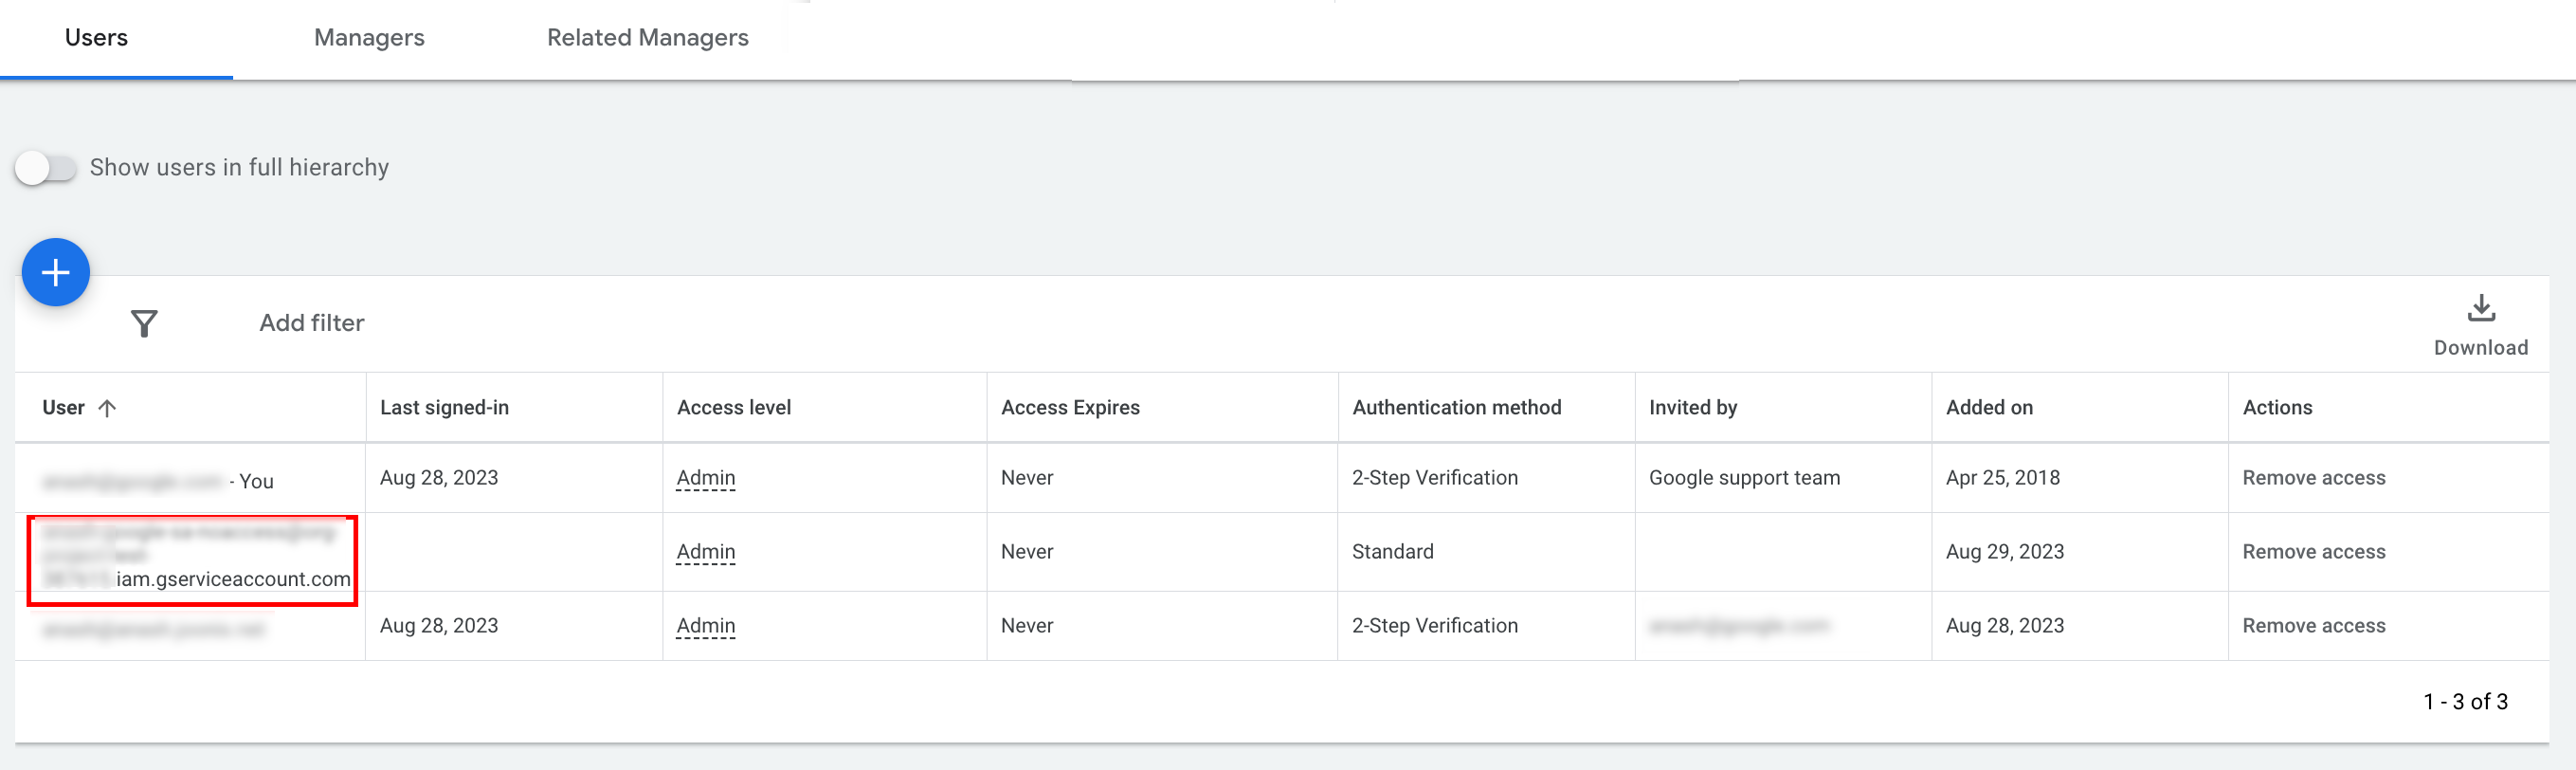
- [İsteğe bağlı] Varsayılan olarak, hizmet hesabına yönetici erişimi veremezsiniz. API çağrılarınız için yönetici erişimi gerekiyorsa erişimi aşağıdaki şekilde yükseltebilirsiniz.
- Erişim düzeyi sütununda hizmet hesabının erişim düzeyinin yanındaki açılır oku tıklayın.
- Açılır listeden Yönetici'yi seçin.
İndirme araçları ve istemci kitaplıkları
API çağrılarını nasıl yapmak istediğinize bağlı olarak bir istemci kitaplığı veya HTTP istemcisi indirebilirsiniz.
İstemci kitaplığı kullanma
Seçtiğiniz istemci kitaplığını indirip yükleyin.
HTTP istemcisini (REST) kullanma
curl
URL üzerinden veri aktarmak için kullanılan komut satırı aracı curl'ü indirip yükleyin.
Google Cloud KSA
gcloud CLI'yı yüklemek için talimatları uygulayın.
Bu kılavuzun geri kalanındaki talimatların, gcloud aracının aşağıdaki sürümüyle çalıştığı doğrulandı. Uygulama davranışındaki veya komut satırı seçeneklerindeki farklılıklar nedeniyle önceki sürümlerde çalışmayabilir.
:~$ gcloud version
Google Cloud SDK 492.0.0
alpha 2024.09.06
beta 2024.09.06
bq 2.1.8
bundled-python3-unix 3.11.9
core 2024.09.06
enterprise-certificate-proxy 0.3.2
gcloud-crc32c 1.0.0
gsutil 5.30
API çağrısı yapma
API çağrısı yapma talimatları için tercih ettiğiniz istemciyi seçin:
Java
İstemci kitaplığı yapıları, Maven Central deposunda yayınlanır. İstemci kitaplığını projenize bağımlı kaynak olarak aşağıdaki şekilde ekleyin:
Maven bağımlılığı:
<dependency>
  <groupId>com.google.api-ads</groupId>
  <artifactId>google-ads</artifactId>
  <version>43.1.0</version>
</dependency>
Gradle bağımlılığı:
implementation 'com.google.api-ads:google-ads:43.1.0'
Bağımlılık sürümlerini yönetmek için Google Ads API Malzeme Listesi (BOM)'ni de kullanmanızı öneririz. Talimatlar için BOM kılavuzuna bakın.
Aşağıdaki içeriğe sahip bir ~/ads.properties dosyası oluşturun:
api.googleads.serviceAccountSecretsPath=JSON_KEY_FILE_PATH
api.googleads.developerToken=INSERT_DEVELOPER_TOKEN_HERE
api.googleads.loginCustomerId=INSERT_LOGIN_CUSTOMER_ID_HERE
Aşağıdaki gibi bir GoogleAdsClient nesnesi oluşturun:
GoogleAdsClient googleAdsClient = null;
try {
  googleAdsClient = GoogleAdsClient.newBuilder().fromPropertiesFile().build();
} catch (FileNotFoundException fnfe) {
  System.err.printf(
      "Failed to load GoogleAdsClient configuration from file. Exception: %s%n",
      fnfe);
  System.exit(1);
} catch (IOException ioe) {
  System.err.printf("Failed to create GoogleAdsClient. Exception: %s%n", ioe);
  System.exit(1);
}
Ardından, hesabınızdaki kampanyaları almak için GoogleAdsService.SearchStream yöntemini kullanarak bir kampanya raporu çalıştırın.
private void runExample(GoogleAdsClient googleAdsClient, long customerId) {
try (GoogleAdsServiceClient googleAdsServiceClient =
googleAdsClient.getLatestVersion().createGoogleAdsServiceClient()) {
String query = "SELECT campaign.id, campaign.name FROM campaign ORDER BY campaign.id";
// Constructs the SearchGoogleAdsStreamRequest.
SearchGoogleAdsStreamRequest request =
SearchGoogleAdsStreamRequest.newBuilder()
.setCustomerId(Long.toString(customerId))
.setQuery(query)
.build();
// Creates and issues a search Google Ads stream request that will retrieve all campaigns.
ServerStream<SearchGoogleAdsStreamResponse> stream =
googleAdsServiceClient.searchStreamCallable().call(request);
// Iterates through and prints all of the results in the stream response.
for (SearchGoogleAdsStreamResponse response : stream) {
for (GoogleAdsRow googleAdsRow : response.getResultsList()) {
System.out.printf(
"Campaign with ID %d and name '%s' was found.%n",
googleAdsRow.getCampaign().getId(), googleAdsRow.getCampaign().getName());
}
}
}
}
C#
İstemci kitaplığı paketleri Nuget.org deposunda yayınlanır. Google.Ads.GoogleAds paketine bir NuGet başvurusu ekleyerek başlayın.
dotnet add package Google.Ads.GoogleAds --version 26.0.0İlgili ayarlara sahip bir GoogleAdsConfig nesnesi oluşturun ve bunu kullanarak bir GoogleAdsClient nesnesi oluşturun.
GoogleAdsConfig config = new GoogleAdsConfig()
{
    DeveloperToken = "******",
    OAuth2Mode = OAuth2Flow.SERVICE_ACCOUNT,
    OAuth2SecretsJsonPath = "PATH_TO_CREDENTIALS_JSON",
    LoginCustomerId = ******
};
GoogleAdsClient client = new GoogleAdsClient(config);
Ardından, hesabınızdaki kampanyaları almak için GoogleAdsService.SearchStream yöntemini kullanarak bir kampanya raporu çalıştırın. Bu kılavuzda raporlama ile ilgili ayrıntılar yer almamaktadır.
public void Run(GoogleAdsClient client, long customerId)
{
// Get the GoogleAdsService.
GoogleAdsServiceClient googleAdsService = client.GetService(
Services.V24.GoogleAdsService);
// Create a query that will retrieve all campaigns.
string query = @"SELECT
campaign.id,
campaign.name,
campaign.network_settings.target_content_network
FROM campaign
ORDER BY campaign.id";
try
{
// Issue a search request.
googleAdsService.SearchStream(customerId.ToString(), query,
delegate (SearchGoogleAdsStreamResponse resp)
{
foreach (GoogleAdsRow googleAdsRow in resp.Results)
{
Console.WriteLine("Campaign with ID {0} and name '{1}' was found.",
googleAdsRow.Campaign.Id, googleAdsRow.Campaign.Name);
}
}
);
}
catch (GoogleAdsException e)
{
Console.WriteLine("Failure:");
Console.WriteLine($"Message: {e.Message}");
Console.WriteLine($"Failure: {e.Failure}");
Console.WriteLine($"Request ID: {e.RequestId}");
throw;
}
}
PHP
İstemci kitaplığı paketleri Packagist deposunda yayınlanır. Projenizin kök dizinine gidin ve kitaplığı ile tüm bağımlılıklarını projenizin kök dizinindeki vendor/ dizinine yüklemek için aşağıdaki komutu çalıştırın.
composer require googleads/google-ads-php:33.4.0GitHub deposundaki
google_ads_php.ini
dosyasının bir kopyasını oluşturun ve kimlik bilgilerinizi içerecek şekilde değiştirin.
[GOOGLE_ADS]
developerToken = "INSERT_DEVELOPER_TOKEN_HERE"
loginCustomerId = "INSERT_LOGIN_CUSTOMER_ID_HERE"

[OAUTH2]
jsonKeyFilePath = "INSERT_ABSOLUTE_PATH_TO_OAUTH2_JSON_KEY_FILE_HERE"
scopes = "https://www.googleapis.com/auth/adwords"
GoogleAdsClient nesnesinin bir örneğini oluşturun.
$oAuth2Credential = (new OAuth2TokenBuilder())
    ->fromFile('/path/to/google_ads_php.ini')
    ->build();

$googleAdsClient = (new GoogleAdsClientBuilder())
    ->fromFile('/path/to/google_ads_php.ini')
    ->withOAuth2Credential($oAuth2Credential)
    ->build();
Ardından, hesabınızdaki kampanyaları almak için GoogleAdsService.SearchStream yöntemini kullanarak bir kampanya raporu çalıştırın.
public static function runExample(GoogleAdsClient $googleAdsClient, int $customerId)
{
$googleAdsServiceClient = $googleAdsClient->getGoogleAdsServiceClient();
// Creates a query that retrieves all campaigns.
$query = 'SELECT campaign.id, campaign.name FROM campaign ORDER BY campaign.id';
// Issues a search stream request.
/** @var GoogleAdsServerStreamDecorator $stream */
$stream = $googleAdsServiceClient->searchStream(
SearchGoogleAdsStreamRequest::build($customerId, $query)
);
// Iterates over all rows in all messages and prints the requested field values for
// the campaign in each row.
foreach ($stream->iterateAllElements() as $googleAdsRow) {
/** @var GoogleAdsRow $googleAdsRow */
printf(
"Campaign with ID %d and name '%s' was found.%s",
$googleAdsRow->getCampaign()->getId(),
$googleAdsRow->getCampaign()->getName(),
PHP_EOL
);
}
}
Python
İstemci kitaplığı PyPI'de dağıtılır. pip komutu kullanılarak aşağıdaki şekilde yüklenebilir:
python -m pip install google-ads==31.0.0GitHub deposundaki google-ads.yaml dosyasının bir kopyasını oluşturun ve kimlik bilgilerinizi içerecek şekilde değiştirin.
developer_token: INSERT_DEVELOPER_TOKEN_HERE
login_customer_id: INSERT_LOGIN_CUSTOMER_ID_HERE
json_key_file_path: JSON_KEY_FILE_PATH_HERE
GoogleAdsClient.load_from_storage yöntemini çağırarak bir GoogleAdsClient örneği oluşturun. GoogleAdsClient.load_from_storage yöntemini çağırırken google-ads.yaml dosyanızın yolunu yönteme dize olarak iletin:
from google.ads.googleads.client import GoogleAdsClient
client = GoogleAdsClient.load_from_storage("path/to/google-ads.yaml")
Kitaplığın günlükçüsüne, günlüklerin nereye yazılacağını söyleyen bir işleyici ekleyin.
Aşağıdaki kod, kitaplığın günlükçüsüne konsola yazdırmasını söyler
(stdout).
import logging
import sys

logger = logging.getLogger('google.ads.googleads.client')
logger.addHandler(logging.StreamHandler(sys.stdout))
Ardından, hesabınızdaki kampanyaları almak için GoogleAdsService.SearchStream yöntemini kullanarak bir kampanya raporu çalıştırın.
def main(client: GoogleAdsClient, customer_id: str) -> None:
ga_service: GoogleAdsServiceClient = client.get_service("GoogleAdsService")
query: str = """
SELECT
campaign.id,
campaign.name
FROM campaign
ORDER BY campaign.id"""
# Issues a search request using streaming.
stream: Iterator[SearchGoogleAdsStreamResponse] = ga_service.search_stream(
customer_id=customer_id, query=query
)
for batch in stream:
rows: List[GoogleAdsRow] = batch.results
for row in rows:
print(
f"Campaign with ID {row.campaign.id} and name "
f'"{row.campaign.name}" was found.'
)
Ruby
İstemci kitaplığı için Ruby gem'leri, Rubygems gem barındırma sitesinde yayınlanır. Yüklemek için önerilen yöntem, bundler'ı kullanmaktır. Gemfile dosyanıza bir satır ekleyin:
gem 'google-ads-googleads', '~> 41.0.0'
Ardından şu komutu çalıştırın:
bundle installGitHub deposundaki
google_ads_config.rb
dosyasının bir kopyasını oluşturun ve kimlik bilgilerinizi içerecek şekilde değiştirin.
Google::Ads::GoogleAds::Config.new do |c|
  c.developer_token = 'INSERT_DEVELOPER_TOKEN_HERE'
  c.login_customer_id = 'INSERT_LOGIN_CUSTOMER_ID_HERE'
  c.keyfile = 'JSON_KEY_FILE_PATH'
end
Bu dosyayı sakladığınız yerin yolunu ileterek bir GoogleAdsClient örneği oluşturun.
client = Google::Ads::GoogleAds::GoogleAdsClient.new('path/to/google_ads_config.rb')
Ardından, hesabınızdaki kampanyaları almak için GoogleAdsService.SearchStream yöntemini kullanarak bir kampanya raporu çalıştırın.
def get_campaigns(customer_id)
# GoogleAdsClient will read a config file from
# ENV['HOME']/google_ads_config.rb when called without parameters
client = Google::Ads::GoogleAds::GoogleAdsClient.new
responses = client.service.google_ads.search_stream(
customer_id: customer_id,
query: 'SELECT campaign.id, campaign.name FROM campaign ORDER BY campaign.id',
)
responses.each do |response|
response.results.each do |row|
puts "Campaign with ID #{row.campaign.id} and name '#{row.campaign.name}' was found."
end
end
end
Perl
Kitaplık, CPAN'de dağıtılır. İstediğiniz dizinde google-ads-perl deposunu klonlayarak başlayın.
git clone https://github.com/googleads/google-ads-perl.gitgoogle-ads-perl dizinine gidin ve kitaplığı kullanmak için gereken tüm bağımlılıkları yüklemek üzere komut isteminde aşağıdaki komutu çalıştırın.
cd google-ads-perlcpan install Module::Buildperl Build.PLperl Build installdeps
GitHub deposundaki
googleads.properties
dosyasının bir kopyasını oluşturun ve kimlik bilgilerinizi içerecek şekilde değiştirin.
jsonKeyFilePath=JSON_KEY_FILE_PATH
developerToken=INSERT_DEVELOPER_TOKEN_HERE
loginCustomerId=INSERT_LOGIN_CUSTOMER_ID_HERE
Bu dosyayı sakladığınız yerin yolunu ileterek bir Client örneği oluşturun.
my $properties_file = "/path/to/googleads.properties";

my $api_client = Google::Ads::GoogleAds::Client->new({
  properties_file => $properties_file
});
Ardından, hesabınızdaki kampanyaları almak için GoogleAdsService.SearchStream yöntemini kullanarak bir kampanya raporu çalıştırın.
sub get_campaigns {
my ($api_client, $customer_id) = @_;
# Create a search Google Ads stream request that will retrieve all campaigns.
my $search_stream_request =
Google::Ads::GoogleAds::V24::Services::GoogleAdsService::SearchGoogleAdsStreamRequest
->new({
customerId => $customer_id,
query =>
"SELECT campaign.id, campaign.name FROM campaign ORDER BY campaign.id"
});
# Get the GoogleAdsService.
my $google_ads_service = $api_client->GoogleAdsService();
my $search_stream_handler =
Google::Ads::GoogleAds::Utils::SearchStreamHandler->new({
service => $google_ads_service,
request => $search_stream_request
});
# Issue a search request and process the stream response to print the requested
# field values for the campaign in each row.
$search_stream_handler->process_contents(
sub {
my $google_ads_row = shift;
printf "Campaign with ID %d and name '%s' was found.\n",
$google_ads_row->{campaign}{id}, $google_ads_row->{campaign}{name};
});
return 1;
}
curl
Öncelikle hizmet hesabını gcloud KSA'da etkin kimlik bilgileri olarak ayarlayın.
gcloud auth login --cred-file=PATH_TO_CREDENTIALS_JSONArdından, Google Ads API için bir OAuth 2.0 erişim jetonu getirin.
gcloud auth \
  print-access-token \
  --scopes='https://www.googleapis.com/auth/adwords'
Ardından, hesabınızdaki kampanyaları almak için GoogleAdsService.SearchStream yöntemini kullanarak bir kampanya raporu çalıştırın.
curl -i -X POST https://googleads.googleapis.com/v24/customers/CUSTOMER_ID/googleAds:searchStream \
   -H "Content-Type: application/json" \
   -H "Authorization: Bearer ACCESS_TOKEN" \
   -H "developer-token: DEVELOPER_TOKEN" \
   -H "login-customer-id: LOGIN_CUSTOMER_ID" \
   --data-binary "@query.json"
query.json klasörünün içeriği aşağıdaki gibidir:
{
  "query": "SELECT campaign.id, campaign.name, campaign.network_settings.target_content_network FROM campaign ORDER BY campaign.id"
}
İlk çağrınızı yaparken hatalarla karşılaşırsanız sorun giderme konusunda yardım almak için API hatalarını işleme bölümüne bakın.