
يساعدك دليل البدء السريع هذا في إجراء طلب بيانات من واجهة برمجة التطبيقات الأول إلى Google Ads API.
المفاهيم الرئيسية
- الرمز المميز للمطوِّر: الرمز المميز للمطوِّر هو سلسلة أبجدية رقمية تتألف من 22 حرفًا، ويتم استخدامه لتعريف تطبيقك على خوادم Google Ads API. وهو مطلوب لإجراء طلبات بيانات من واجهة برمجة التطبيقات.
- مستوى الوصول إلى واجهة برمجة التطبيقات: يتحكّم مستوى الوصول إلى واجهة برمجة التطبيقات الخاص بالرمز المميز للمطوِّر في عدد طلبات البيانات من واجهة برمجة التطبيقات التي يمكنك إجراؤها يوميًا والبيئات التي يمكنك إرسال طلبات البيانات من واجهة برمجة التطبيقات إليها.
- الحساب الإداري على "إعلانات Google": يُستخدَم الحساب الإداري على "إعلانات Google" لإدارة حسابات أخرى على "إعلانات Google". يمكن استخدام حساب إداري على "إعلانات Google" لإدارة حسابات عملاء على "إعلانات Google" أو حسابات إدارية أخرى على "إعلانات Google". يجب أن يتوفّر لك حساب إداري على "إعلانات Google" للحصول على رمز مميز للمطوِّر.
- حساب عميل على "إعلانات Google": هو حساب "إعلانات Google" الذي يتم تنفيذ طلبات البيانات من واجهة برمجة التطبيقات عليه.
- رقم تعريف عميل الحساب الإداري: هو الرقم المكوّن من 10 أرقام الذي يحدّد حساب عميل على "إعلانات Google". إذا نسخت هذا المعرّف من واجهة مستخدم "إعلانات Google"، احرص على إزالة الشرطات.
- بروتوكول OAuth 2.0: بروتوكول OAuth 2.0 هو بروتوكول متوافق مع معايير المجال للتفويض، وتستخدمه جميع واجهات Google APIs. تحتاج إلى حساب خدمة ومفتاح لإنشاء بيانات اعتماد OAuth 2.0 لإجراء طلبات البيانات من واجهة برمجة التطبيقات.
- مشروع Google Cloud: يشكّل مشروع Google Cloud الأساس لإنشاء جميع خدمات Google وتفعيلها واستخدامها، بما في ذلك إدارة واجهات برمجة التطبيقات وبيانات اعتماد واجهة برمجة تطبيقات OAuth 2.0. يمكنك إنشاء مشروع من وحدة تحكّم Google Cloud.
- حساب الخدمة: هو نوع خاص من حسابات Google يخص تطبيقك وليس مستخدمًا فرديًا. ويتم استخدامها للمصادقة على تطبيقك في Google Ads API. يجب أن يكون لديك مشروع على Google Cloud للحصول على حساب خدمة.
- مفتاح حساب الخدمة: ملف JSON لبيانات اعتماد التطبيق يحتوي على المفتاح الخاص لحساب الخدمة. ويُستخدَم لإنشاء بيانات اعتماد OAuth 2.0 لمصادقة حساب خدمة عند إجراء طلب إلى Google Ads API. يجب توفير حساب خدمة للحصول على مفتاح حساب الخدمة.
المتطلبات الأساسية
لإجراء طلب بيانات من واجهة برمجة التطبيقات إلى Google Ads API، عليك إكمال الخطوات التالية.
الحصول على الرمز المميز للمطوِّر
إذا سبق لك الاشتراك للحصول على رمز مميز للمطوِّر، يمكنك العثور عليه من خلال الانتقال إلى مركز واجهة برمجة التطبيقات أثناء تسجيل الدخول إلى حسابك الإداري على "إعلانات Google".
الوصول إلى "مركز واجهات برمجة التطبيقات"
إذا لم يكن لديك رمز مميز للمطوِّر، يمكنك الاشتراك للحصول على رمز في "مركز واجهة برمجة التطبيقات".
كيفية الاشتراك للحصول على رمز مميّز للمطوّر
- انتقِل إلى مركز واجهات برمجة التطبيقات في متصفّح الويب. سجِّل الدخول إلى حسابك الإداري على "إعلانات Google" إذا طُلب منك ذلك. أنشئ حسابًا إداريًا على "إعلانات Google" إذا لم يكن لديك حساب.
- أكمِل نموذج الوصول إلى واجهة برمجة التطبيقات واقبل الأحكام والشروط.
- تأكَّد من صحة معلوماتك ومن أنّ عنوان URL الخاص بالموقع الإلكتروني لشركتك يعمل بشكل سليم. إذا كان الموقع الإلكتروني غير متاح، قد يتعذّر على Google معالجة طلبك ورفضه.
- تأكَّد من أنّ عنوان البريد الإلكتروني الخاص بجهة الاتصال المعنيّة بواجهة برمجة التطبيقات الذي تقدّمه يؤدي إلى صندوق وارد تتم مراقبته بانتظام. قد يتواصل فريق الامتثال لواجهات برمجة التطبيقات في Google مع هذا العنوان الإلكتروني أثناء عملية المراجعة للحصول على توضيحات. إذا تعذّر التواصل معك، قد لا تواصل Google معالجة طلبك.
- يمكنك تعديل عنوان البريد الإلكتروني الخاص بالتواصل بشأن واجهة برمجة التطبيقات في مركز واجهات برمجة التطبيقات. يُرجى إبقاء هذه المعلومات محدَّثة، حتى بعد انتهاء عملية تقديم الطلب، كي تتمكّن Google من إرسال إشعارات مهمة بشأن الخدمة إليك.
بعد إكمال عملية تقديم الطلب، سيظهر الرمز المميز للمطوِّر في "مركز واجهة برمجة التطبيقات" بحالة في انتظار الموافقة. أصبح الرمز المميز للمطوِّر يتضمّن الآن مستوى الوصول إلى الحسابات الاختبارية.
ضبط مشروعك على Google API Console
يُستخدَم مشروع Google API Console لإدارة Google APIs وبيانات اعتماد OAuth 2.0 API. يمكنك العثور على مشاريعك الحالية في Google API Console أو إنشاء مشروع جديد من خلال الانتقال إلى Google API Console.
ابدأ بتفعيل Google Ads API في مشروعك:
بعد ذلك، تحتاج إلى حساب خدمة ومفتاح حساب خدمة لإجراء طلبات البيانات من واجهة برمجة التطبيقات. إذا كنت تستخدم حاليًا واجهة Google API أخرى وأنشأت حساب خدمة ومفتاح OAuth 2.0، يمكنك تخطّي هذه الخطوة وإعادة استخدام بيانات الاعتماد الحالية.
كيفية إنشاء حساب خدمة ومفتاح
- في Google Cloud Console، انتقِل إلى "القائمة" > المشرف وإدارة الهوية وإمكانية الوصول > حسابات الخدمة.
- اختَر حساب الخدمة.
- انقر على المفاتيح > إضافة مفتاح > إنشاء مفتاح جديد.
- اختَر JSON، ثمّ انقر على إنشاء.
يتم إنشاء زوج المفتاح العام/الخاص وتنزيله على جهازك كملف جديد. احفظ ملف JSON الذي تم تنزيله باسم
credentials.jsonفي دليل العمل. هذا الملف هو النسخة الوحيدة من هذا المفتاح. - انقر على إغلاق (Close).
ضبط إعدادات حساب العميل على "إعلانات Google"
ابدأ بتحديد حساب "إعلانات Google" الذي تريد إرسال طلبات البيانات من واجهة برمجة التطبيقات إليه. يعتمد نوع الحساب الذي يمكنك طلب بيانات من واجهة برمجة التطبيقات للوصول إليه على مستوى الوصول إلى واجهة برمجة التطبيقات لرمز المطوِّر المميّز. راجِع مركز واجهة برمجة التطبيقات لمعرفة مستوى الوصول إلى واجهة برمجة التطبيقات.
مستويات الوصول "المستكشف" و"الأساسي" و"العادي"
يمكنك إجراء مكالمات إلى حسابك الفعلي على "إعلانات Google". ومع ذلك، يمكنك إنشاء حساب تجريبي على "إعلانات Google" باتّباع التعليمات الواردة في علامة التبويب الوصول إلى الحساب التجريبي إذا لزم الأمر.
مستوى الوصول إلى الحساب التجريبي
لا يمكن استخدام الرمز المميز للمطوِّر لإجراء طلبات بيانات من واجهة برمجة التطبيقات إلى حساب إنتاجي على "إعلانات Google". يمكنك إجراء طلبات بيانات من واجهة برمجة التطبيقات مقابل الحسابات التجريبية على "إعلانات Google" فقط.
كيفية إنشاء حساب تجريبي على "إعلانات Google"
تنشئ التعليمات التالية حسابًا إداريًا تجريبيًا على "إعلانات Google" وحسابًا تجريبيًا على "إعلانات Google" خاصًا بالمعلنين ضمنه.
انقر على الزر الأزرق لإنشاء حساب إداري تجريبي على "إعلانات Google". إذا طُلب منك ذلك، سجِّل الدخول باستخدام حساب Google غير مرتبط بحسابك الإداري على "إعلانات Google". إذا لم يكن لديك حساب، استخدِم الزر إنشاء حساب في تلك الصفحة لإنشاء حساب جديد على Google.
- أثناء تواجدك في حسابك الإداري التجريبي على "إعلانات Google"، أنشئ حساب عميل تجريبيًا على "إعلانات Google" باتّباع الخطوات التالية: انقر على الحسابات > > إنشاء حساب جديد واملأ النموذج. أي حسابات على "إعلانات Google" تنشئها من حسابك الإداري التجريبي على "إعلانات Google" ستكون تلقائيًا حسابات تجريبية على "إعلانات Google".
- يمكنك اختياريًا إنشاء بضع حملات ضمن حساب عميل الاختبار على "إعلانات Google" من صفحة "إعلانات Google".
لإجراء طلب بيانات من واجهة برمجة التطبيقات إلى أحد عملاء "إعلانات Google"، يجب منح حساب الخدمة إذن الوصول والأذونات المناسبة إلى حساب العميل على "إعلانات Google". لتنفيذ ذلك، يجب أن يكون لديك إذن وصول إداري إلى حساب العميل.
كيفية منح حساب الخدمة إذن الوصول إلى حسابك على "إعلانات Google"
- ابدأ بتسجيل الدخول إلى حسابك على "إعلانات Google" بصفتك مشرفًا.
- انتقِل إلى المشرف > الوصول والأمان.
- انقر على الزر
ضمن علامة التبويب المستخدمون.
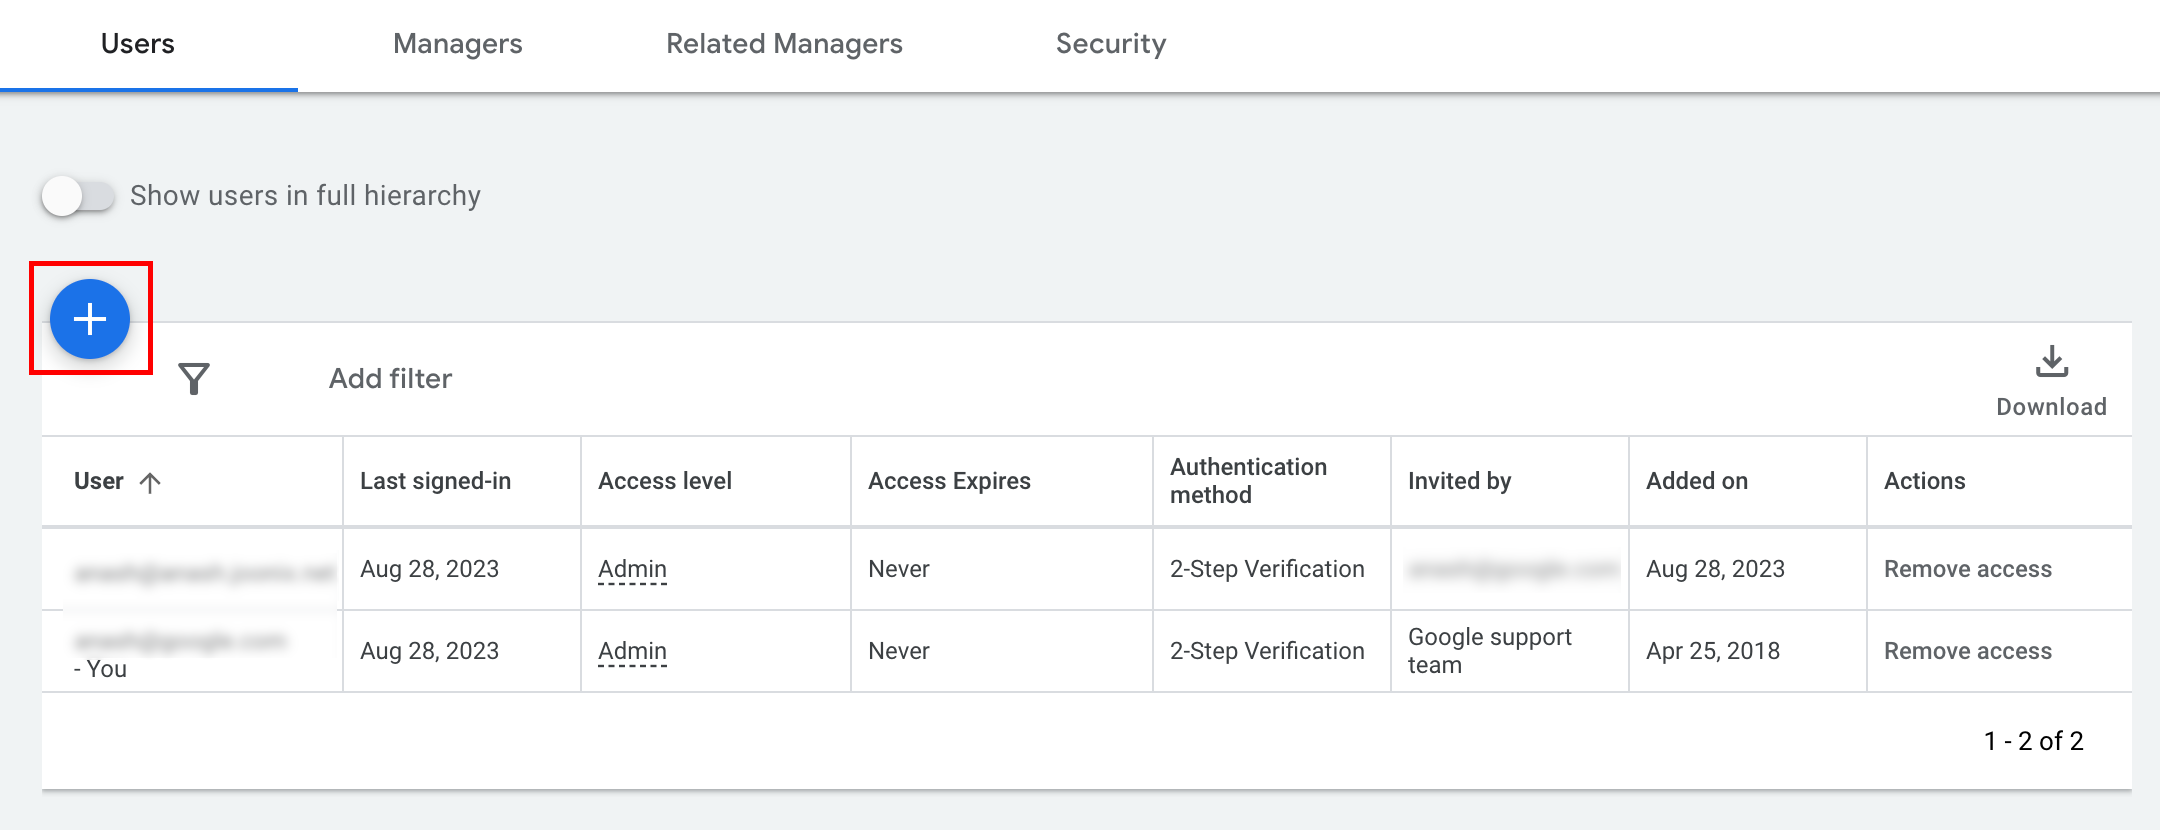
- اكتب عنوان البريد الإلكتروني لحساب الخدمة في مربّع الإدخال البريد الإلكتروني.
اختَر مستوى الوصول إلى الحساب المناسب وانقر على زر إضافة حساب. يُرجى العِلم أنّ مستوى الوصول "البريد الإلكتروني فقط" غير متاح لحسابات الخدمة.

- يتم منح حساب الخدمة إذن الوصول.
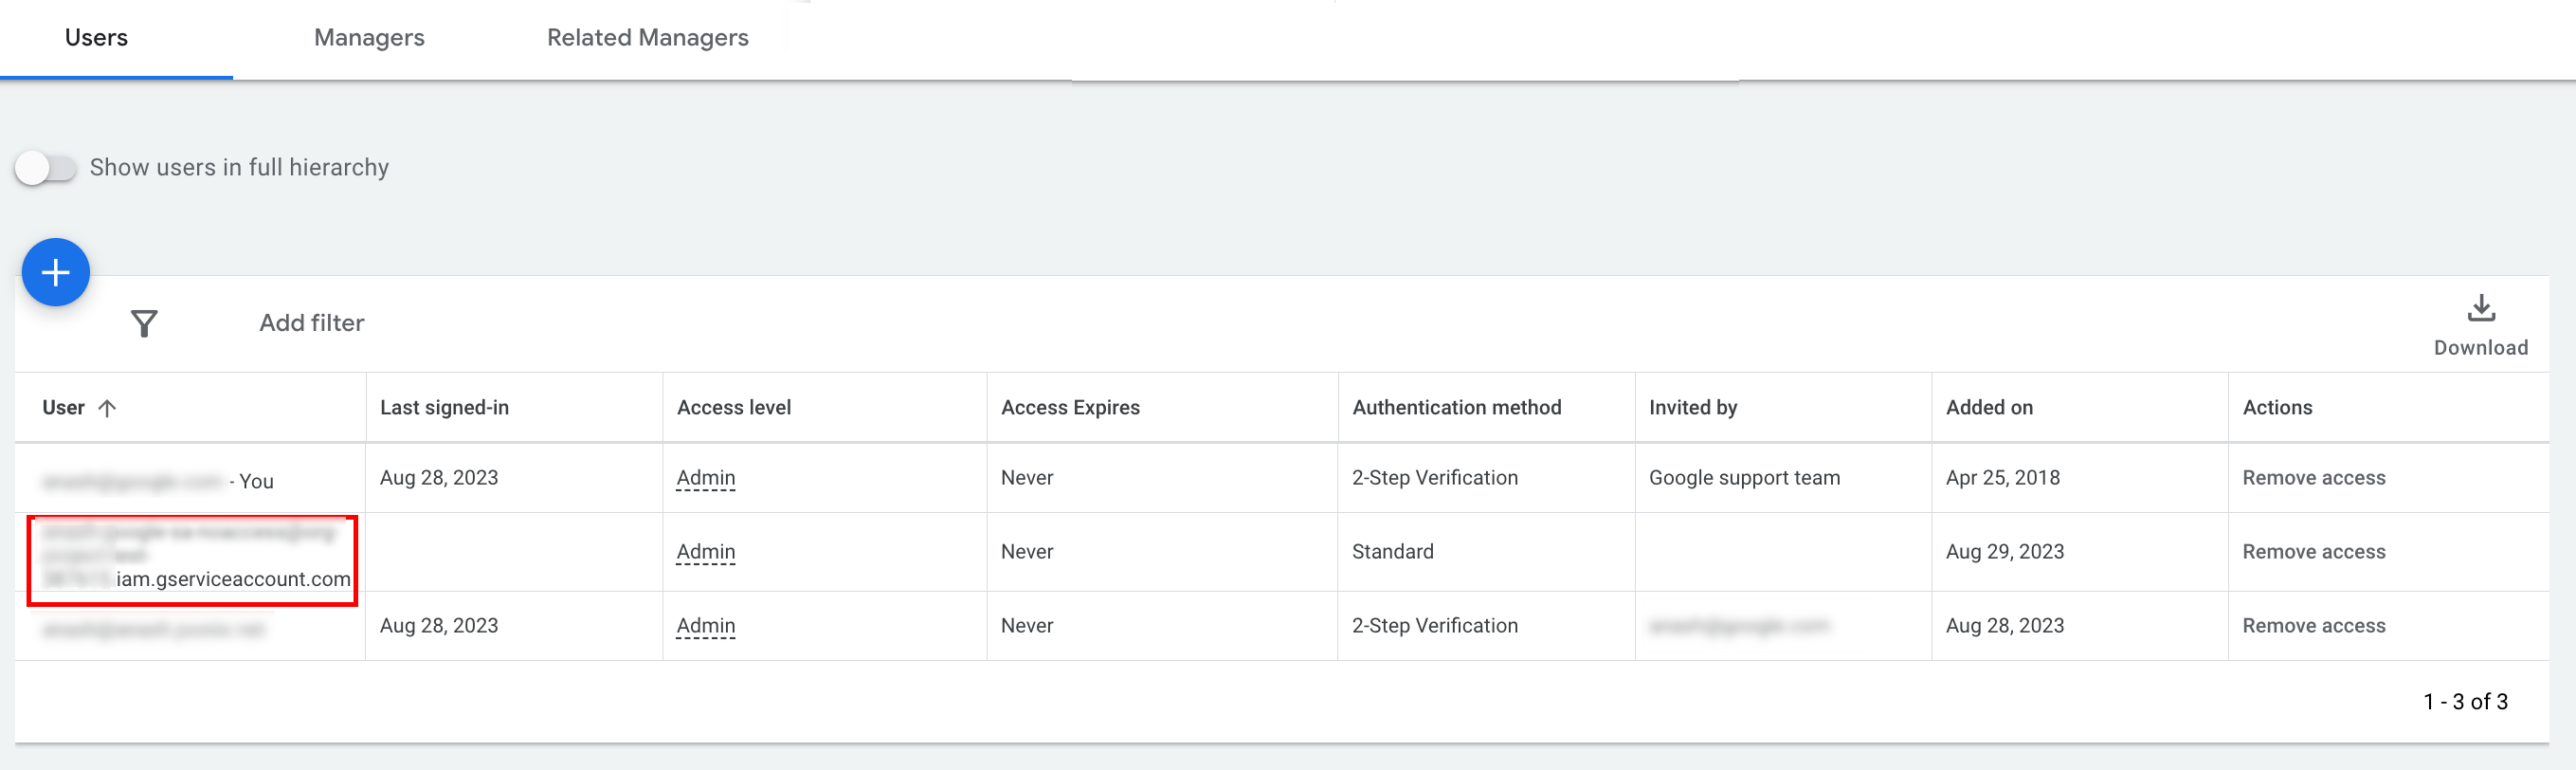
- [اختياري] لا يمكنك تلقائيًا منح حساب خدمة إذن الوصول إلى المشرف. إذا كانت طلبات البيانات من واجهة برمجة التطبيقات تتطلّب إذن الوصول كمشرف، يمكنك ترقية إذن الوصول باتّباع الخطوات التالية.
- انقر على سهم القائمة المنسدلة بجانب مستوى الوصول الخاص بحساب الخدمة في عمود مستوى الوصول.
- اختَر المشرف من القائمة المنسدلة.
تنزيل الأدوات ومكتبات البرامج
يمكنك اختيار تنزيل مكتبة برامج العميل أو عميل HTTP حسب الطريقة التي تريد بها إجراء طلبات البيانات من واجهة برمجة التطبيقات.
استخدام مكتبة برامج
نزِّل مكتبة برامج من اختيارك وثبِّتها.
استخدام عميل HTTP (REST)
curl
نزِّل وثبِّت curl، وهي أداة سطر الأوامر لنقل البيانات من خلال عنوان URL.
واجهة سطر الأوامر (CLI) في Google Cloud
اتّبِع التعليمات لتثبيت gcloud CLI.
تم التأكّد من أنّ التعليمات الواردة في بقية هذا الدليل تعمل مع الإصدار التالي من أداة gcloud، وقد لا تعمل مع الإصدارات السابقة بسبب الاختلافات في سلوك التطبيق أو خيارات سطر الأوامر.
:~$ gcloud version
Google Cloud SDK 492.0.0
alpha 2024.09.06
beta 2024.09.06
bq 2.1.8
bundled-python3-unix 3.11.9
core 2024.09.06
enterprise-certificate-proxy 0.3.2
gcloud-crc32c 1.0.0
gsutil 5.30
تقديم طلب بيانات من واجهة برمجة التطبيقات
اختَر العميل الذي تريده للحصول على تعليمات حول كيفية إجراء طلب بيانات من واجهة برمجة التطبيقات:
جافا
يتم نشر عناصر مكتبة العميل في مستودع Maven المركزي. أضِف مكتبة العميل كعنصر يَعتمد عليه تشغيل مشروعك على النحو التالي:
تكون تبعية Maven على النحو التالي:
<dependency>
  <groupId>com.google.api-ads</groupId>
  <artifactId>google-ads</artifactId>
  <version>42.2.0</version>
</dependency>
تكون تبعية Gradle على النحو التالي:
implementation 'com.google.api-ads:google-ads:42.2.0'
ننصحك أيضًا باستخدام قائمة مواد Google Ads API لإدارة إصدارات التبعيات. راجِع دليل قائمة المواد للحصول على التعليمات.
أنشئ ملفًا ~/ads.properties يتضمّن المحتوى التالي:
api.googleads.serviceAccountSecretsPath=JSON_KEY_FILE_PATH
api.googleads.developerToken=INSERT_DEVELOPER_TOKEN_HERE
api.googleads.loginCustomerId=INSERT_LOGIN_CUSTOMER_ID_HERE
أنشئ عنصر GoogleAdsClient على النحو التالي:
GoogleAdsClient googleAdsClient = null;
try {
  googleAdsClient = GoogleAdsClient.newBuilder().fromPropertiesFile().build();
} catch (FileNotFoundException fnfe) {
  System.err.printf(
      "Failed to load GoogleAdsClient configuration from file. Exception: %s%n",
      fnfe);
  System.exit(1);
} catch (IOException ioe) {
  System.err.printf("Failed to create GoogleAdsClient. Exception: %s%n", ioe);
  System.exit(1);
}
بعد ذلك، شغِّل تقرير حملة باستخدام طريقة GoogleAdsService.SearchStream لاسترداد الحملات في حسابك.
private void runExample(GoogleAdsClient googleAdsClient, long customerId) {
try (GoogleAdsServiceClient googleAdsServiceClient =
googleAdsClient.getLatestVersion().createGoogleAdsServiceClient()) {
String query = "SELECT campaign.id, campaign.name FROM campaign ORDER BY campaign.id";
// Constructs the SearchGoogleAdsStreamRequest.
SearchGoogleAdsStreamRequest request =
SearchGoogleAdsStreamRequest.newBuilder()
.setCustomerId(Long.toString(customerId))
.setQuery(query)
.build();
// Creates and issues a search Google Ads stream request that will retrieve all campaigns.
ServerStream<SearchGoogleAdsStreamResponse> stream =
googleAdsServiceClient.searchStreamCallable().call(request);
// Iterates through and prints all of the results in the stream response.
for (SearchGoogleAdsStreamResponse response : stream) {
for (GoogleAdsRow googleAdsRow : response.getResultsList()) {
System.out.printf(
"Campaign with ID %d and name '%s' was found.%n",
googleAdsRow.getCampaign().getId(), googleAdsRow.getCampaign().getName());
}
}
}
}
#C
يتم نشر حِزم مكتبة البرامج إلى مستودع Nuget.org. ابدأ بإضافة مرجع nuget إلى حزمة Google.Ads.GoogleAds.
dotnet add package Google.Ads.GoogleAds --version 25.1.0أنشئ عنصر GoogleAdsConfig يتضمّن الإعدادات ذات الصلة، واستخدِمه لإنشاء عنصر GoogleAdsClient.
GoogleAdsConfig config = new GoogleAdsConfig()
{
    DeveloperToken = "******",
    OAuth2Mode = OAuth2Flow.SERVICE_ACCOUNT,
    OAuth2SecretsJsonPath = "PATH_TO_CREDENTIALS_JSON",
    LoginCustomerId = ******
};
GoogleAdsClient client = new GoogleAdsClient(config);
بعد ذلك، شغِّل تقرير حملة باستخدام طريقة GoogleAdsService.SearchStream لاسترداد الحملات في حسابك. لا يتناول هذا الدليل تفاصيل عملية
الإبلاغ.
public void Run(GoogleAdsClient client, long customerId)
{
// Get the GoogleAdsService.
GoogleAdsServiceClient googleAdsService = client.GetService(
Services.V23.GoogleAdsService);
// Create a query that will retrieve all campaigns.
string query = @"SELECT
campaign.id,
campaign.name,
campaign.network_settings.target_content_network
FROM campaign
ORDER BY campaign.id";
try
{
// Issue a search request.
googleAdsService.SearchStream(customerId.ToString(), query,
delegate (SearchGoogleAdsStreamResponse resp)
{
foreach (GoogleAdsRow googleAdsRow in resp.Results)
{
Console.WriteLine("Campaign with ID {0} and name '{1}' was found.",
googleAdsRow.Campaign.Id, googleAdsRow.Campaign.Name);
}
}
);
}
catch (GoogleAdsException e)
{
Console.WriteLine("Failure:");
Console.WriteLine($"Message: {e.Message}");
Console.WriteLine($"Failure: {e.Failure}");
Console.WriteLine($"Request ID: {e.RequestId}");
throw;
}
}
PHP
يتم نشر حِزم مكتبة البرامج في مستودع Packagist. انتقِل إلى الدليل الجذر لمشروعك ونفِّذ الأمر التالي لتثبيت المكتبة وجميع العناصر التابعة لها في الدليل vendor/ الخاص بالدليل الجذر لمشروعك.
composer require googleads/google-ads-php:32.2.0أنشئ نسخة من ملف
google_ads_php.ini
من مستودع GitHub وعدِّلها لتضمين بيانات الاعتماد الخاصة بك.
[GOOGLE_ADS]
developerToken = "INSERT_DEVELOPER_TOKEN_HERE"
loginCustomerId = "INSERT_LOGIN_CUSTOMER_ID_HERE"

[OAUTH2]
jsonKeyFilePath = "INSERT_ABSOLUTE_PATH_TO_OAUTH2_JSON_KEY_FILE_HERE"
scopes = "https://www.googleapis.com/auth/adwords"
أنشئ مثيلاً من الكائن GoogleAdsClient.
$oAuth2Credential = (new OAuth2TokenBuilder())
    ->fromFile('/path/to/google_ads_php.ini')
    ->build();

$googleAdsClient = (new GoogleAdsClientBuilder())
    ->fromFile('/path/to/google_ads_php.ini')
    ->withOAuth2Credential($oAuth2Credential)
    ->build();
بعد ذلك، شغِّل تقرير حملة باستخدام طريقة GoogleAdsService.SearchStream لاسترداد الحملات في حسابك.
public static function runExample(GoogleAdsClient $googleAdsClient, int $customerId)
{
$googleAdsServiceClient = $googleAdsClient->getGoogleAdsServiceClient();
// Creates a query that retrieves all campaigns.
$query = 'SELECT campaign.id, campaign.name FROM campaign ORDER BY campaign.id';
// Issues a search stream request.
/** @var GoogleAdsServerStreamDecorator $stream */
$stream = $googleAdsServiceClient->searchStream(
SearchGoogleAdsStreamRequest::build($customerId, $query)
);
// Iterates over all rows in all messages and prints the requested field values for
// the campaign in each row.
foreach ($stream->iterateAllElements() as $googleAdsRow) {
/** @var GoogleAdsRow $googleAdsRow */
printf(
"Campaign with ID %d and name '%s' was found.%s",
$googleAdsRow->getCampaign()->getId(),
$googleAdsRow->getCampaign()->getName(),
PHP_EOL
);
}
}
Python
يتم توزيع مكتبة البرامج على PyPI
ويمكن تثبيتها باستخدام الأمر pip على النحو التالي:
python -m pip install google-ads==29.2.0أنشئ نسخة من ملف
google-ads.yaml من
مستودع GitHub وعدِّلها لتضمين بيانات الاعتماد الخاصة بك.
developer_token: INSERT_DEVELOPER_TOKEN_HERE
login_customer_id: INSERT_LOGIN_CUSTOMER_ID_HERE
json_key_file_path: JSON_KEY_FILE_PATH_HERE
أنشئ مثيلاً من GoogleAdsClient من خلال استدعاء الطريقة GoogleAdsClient.load_from_storage. مرِّر مسار google-ads.yaml كسلسلة إلى الطريقة عند استدعائها:
from google.ads.googleads.client import GoogleAdsClient
client = GoogleAdsClient.load_from_storage("path/to/google-ads.yaml")
أضِف معالجًا إلى أداة تسجيل المكتبة لتحديد مكان طباعة السجلات.
سيؤدي ما يلي إلى توجيه مسجّل المكتبة إلى الطباعة في وحدة التحكّم
(stdout).
import logging
import sys

logger = logging.getLogger('google.ads.googleads.client')
logger.addHandler(logging.StreamHandler(sys.stdout))
بعد ذلك، شغِّل تقرير حملة باستخدام طريقة GoogleAdsService.SearchStream لاسترداد الحملات في حسابك.
def main(client: GoogleAdsClient, customer_id: str) -> None:
ga_service: GoogleAdsServiceClient = client.get_service("GoogleAdsService")
query: str = """
SELECT
campaign.id,
campaign.name
FROM campaign
ORDER BY campaign.id"""
# Issues a search request using streaming.
stream: Iterator[SearchGoogleAdsStreamResponse] = ga_service.search_stream(
customer_id=customer_id, query=query
)
for batch in stream:
rows: List[GoogleAdsRow] = batch.results
for row in rows:
print(
f"Campaign with ID {row.campaign.id} and name "
f'"{row.campaign.name}" was found.'
)
Ruby
يتم نشر حِزم Ruby الخاصة بمكتبة البرامج إلى موقع استضافة حِزم Rubygems. الطريقة المقترَحة للتثبيت هي استخدام حزمة. أضِف سطرًا إلى ملف Gemfile:
gem 'google-ads-googleads', '~> 38.0.0'
بعد ذلك، استخدِم الأمر التالي:
bundle installأنشئ نسخة من ملف
google_ads_config.rb
من مستودع GitHub وعدِّلها لتضمين بيانات الاعتماد الخاصة بك.
Google::Ads::GoogleAds::Config.new do |c|
  c.developer_token = 'INSERT_DEVELOPER_TOKEN_HERE'
  c.login_customer_id = 'INSERT_LOGIN_CUSTOMER_ID_HERE'
  c.keyfile = 'JSON_KEY_FILE_PATH'
end
أنشئ مثيلاً من GoogleAdsClient عن طريق تمرير المسار إلى المكان الذي تحتفظ فيه بهذا الملف.
client = Google::Ads::GoogleAds::GoogleAdsClient.new('path/to/google_ads_config.rb')
بعد ذلك، شغِّل تقرير حملة باستخدام طريقة GoogleAdsService.SearchStream لاسترداد الحملات في حسابك.
def get_campaigns(customer_id)
# GoogleAdsClient will read a config file from
# ENV['HOME']/google_ads_config.rb when called without parameters
client = Google::Ads::GoogleAds::GoogleAdsClient.new
responses = client.service.google_ads.search_stream(
customer_id: customer_id,
query: 'SELECT campaign.id, campaign.name FROM campaign ORDER BY campaign.id',
)
responses.each do |response|
response.results.each do |row|
puts "Campaign with ID #{row.campaign.id} and name '#{row.campaign.name}' was found."
end
end
end
Perl
يتم توزيع المكتبة على
CPAN. ابدأ بنسخ مستودع google-ads-perl في الدليل الذي تختاره.
git clone https://github.com/googleads/google-ads-perl.gitانتقِل إلى الدليل google-ads-perl ونفِّذ الأمر التالي في موجه الأوامر لتثبيت جميع التبعيات اللازمة لاستخدام المكتبة.
cd google-ads-perlcpan install Module::Buildperl Build.PLperl Build installdeps
أنشئ نسخة من ملف
googleads.properties
من مستودع GitHub وعدِّلها لتضمين بيانات الاعتماد الخاصة بك.
jsonKeyFilePath=JSON_KEY_FILE_PATH
developerToken=INSERT_DEVELOPER_TOKEN_HERE
loginCustomerId=INSERT_LOGIN_CUSTOMER_ID_HERE
أنشئ مثيلاً من Client عن طريق تمرير المسار إلى المكان الذي تحتفظ فيه بهذا الملف.
my $properties_file = "/path/to/googleads.properties";

my $api_client = Google::Ads::GoogleAds::Client->new({
  properties_file => $properties_file
});
بعد ذلك، شغِّل تقرير حملة باستخدام طريقة GoogleAdsService.SearchStream لاسترداد الحملات في حسابك.
sub get_campaigns {
my ($api_client, $customer_id) = @_;
# Create a search Google Ads stream request that will retrieve all campaigns.
my $search_stream_request =
Google::Ads::GoogleAds::V23::Services::GoogleAdsService::SearchGoogleAdsStreamRequest
->new({
customerId => $customer_id,
query =>
"SELECT campaign.id, campaign.name FROM campaign ORDER BY campaign.id"
});
# Get the GoogleAdsService.
my $google_ads_service = $api_client->GoogleAdsService();
my $search_stream_handler =
Google::Ads::GoogleAds::Utils::SearchStreamHandler->new({
service => $google_ads_service,
request => $search_stream_request
});
# Issue a search request and process the stream response to print the requested
# field values for the campaign in each row.
$search_stream_handler->process_contents(
sub {
my $google_ads_row = shift;
printf "Campaign with ID %d and name '%s' was found.\n",
$google_ads_row->{campaign}{id}, $google_ads_row->{campaign}{name};
});
return 1;
}
curl
ابدأ بضبط حساب الخدمة كبيانات الاعتماد النشطة في gcloud CLI.
gcloud auth login --cred-file=PATH_TO_CREDENTIALS_JSONبعد ذلك، احصل على رمز دخول OAuth 2.0 المميز لواجهة Google Ads API.
gcloud auth \
  print-access-token \
  --scopes='https://www.googleapis.com/auth/adwords'
بعد ذلك، شغِّل تقرير حملة باستخدام طريقة GoogleAdsService.SearchStream لاسترداد الحملات في حسابك.
curl -i -X POST https://googleads.googleapis.com/v23/customers/CUSTOMER_ID/googleAds:searchStream \
   -H "Content-Type: application/json" \
   -H "Authorization: Bearer ACCESS_TOKEN" \
   -H "developer-token: DEVELOPER_TOKEN" \
   -H "login-customer-id: LOGIN_CUSTOMER_ID" \
   --data-binary "@query.json"
في ما يلي محتويات query.json:
{
  "query": "SELECT campaign.id, campaign.name, campaign.network_settings.target_content_network FROM campaign ORDER BY campaign.id"
}
إذا واجهت أخطاء عند إجراء طلبك الأول، يُرجى الاطّلاع على التعامل مع أخطاء واجهة برمجة التطبيقات للحصول على إرشادات حول تحديد المشاكل وحلّها.