Koleksiyonlar ile düzeninizi koruyun
İçeriği tercihlerinize göre kaydedin ve kategorilere ayırın.
OAuth2 kimlik bilgileri oluşturmak için kullanabileceğiniz bir diğer seçenek de OAuth2 Playground'u kullanmaktır. OAuth2 Playground, Google API Konsolu ile birlikte OAuth2 jetonlarını manuel olarak oluşturmanıza olanak tanır.
OAuth2 Playground, yalnızca tek bir yönetici hesabı veya Google Ads kullanıcısı için hesaplara erişmesi gereken kullanıcılar içindir. Birden fazla kullanıcıdan kimlik bilgisi istemeniz gerekiyorsa Google Ads API'de OAuth için bir istemci kitaplığı yapılandırmanız daha iyi olabilir.
Proje açılır listesinden mevcut bir projeyi seçin veya yeni bir proje oluşturun.
Kimlik bilgileri sayfasında Kimlik bilgileri oluştur'u ve ardından OAuth istemci kimliği'ni seçin.
Uygulama türü bölümünde Web uygulaması'nı seçin.
Yetkilendirilmiş yönlendirme URI'leri bölümünde aşağıdaki bilgileri içeren bir satır ekleyin:
https://developers.google.com/oauthplayground
Oluştur'u tıklayın.
İstemci kimliği sayfasında istemci kimliğini ve istemci gizli anahtarını not edin.
Bu bilgilere bir sonraki adımda ihtiyacınız olacak.
Mevcut bir bulut projeniz varsa 5. adımda açıklandığı gibi Yetkili yönlendirme URI'lerini ayarlayarak bu projeyi yeniden kullanabilirsiniz.
Jeton oluşturma
OAuth2 Playground'a gidin.
(Bu bağlantıyı kullandığınızda bazı anahtar değerleri sizin için önceden doldurulur.)
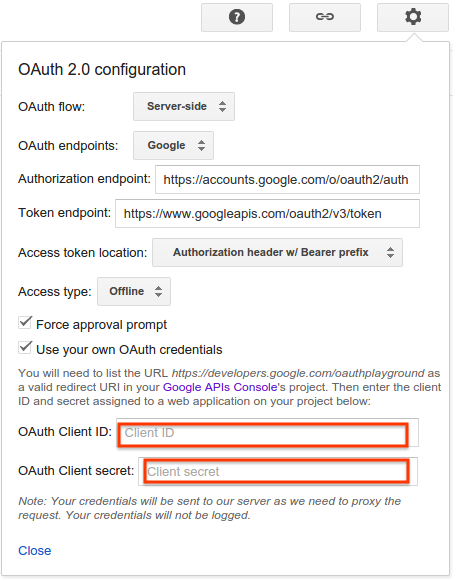
Sağ üst köşedeki dişli simgesini tıklayın ve Kendi OAuth kimlik bilgilerinizi kullanın etiketli kutuyu seçin (zaten seçili değilse).
Aşağıdakilerden emin olun:
OAuth akışı, Sunucu tarafı olarak ayarlanır.
Erişim türü, Çevrimdışı olarak ayarlanır (bu, yalnızca erişim jetonu yerine yenileme jetonu ve erişim jetonu almanızı sağlar).
Yukarıda aldığınız OAuth2 istemci kimliği ve OAuth2 istemci gizli anahtarını girin.
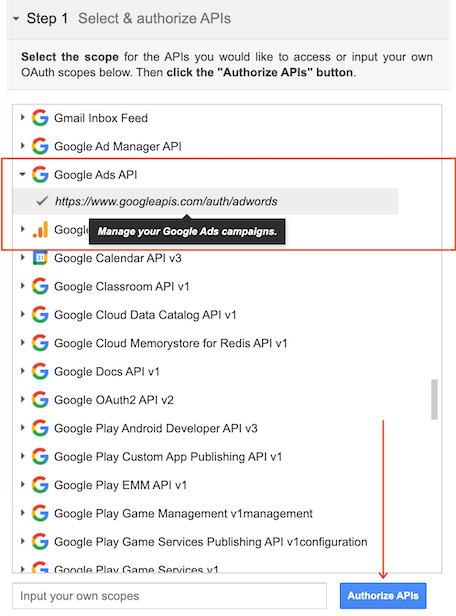
1. adım: API'leri seçin ve yetkilendirin başlıklı bölümde listeden Google Ads API'yi tıklayın ve kapsamını seçin https://www.googleapis.com/auth/adwords. Ardından API'leri yetkilendir'i tıklayın:
İstenirse erişim ve yetki vermek istediğiniz hesapta oturum açın. Aksi takdirde, sağ üst köşedeki mevcut Google kullanıcısının, kimlik bilgilerini almak istediğiniz Google Ads veya yönetici hesabı olduğunu onaylayın.
Uygulamanızın Google Ads kampanyalarınızı yönetmek istediğini belirten bir istem gösterilir. Devam etmek için Kabul et'i tıklayın.
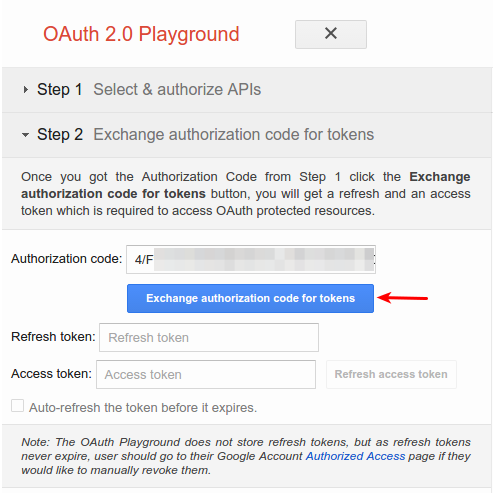
2. Adım - Jetonlar için yetkilendirme kodu değiş tokuşu yap etiketli sekmede Yetkilendirme kodu görünür. Jetonlar için yetkilendirme kodu değiş tokuşu yap'ı tıklayın.
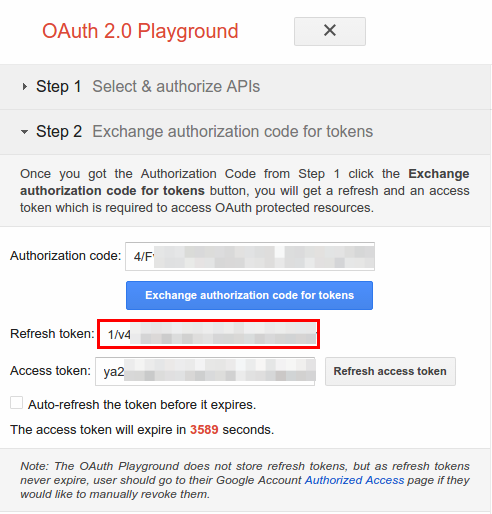
Her şey yolunda giderse Yenileme jetonu ve Erişim jetonu sizin için doldurulur (2. adım: Jetonlar için yetkilendirme kodu değiş tokuşu yap seçeneğini yeniden genişletmeniz gerekebilir):
Yenileme jetonunu, istemci kimliği ve istemci gizli anahtarıyla birlikte tercih ettiğiniz istemci kitaplığının yapılandırma dosyasına kopyalayın.
Artık yenileme jetonunuz olduğuna göre, yetkilendirilmiş yönlendirme URI'si olarak OAuth2 Playground'a ihtiyacınız yok. Yetkili yönlendirme URI'leri listesinden kaldırmak için:
Kimlik bilgileri sayfasında, düzenlemek istediğiniz istemci kimliği adını tıklayın.
https://developers.google.com/oauthplayground öğesini Yetkili yönlendirme URI'leri listesinden kaldırın. En az bir yönlendirme URI'si bırakmanız gerektiğini unutmayın.
[null,null,["Son güncelleme tarihi: 2025-08-31 UTC."],[[["\u003cp\u003eThe OAuth2 Playground helps generate OAuth2 credentials for single Google Ads user accounts.\u003c/p\u003e\n"],["\u003cp\u003eYou need a web application client ID and client secret to use the OAuth2 Playground.\u003c/p\u003e\n"],["\u003cp\u003eThe process involves authorizing the Google Ads API and exchanging an authorization code for refresh and access tokens.\u003c/p\u003e\n"],["\u003cp\u003eAfter obtaining the refresh token, remove the OAuth2 Playground as an authorized redirect URI for security.\u003c/p\u003e\n"]]],[],null,["# OAuth Playground\n\nAnother option for generating OAuth2 credentials is to use the **OAuth2\nPlayground**. The OAuth2 Playground, in conjunction with the Google API Console,\nlets you manually create OAuth2 tokens.\n\n\u003cbr /\u003e\n\n\u003cbr /\u003e\n\nThe OAuth2 Playground is for users who only need to access the accounts for a\n*single* manager account or Google Ads user. If you need to prompt multiple\nusers for credentials, it is likely better to [Configure a client library for\nOAuth in the Google Ads API](/google-ads/api/docs/oauth/client-library).\n\nGet a client ID and client secret\n---------------------------------\n\n| **Warning:** To use the **OAuth2 Playground** , you need to generate a **client\n| ID** for a [web application](/identity/protocols/OAuth2WebServer). This is the *only* type of application that works with the OAuth2 Playground. Refer to [Select an app type](/google-ads/api/docs/oauth/cloud-project#select_an_app_type) for more information.\n\nIf you don't have an existing cloud project:\n\n1. Open the [Google API Console\n Credentials page](https://console.cloud.google.com/apis/credentials).\n\n2. From the project drop-down, select an existing project or create a new one.\n\n3. On the Credentials page, select **Create credentials** , then select\n **OAuth client ID**.\n\n4. Under **Application type** , choose **Web application**.\n\n5. Under **Authorized redirect URIs** , add a line with:\n `https://developers.google.com/oauthplayground`\n\n6. Click **Create**.\n\n7. On the Client ID page, take note of the **client ID** and **client secret**.\n You'll need these in the next step.\n\nIf you have an existing cloud project, you can reuse it by setting the\nAuthorized redirect URIs as described in step 5.\n\nGenerate tokens\n---------------\n\n| **Warning:** The Google user you're signed in as in your browser determines which Google Ads accounts you'll be able to access with the OAuth2 credentials you generate. Therefore, you may want to do these steps in an incognito window or when you're not signed in to your Google Account, since it's likely that the user whose credentials you want to use isn't the same user you were signed in as when you got the client ID and secret.\n\n1. Go to the [OAuth2\n Playground](/oauthplayground#step1&scopes=https%3A//www.googleapis.com/auth/adwords&url=https%3A//&content_type=application/json&http_method=GET&useDefaultOauthCred=checked&oauthEndpointSelect=Google&oauthAuthEndpointValue=https%3A//accounts.google.com/o/oauth2/v2/auth&oauthTokenEndpointValue=https%3A//oauth2.googleapis.com/token&includeCredentials=unchecked&accessTokenType=bearer&autoRefreshToken=unchecked&accessType=offline&forceAprovalPrompt=checked&response_type=code),\n (using this link should pre-populate some key values for you).\n\n2. Click the gear icon\n in the upper right corner and select the box labeled **Use your own OAuth\n credentials** (if it isn't already selected).\n\n3. Make sure that:\n\n - **OAuth flow** is set to **Server-side**.\n - **Access type** is set to **Offline** (this ensures you get a refresh token *and* an access token, instead of just an access token).\n4. Enter the **OAuth2 client ID** and **OAuth2 client secret** you obtained above.\n\n5. In the section labeled **Step 1 - Select \\& authorize APIs** , click **Google\n Ads API** from the list and select its scope,\n `https://www.googleapis.com/auth/adwords`. Then click **Authorize APIs**:\n\n6. If prompted, sign in to the account to which you want to grant access and\n authorization. Otherwise, confirm that the current Google user in the top\n right corner is the Google Ads or manager account for whom you want to obtain\n credentials.\n\n | If you got your client ID and secret only a few minutes ago, and you get an error such as **Error: redirect_uri_mismatch** , the changes you made may not have propagated. Click the back button in your browser, wait a few minutes, then try clicking **Authorize APIs** again.\n\n \u003cbr /\u003e\n\n | If you get an error that you have not been granted access by the developer and the app is currently being tested, you will need to visit the OAuth consent screen page within your GCP project and do one of the following:\n |\n | \u003cbr /\u003e\n |\n | - Publish the app.\n |\n | - Keep the app in the Testing status, and add yourself as a test user.\n |\n \u003cbr /\u003e\n\n7. A prompt appears indicating your app would like to\n **Manage your Google Ads Campaigns** . Click **Accept** to continue.\n\n8. In the tab labeled **Step 2 - Exchange authorization code for tokens** ,\n an **Authorization code** should appear. Click\n **Exchange authorization code for tokens**.\n\n9. If all goes well, the **Refresh token** and **Access token** should be\n filled in for you (you may have to re-expand\n **Step 2 - Exchange authorization code for tokens**):\n\n10. Copy the **Refresh token** into the configuration file for your client\n library of choice, along with the **client ID** and **client secret**.\n\n11. [Configure a client library for OAuth in the Google Ads API](/google-ads/api/docs/oauth/client-library).\n\nRemove the OAuth2 Playground from your client ID\n------------------------------------------------\n\nNow that you have a **refresh token**, you no longer need the OAuth2 Playground\nto be an authorized redirect URI. To remove it from the list of authorized\nredirect URIs:\n\n1. Go to the [Google API Console Credentials page](https://console.cloud.google.com/apis/credentials).\n\n2. From the project drop-down, select your project.\n\n3. On the Credentials page, click the **client ID name** to edit.\n\n4. Remove `https://developers.google.com/oauthplayground` from the **Authorized\n redirect URIs** . Note that you must leave at least *one* redirect URI in\n place.\n\n5. Click **Save**."]]

 tıklayın ve Kendi OAuth kimlik bilgilerinizi kullanın etiketli kutuyu seçin (zaten seçili değilse).