
Page Summary
-
The single user authentication flow allows an app to manage all Google Ads accounts associated with a single authorized user.
-
This workflow involves granting a user access to all relevant accounts and then having that user authorize your app.
-
While simpler for a few users, this workflow has drawbacks compared to service accounts, including more complex setup, potential app verification, and risks if the authorized user leaves.
-
You can generate the necessary credentials, such as a refresh token, using tools like gcloud CLI after configuring an OAuth consent screen and creating OAuth credentials in the Google Cloud Console.
-
Once credentials are obtained, you can configure your Google Ads API client library to use them for API calls.
Similar to the service account workflow, the single user authentication flow makes use of the authorization and user management features offered by the Google Ads UI to grant the app access to all the necessary accounts. This authentication workflow has two steps:
- You grant a single user access to all the Google Ads accounts that should be managed by the app.
- The user authorizes your app to manage their Google Ads accounts on their behalf, thus granting the app access to all the Google Ads accounts.
Since there is only one user involved, you can rely on tools such as [gcloud CLI][gcloud-cli] or the [GenerateUserCredential code example][generate-user-credentials-example] instead of building your own OAuth 2.0 user authentication flow.
A related use case for this workflow is when your accounts can be accessed through a handful of user logins (e.g. 3-4 users), so the development effort to build a full-blown OAuth user authentication workflow isn't justified when compared to the effort for obtaining authorization for 3-4 users using a command line tool such as gcloud CLI.
Drawbacks
There are a few disadvantages to this flow when compared to the service account workflow:
- User authentication workflow requires you to create an OAuth 2.0 client ID and secret in the Google Cloud Console, which requires more configuration steps than creating a service account and key.
- Your app may have to go through an additional [Google Cloud App verification process][app-verification].
- If the authorized user leaves the team or company, then your app may stop working if you remove the user from your accounts or disable the user account. Service accounts are not tied to individual users, so this risk is avoided.
- The user authorizing the Google Ads account should take extra precautions such as [enabling 2 factor authentication][2fa] to defend against their Google Account getting compromised due to getting compromised due to poor security, malware, or phishing. Service accounts are less vulnerable to this issue since some of these modes of attack don't directly apply to them.
Generate credentials
Follow the [instructions][configure-oauth-consent] to configure an OAuth consent screen for your application and add
https://www.googleapis.com/auth/adwordsas an OAuth 2.0 scope. See Setting up your OAuth consent screen for details.Create a client ID and client secret by following the [instructions][create-credentials]. Once you create the OAuth 2.0 client, download the client's JSON file by first clicking its Download OAuth client icon and then the DOWNLOAD JSON button on the following screen. Save the file as
credentials.json.Identify a user account that has access to all the Google Ads accounts you want to manage using your app. If there are accounts with missing access, then follow the [instructions][grant-access] to grant the necessary access.
[Download and install][install-gcloud] gcloud CLI. Once installed, verify that the tool works correctly by running the
gcloud versioncommand from a command line prompt. The output may look as follows.:~$ gcloud version Google Cloud SDK 492.0.0 alpha 2024.09.06 beta 2024.09.06 bq 2.1.8 bundled-python3-unix 3.11.9 core 2024.09.06 enterprise-certificate-proxy 0.3.2 gcloud-crc32c 1.0.0 gsutil 5.30Generate an OAuth 2.0 refresh token by running the gcloud CLI tool:
gcloud auth application-default

  login --scopes=https://www.googleapis.com/auth/adwords,https://www.googleapis.com/auth/cloud-platform

  --client-id-file=<path_to_credentials.json>
The
credentials.jsonfile is from the previous step.The
gcloudcommand opens a Google Account login window in a new browser window and takes you through the OAuth 2.0 authentication steps. Make sure you sign in as the user you selected from the previous steps. If your app is unverified, you might see a warning screen. In such cases, it's safe to click the Show Advanced link and click the Go to PROJECT_NAME (unverified) option.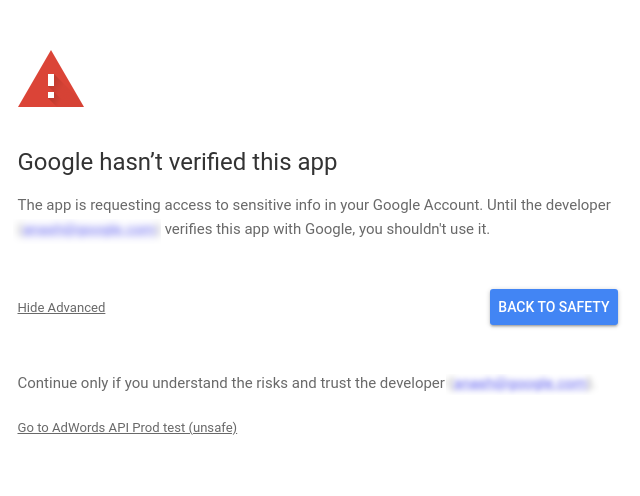
After you verify the scopes, click the Continue button to grant the permission. The browser navigates to
https://cloud.google.com/sdk/auth_success, indicating that the authentication was successful. The page displays the following message:Authorization code granted. Close this tab.The
gcloudcommand prints the following message:Credentials saved to file: [/****/.config/gcloud/application_default_credentials.json]Now open the
application_default_credentials.jsonfile. Its contents should be similar to follows:{ "account": "", "client_id": "******.apps.googleusercontent.com", "client_secret": "******", "refresh_token": "******", "type": "authorized_user", "universe_domain": "googleapis.com" }
Client library configuration
Select the tab corresponding to your programming language for instructions on how to configure your client library.
Java
Configure the following keys in your ads.properties file.
api.googleads.clientId=INSERT_CLIENT_ID_HERE
api.googleads.clientSecret=INSERT_CLIENT_SECRET_HERE
api.googleads.refreshToken=INSERT_REFRESH_TOKEN_HERE
api.googleads.loginCustomerId=INSERT_LOGIN_CUSTOMER_ID_HERE
See the [configuration guide][java-config-guide] for additional options.
.NET
You can initialize your GoogleAdsClient instance at runtime, using the
credentials you have obtained from the user whose accounts you are making
API calls to.
GoogleAdsConfig config = new GoogleAdsConfig()
{
    OAuth2Mode = OAuth2Flow.APPLICATION,
    OAuth2ClientId = "INSERT_OAUTH2_CLIENT_ID",
    OAuth2ClientSecret = "INSERT_OAUTH2_CLIENT_SECRET",
    OAuth2RefreshToken = "INSERT_OAUTH2_REFRESH_TOKEN",
    ...
};
GoogleAdsClient client = new GoogleAdsClient(config);
See the [configuration guide][dotnet-config-guide] for additional options.
Python
Configure the following keys in your google-ads.yaml file.
client_id: INSERT_OAUTH2_CLIENT_ID_HERE
client_secret: INSERT_OAUTH2_CLIENT_SECRET_HERE
refresh_token: INSERT_REFRESH_TOKEN_HERE
login_customer_id: INSERT_LOGIN_CUSTOMER_ID_HERE
See the [configuration guide][python-config-guide] for additional options.
PHP
Configure the following keys in your google_ads_php.ini.
[GOOGLE_ADS]
loginCustomerId = "INSERT_LOGIN_CUSTOMER_ID_HERE"

[OAUTH2]
clientId = "INSERT_OAUTH2_CLIENT_ID_HERE"
clientSecret = "INSERT_OAUTH2_CLIENT_SECRET_HERE"
refreshToken = "INSERT_OAUTH2_REFRESH_TOKEN_HERE"
See the [configuration guide][php-config-guide] for additional options.
Ruby
Configure the following keys in your
[google_ads_config.rb][ruby-config-file] file.
  Google::Ads::GoogleAds::Config.new do |c|
     c.client_id = 'INSERT_CLIENT_ID_HERE'
     c.client_secret = 'INSERT_CLIENT_SECRET_HERE'
     c.refresh_token = 'INSERT_REFRESH_TOKEN_HERE'
     c.developer_token = 'INSERT_DEVELOPER_TOKEN_HERE'
     c.login_customer_id = 'INSERT_LOGIN_CUSTOMER_ID_HERE'
  end
See the [configuration guide][ruby-config-guide] for additional options.
Perl
Configure the following keys in your googleads.properties file.
 clientId=INSERT_OAUTH2_CLIENT_ID_HERE
 clientSecret=INSERT_OAUTH2_CLIENT_SECRET_HERE
 refreshToken=INSERT_OAUTH2_REFRESH_TOKEN_HERE
 loginCustomerId=INSERT_LOGIN_CUSTOMER_ID_HERE
See the [configuration guide][perl-config-guide] for additional options.
curl
Start by using an HTTP client to fetch an OAuth 2.0 access token. This guide
uses the curl command.
curl \
  --data "grant_type=refresh_token" \
  --data "client_id=CLIENT_ID" \
  --data "client_secret=CLIENT_SECRET" \
  --data "refresh_token=REFRESH_TOKEN" \
  https://www.googleapis.com/oauth2/v3/token
You can now use the access token in your API calls. The following example
shows how to run a campaign report using the
GoogleAdsService.SearchStream method to retrieve the
campaigns in your account. This guide doesn't cover the details of
reporting.
curl -i -X POST https://googleads.googleapis.com/v24/customers/CUSTOMER_ID/googleAds:searchStream \
   -H "Content-Type: application/json" \
   -H "Authorization: Bearer ACCESS_TOKEN" \
   -H "developer-token: DEVELOPER_TOKEN" \
   -H "login-customer-id: LOGIN_CUSTOMER_ID" \
   --data-binary "@query.json"
The contents of query.json are as follows:
{
  "query": "SELECT campaign.id, campaign.name, campaign.network_settings.target_content_network FROM campaign ORDER BY campaign.id"
}
[service-account-workflow]: /google-ads/api/docs/oauth/service-accounts [gcloud-cli]: https://cloud.google.com/sdk/gcloud [generate-user-credentials-example]: /google-ads/api/samples/generate-user-credentials [app-verification]: //support.google.com/cloud/answer/13461325 [2fa]: //support.google.com/google-ads/answer/12864186 [configure-oauth-consent]: /workspace/guides/configure-oauth-consent [create-credentials]: /workspace/guides/create-credentials#desktop-app [grant-access]: //support.google.com/google-ads/answer/6372672 [install-gcloud]: //cloud.google.com/sdk/docs/install [java-config-guide]: /google-ads/api/docs/client-libs/java/config-file [dotnet-config-guide]: /google-ads/api/docs/client-libs/dotnet/configuration [python-config-guide]: /google-ads/api/docs/client-libs/python/configuration [php-config-guide]: /google-ads/api/docs/client-libs/php/configuration [ruby-config-file]: //github.com/googleads/google-ads-ruby/blob/HEAD/google_ads_config.rb [ruby-config-guide]: /google-ads/api/docs/client-libs/ruby/configuration [perl-config-guide]: /google-ads/api/docs/client-libs/perl/configuration [oauth-playground]: /oauthplayground/ [playground-video]: //www.youtube.com/watch?v=KFICa7Ngzng