Earth Engine 的设计使得您在进行计算时几乎无需担心地图投影。与缩放一样,计算所采用的投影是基于“拉取”方式确定的。具体而言,输入是在输出投影中请求的。输出可以通过函数参数(例如 crs)、Code Editor 和 geemap 地图对象(采用 maps Mercator (EPSG:3857) 投影)或 reproject() 调用确定。当您在 Code Editor 或 geemap 中显示图片时,系统会以 maps mercator 格式请求输入。请考虑对具有正弦投影的 MODIS 图像执行以下简单操作:
Code Editor (JavaScript)
// The input image has a SR-ORG:6974 (sinusoidal) projection.
var image = ee.Image('MODIS/061/MOD13A1/2014_05_09').select(0);

// Normalize the image and add it to the map.
var rescaled = image.unitScale(-2000, 10000);
var visParams = {min: 0.15, max: 0.7};
Map.addLayer(rescaled, visParams, 'Rescaled');
import ee
import geemap.core as geemap
Colab (Python)
# The input image has a SR-ORG:6974 (sinusoidal) projection.
image = ee.Image('MODIS/061/MOD13A1/2014_05_09').select(0)

# Normalize the image and add it to the map.
rescaled = image.unitScale(-2000, 10000)
vis_params = {'min': 0.15, 'max': 0.7}
m = geemap.Map()
m.add_layer(rescaled, vis_params, 'Rescaled')
m
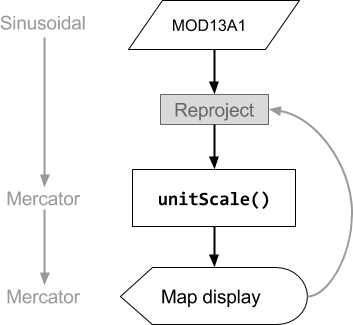
此代码示例的操作顺序如图 1 所示。请注意,输入的投影由输出决定,具体而言,是代码编辑器中地图显示的 maps mercator 投影。此投影会通过一系列操作传播回来,以便以地图的缩放级别决定的比例,在 Maps Mercator 中请求输入。

在 Earth Engine 中,投影由坐标参考系 (CRS 或许多方法的 crs 参数) 指定。您可以通过对图片调用 projection() 来检查图片的投影:
Code Editor (JavaScript)
var image = ee.Image('LANDSAT/LC08/C02/T1_TOA/LC08_044034_20140318').select(0);
print('Projection, crs, and crs_transform:', image.projection());
print('Scale in meters:', image.projection().nominalScale());
import ee
import geemap.core as geemap
Colab (Python)
image = ee.Image('LANDSAT/LC08/C02/T1_TOA/LC08_044034_20140318').select(0)
display('Projection, crs, and crs_transform:', image.projection())
display('Scale in meters:', image.projection().nominalScale())
请注意,通过对 projection() 返回的 ee.Projection 调用 nominalScale(),您可以确定图片的原生分辨率。原始分辨率是图片金字塔最低级别的标称像素尺度(以米为单位)。由于图片的每个波段可以具有不同的比例和/或投影,因此,如果您对至少有一个波段的投影与其他波段不同的图片调用 projection(),则可能会看到如下错误:
默认投影
除非您需要在特定投影中进行计算,否则通常无需指定投影。只有在输出不明确的情况下,Earth Engine 才会要求您指定投影和/或比例。缩减包含不同投影图像的 ImageCollection(即创建合成图像)可能会导致模糊不清。如果图片是具有不同投影的输入图片的合成图或拼接图,则其投影将采用默认投影,即 1 度比例的 WGS84。
例如:
Code Editor (JavaScript)
var collection = ee.ImageCollection('LANDSAT/LC08/C02/T1_TOA');
var mosaic = collection.filterDate('2018-01-01', '2019-01-01').mosaic();
print(mosaic.projection());
import ee
import geemap.core as geemap
Colab (Python)
collection = ee.ImageCollection('LANDSAT/LC08/C02/T1_TOA')
mosaic = collection.filterDate('2018-01-01', '2019-01-01').mosaic()
display(mosaic.projection())
如果您尝试在计算中使用这样的图片,可能会看到类似以下内容的错误:
通常,不希望或不打算进行 1 度级别的汇总,因此 Earth Engine 会提供这条友好提醒,以便您为输出提供完整的规范。
用户通常会对此行为感到困惑,并担心“丢失”投影信息,但系统实际上不会在需要之前计算像素(了解详情),并且在需要时,请求中始终会附带输出投影,其中指定了如何计算复合图像。
在大多数用例中,不进行投影并不是问题,实际上是一种有价值的优化,因为这样可以预览任何缩放级别的结果,而无需等待完整分辨率计算完成。但这确实意味着,在不同缩放级别下,输出可能会有所不同。
如果优化的显示图片因故不够用,可以通过重新投影输出(如以下部分所述)来强制在特定投影中进行计算。
重新投影
您可以使用 reproject() 方法强制在特定投影中执行操作。使用 reproject() 会导致在 reproject() 调用中指定的投影中请求输入。
在 reproject() 调用之前,代码中的计算将在指定的投影中完成。例如,如需强制在特定投影中生成复合图,请执行以下操作:
Code Editor (JavaScript)
// Some projection that is suitable for your area of interest.
var proj = ee.Projection(...);
var output = collection.reduce(...).reproject(proj);
import ee
import geemap.core as geemap
Colab (Python)
# Some projection that is suitable for your area of interest.
proj = ee.Projection(...)
output = collection.reduce(...).reproject(proj)
需要固定投影的一些情况包括:
- 计算梯度(例如
ee.Terrain.gradient或ee.Terrain.slope)。 reduceResolution,适用于您希望将较高分辨率的像素汇总为较低分辨率的情况。(详细了解如何降低分辨率)。
除非绝对必要,否则您应避免使用 reproject(),原因有很多。例如,假设您重新投影某个对象并将其添加到地图中。如果您在 reproject() 调用中指定的比例远小于地图的缩放级别,Earth Engine 将请求非常小比例的所有输入,并涵盖非常广泛的空间范围。这可能会导致一次请求的数据量过多,从而导致错误。
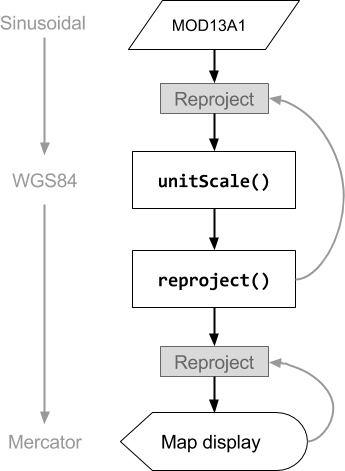
如果最终输出的投影与 reproject() 调用中指定的投影不同,则会导致另一次重新投影。这也是在代码中谨慎使用 reproject() 的另一个原因。请考虑以下示例,该示例会强制将 MODIS 图像先重新投影到 WGS84,然后再重新投影到 maps mercator,以便在代码编辑器地图中显示:
Code Editor (JavaScript)
// The input image has a SR-ORG:6974 (sinusoidal) projection.
var image = ee.Image('MODIS/061/MOD13A1/2014_05_09').select(0);

// Operations *before* the reproject call will be done in the projection
// specified by reproject().  The output results in another reprojection.
var reprojected = image
    .unitScale(-2000, 10000)
    .reproject('EPSG:4326', null, 500);
Map.addLayer(reprojected, {min: 0.15, max: 0.7}, 'Reprojected');
import ee
import geemap.core as geemap
Colab (Python)
# The input image has a SR-ORG:6974 (sinusoidal) projection.
image = ee.Image('MODIS/061/MOD13A1/2014_05_09').select(0)

# Operations *before* the reproject call will be done in the projection
# specified by reproject(). The output results in another reprojection.
reprojected = image.unitScale(-2000, 10000).reproject('EPSG:4326', None, 500)
m = geemap.Map()
m.add_layer(reprojected, {'min': 0.15, 'max': 0.7}, 'Reprojected')
m
图 2 图解了与此简单重投影示例对应的操作流程。请注意,第一个重新投影是显式的,如 reproject() 调用中所指定。第二次重新投影是隐式的,由 Earth Engine 自动执行,以便在地图上显示结果。另请注意,有关要使用哪种投影的信息会从请求传播回输入。

