上传表格素材资源
您可以使用素材资源管理器或命令行界面 (CLI) 上传 Shapefile 或 CSV 格式的数据集。(如需详细了解如何使用代码编辑器或 CLI 导入栅格数据,请参阅导入栅格数据。)您上传的资源最初是私享的,但可以按照“共享资源”部分中所述的方式进行共享。
上传 Shapefile
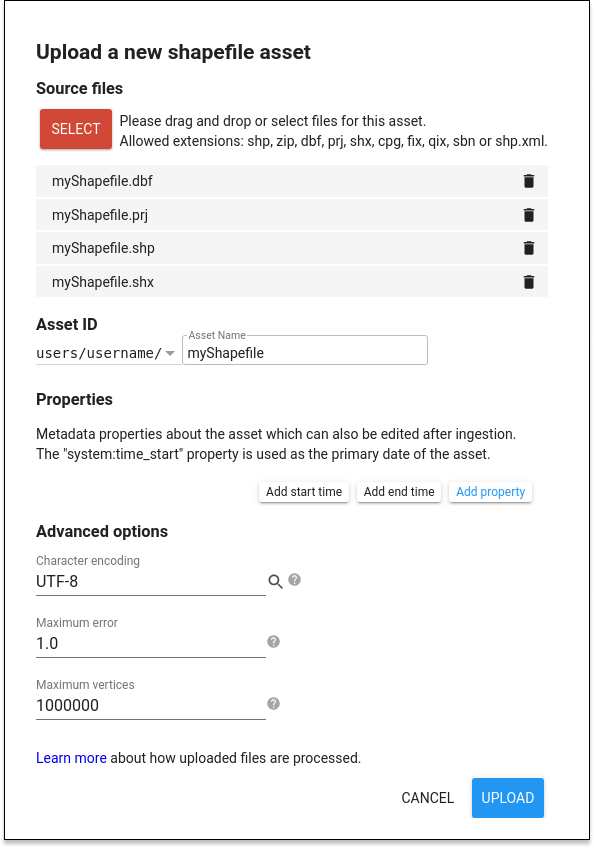
如需从代码编辑器上传 Shapefile,请点击  按钮,然后选择 Table Upload(表格上传)部分下的 Shape files(Shapefile)。系统会显示一个类似于图 1 的上传对话框。点击 SELECT 按钮,然后在本地文件系统中找到包含 Shapefile 的 Shapefile 或 Zip 归档。选择 .shp 文件时,请务必选择相关的 .dbf、.shx 和 .prj 文件。如果未提供 .prj 文件,Earth Engine 将默认使用 WGS84(经度、纬度)坐标。如果您要上传 ZIP 归档文件,请确保其中仅包含一个 Shapefile(一组 .shp、.dbf、.shx、.prj 等文件),且没有重复的文件名。请确保文件名不包含额外的英文句点或圆点。(文件名将在扩展名前面包含一个英文句点。)
在您的用户文件夹中为表分配一个合适的素材资源 ID(该 ID 应不存在)。点击上传以开始上传。
上传 CSV 文件
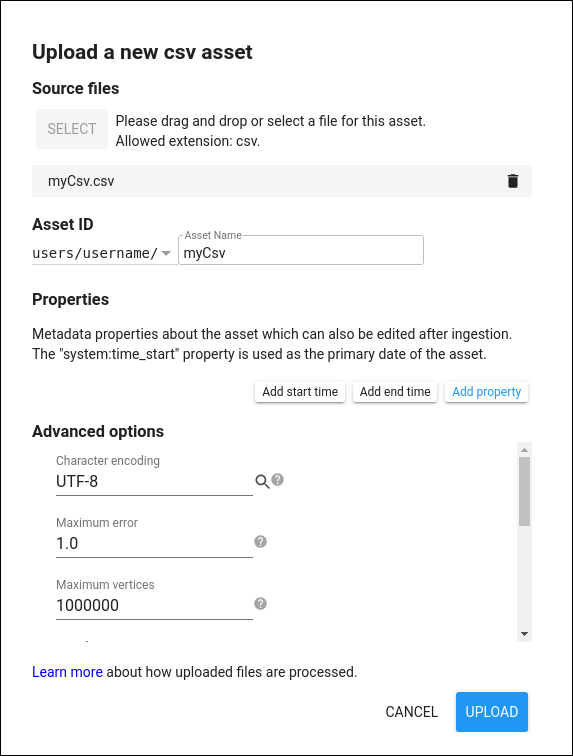
如需通过代码编辑器上传 CSV 文件,请激活素材资源标签页,然后点击 按钮,然后选择表格上传部分下的 CSV 文件。系统会显示一个类似于图 2 的上传对话框。点击 SELECT(选择)按钮,然后前往本地文件系统中的 .csv 文件。为表指定一个相关且具有唯一性的素材资源 ID 名称。
点击“确定”以开始上传。
CSV 文件应包含每项地图项对应的一行,并且列数应与地图项集的属性或变量数量相同。如果地图项是地理空间地图项,则必须具有由几何图形字符串 (GeoJSON、WKT) 或 x 和 y 位置属性定义的地理位置。 如果 CSV 文件是从 GIS 或地理空间数据工具(例如 GDAL/OGR)导出的,则应该已经存在格式正确且命名正确的几何图形列。 或者,您也可以在电子表格应用中定义两个表示点位置的 x 坐标和 y 坐标列,并将其与任何其他变量一起以 CSV 格式导出。
高级选项
在上传对话框的高级选项部分中,查看和更改默认设置。通过拆分具有大量顶点的几何图形,可以提升 Earth Engine 的性能。Earth Engine 不允许地图项的顶点数超过 100 万个。在表上传期间,Earth Engine 会自动拆分顶点数超过 100 万的几何图形。您可以指定较低的值以提高矢量渲染性能。
Earth Engine 会尝试检测主几何图形列,并假定数据投影为 WGS84,除非另有说明。几何图形的测地线状态由给定投影的默认边缘解读决定(例如,WGS84 使用测地线几何图形),但可以在“高级设置”菜单中替换此设置。如果数据的几何图形是由 x 列和 y 列定义的点,请务必将相应列命名为“经度”和“纬度”,或在“高级设置”下指定 x 列和 y 列名称。
跟踪上传进度
开始上传表后,系统会将“提取资源”任务添加到任务管理器中,该任务位于代码编辑器右侧的 Tasks 标签页下。点击 ? 查看上传状态图标。如需取消上传,请点击相应任务旁边的旋转图标  。提取完成后,任务单元格会变为蓝色,并且资源会显示在您的用户文件夹中的素材资源标签页下,带有 图标。
表上传限制
上传表时,表中特征的数量上限为 1 亿。地图项上的房源数量上限为 1,024 个。这些限制可确保能够高效地查询生成的素材资源。此外,每个地图项都有顶点数量上限,如上文“高级选项”部分所述。
将表格素材资源加载到脚本中
如需在脚本中根据表格素材资源创建 FeatureCollection,请按照管理素材资源页面中的说明导入该素材资源。