이미지를 로드하고 표시하는 방법을 알았으니 이제 이미지에 계산을 적용해 보겠습니다.
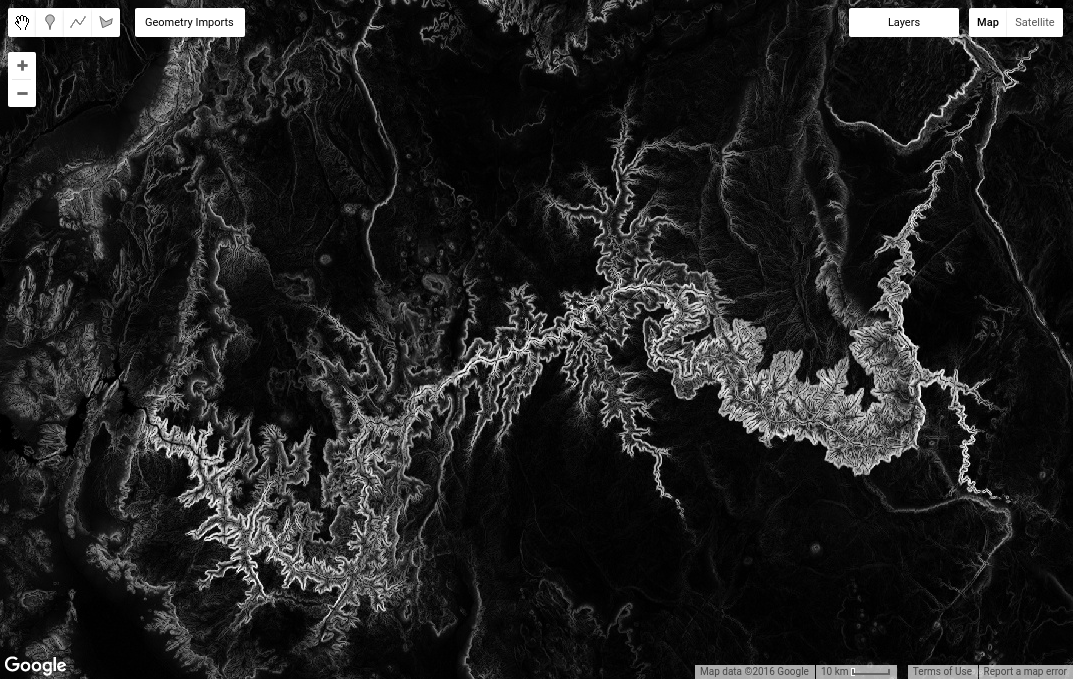
예를 들어 ee.Terrain 패키지의 slope 메서드에 SRTM 고도 이미지를 전달하여 지형의 경사를 계산할 수 있습니다.
코드 편집기 (JavaScript)
// Load the SRTM image.
var srtm = ee.Image('CGIAR/SRTM90_V4');

// Apply an algorithm to an image.
var slope = ee.Terrain.slope(srtm);

// Display the result.
Map.setCenter(-112.8598, 36.2841, 9); // Center on the Grand Canyon.
Map.addLayer(slope, {min: 0, max :60}, 'slope');
코드 ee.Terrain.slope(srtm)에서 srtm 이미지가 경사 알고리즘의 인수로 제공됩니다. 결과는 그림 3과 같이 표시됩니다.
이미지 수학
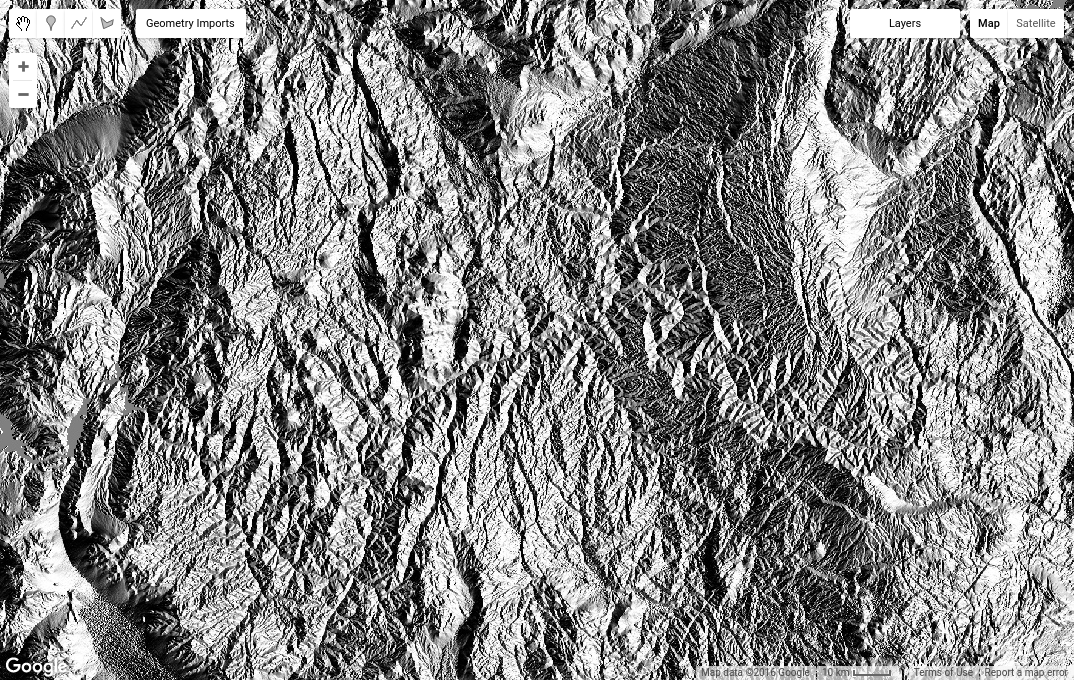
이미지 객체에서 호출할 수 있는 ee.Image 클래스의 메서드도 있습니다. 예를 들어 이미지 밴드를 사용하여 수학을 수행한다고 가정해 보겠습니다 (밴드 수학 또는 지도 대수라고도 함). 예를 들어 측면 이미지에 대한 삼각 함수 연산에 관심이 있을 수 있습니다. 이렇게 하려면 먼저 종횡비 이미지를 라디안으로 변환한 다음 sin()를 호출합니다. srtm 이미지를 재사용합니다.
코드 편집기 (JavaScript)
// Get the aspect (in degrees).
var aspect = ee.Terrain.aspect(srtm);

// Convert to radians, compute the sin of the aspect.
var sinImage = aspect.divide(180).multiply(Math.PI).sin();

// Display the result.
Map.addLayer(sinImage, {min: -1, max: 1}, 'sin');
결과는 그림 4와 같이 표시됩니다. aspect.divide(180).multiply(Math.PI).sin() 코드를 자세히 살펴보는 것이 좋습니다. 이와 같이 여러 메서드를 연결하면 코드는 '종횡비를 180으로 나누고 그 결과를 π로 곱한 다음 최종적으로 sin을 취하라'고 말합니다. 이러한 방식으로 메서드를 결합하여 이미지에 복잡한 수학 연산을 실행할 수 있습니다. 수학 연산, add(), subtract(), multiply() 등의 전체 목록은 Image 문서를 참고하세요.
이미지 통계
이미지에서 유용한 또 다른 작업 클래스는 이미지 영역 또는 래스터-벡터 오버레이에서 픽셀 통계를 계산하는 것입니다. Earth Engine에서 통계를 계산하려면 ee.Reducer 패키지의 클래스로 표시되는 리듀서를 사용합니다. 예를 들어 특정 지역의 평균 고도에 관심이 있다고 가정해 보겠습니다. 기하학적 도형 그리기 도구를 사용하여 다각형을 그려 리전을 정의할 수 있습니다.
영역을 대화형으로 그리려면 다각형 그리기 도구( )를 가져온 다음 관심 영역 위에 다각형을 디지털화하고 완료되면 나가기를 클릭합니다. 결과
 ee.Geometry 객체는 자동으로 geometry로 이름이 지정되고 스크립트 상단에 가져오기로 추가됩니다. 가져오기에서 변수 이름을 클릭하고 새 이름을 입력하여 변수 이름을 'polygon'으로 변경합니다.
그런 다음 다음 코드를 사용하여 다각형의 평균 픽셀 값을 가져옵니다.
코드 편집기 (JavaScript)
// Compute the mean elevation in the polygon.
var meanDict = srtm.reduceRegion({
  reducer: ee.Reducer.mean(),
  geometry: polygon,
  scale: 90
});

// Get the mean from the dictionary and print it.
var mean = meanDict.get('elevation');
print('Mean elevation', mean);
여기에서 몇 가지 사항을 확인해야 합니다. 먼저 reduceRegion()는 Image 객체에 사용할 수 있는 메서드입니다 (여기에서 지역 축소에 대해 자세히 알아보기). 두 번째로 메서드 인수는 단일 인수로 전달되는 JavaScript 객체에 제공됩니다. (구체적으로 객체의 키는 메서드 매개변수의 이름입니다. 값은 메서드의 인수입니다. 셋째, reducer 매개변수는 계산할 통계 유형을 지정하고 geometry 매개변수는 통계를 계산할 리전을 지정합니다. scale 매개변수는 사용할 픽셀 크기(미터)입니다. 모호성을 방지하려면 축소할 때 항상 스케일을 지정해야 합니다. Earth Engine에서 입력으로부터 적절한 스케일을 자동으로 결정하지 못할 수 있기 때문입니다.
(Earth Engine의 스케일 자세히 알아보기)
마지막으로 reduceRegion()의 반환 값은 키가 밴드 이름이고 값이 밴드의 픽셀 통계인 사전입니다. 사전의 get() 메서드는 인수로 제공된 키에 해당하는 값을 반환합니다. 이 경우 srtm 이미지에는 'elevation'이라는 밴드가 하나 있으므로 예시 코드는 딕셔너리에서 해당 통계를 가져와 출력합니다.
이 코드를 실행할 때 다음과 같은 오류가 표시되면
걱정하지 마세요. 오류를 해결하기 위해 할 수 있는 몇 가지 방법이 있습니다. reduceRegion() 메서드에는 계산에 이렇게 많은 픽셀을 포함할지 여부를 고려하도록 하는 검사가 있습니다. 이는 전 세계의 모든 1미터 픽셀의 평균을 계산하는 것과 같은 어리석은 작업을 실수로 실행하지 않도록 하기 위한 것입니다 (이러한 작업을 실행하지 마세요). 이 오류를 해결하려면 매개변수 사전에 bestEffort: true를 추가하여 bestEffort 매개변수를 true로 설정하거나 maxPixels 매개변수를 기본값인 1,000만 픽셀보다 높은 값으로 설정하세요. bestEffort가 true이면 Earth Engine에서 maxPixels를 초과하지 않도록 자동으로 스케일을 다시 계산합니다.
여담: Earth Engine의 스케일
이전 예에서 scale은 SRTM 이미지의 기본 해상도에 가깝게 설정됩니다. 다음 명령어를 사용하여 이미지의 기본 해상도를 확인할 수 있습니다.
코드 편집기 (JavaScript)
var scale = srtm.projection().nominalScale();
print('SRTM scale in meters', scale);
기본 해상도보다 작은 스케일을 지정하면 Earth Engine에서 가장 가까운 이웃을 사용하여 입력 이미지를 리샘플링한 다음 이러한 작은 픽셀을 모두 계산에 포함합니다. 스케일을 더 크게 설정하면 Earth Engine에서 집계된 버전의 입력에서 입력 픽셀을 사용합니다 (즉, 이미지 피라미드의 상위 수준에서 픽셀을 가져옴). Earth Engine에서 규모를 처리하는 방법을 이 문서에서 자세히 알아보세요.
지금까지는 단일 밴드가 있는 단일 이미지를 사용했습니다. 다음 페이지에서는 다중 밴드 이미지와 이미지 컬렉션에 대해 알아봅니다.